Asset Store Link
→ Get Backbone Localization from the Asset StoreBackbone Localization
Introduction
When we develop a game, we often focus on graphics, mechanics, or sound. But if we want people from different countries to play it, we need something more: they need to understand it.
Localization means adapting your game to different languages — from UI text to menus, images, audio, or even materials. It's not just about translation — it’s about giving each player a native experience, no matter what language they speak.
A game without localization has an invisible wall: it might be great, but many players will never get to enjoy it.
Welcome to the Backbone Localization Manual. This guide will walk you through all features, workflows, and best practices for localizing your Unity project using Backbone.
What is Backbone Localization
Backbone Localization is a modular system designed to make localizing your game in Unity easy, fast, and scalable. It supports localized strings, sprites, textures, audio clips, and even materials — all fully editable directly from the Unity Inspector.
It allows you to assign values per language using components attached to GameObjects, or manage content centrally using localization keys. You can also import and export data using CSV files, making it ideal for both designers and developers.
The system supports three main workflows:
- Simple component-based localization: Quickly add localized content to UI or GameObjects with minimal setup.
- Centralized list-based localization: Manage large amounts of content through key-value lists and CSV import/export.
- Full programmatic control: Access and manage localization dynamically via an easy-to-use API.
You can also combine these workflows freely, adapting the system to your specific needs. Whether you're building a small indie title or a large commercial project, Backbone adapts to your workflow, helping you deliver a native experience to every player.
Key Benefits
Backbone Localization is more than just a localization tool — it’s a flexible, production-ready solution designed to make your workflow smoother, your content more accessible, and your team more efficient. Whether you're working solo or coordinating a large team, this system gives you everything you need to localize your game with confidence and control.
Here’s why developers love it:
- Quick Setup: Add components directly to UI elements or GameObjects and assign localized values per language in the Inspector.
- Centralized Control: Use key-based lists for scalable management of localized content. Ideal for large teams or professional workflows.
- CSV Export/Import: Easily collaborate with translators or external tools.
- Runtime API: If you want total control over your project, you can use the clean and well-documented API to access and update localized content in real time, manage language changes, and integrate localization tightly with your game logic.
- Full Integration: Works seamlessly across text, images, audio, and materials — with automatic updates when the language changes.
- Modular Design: Choose the workflow that best fits your team and project — or combine them as needed.
Unity Version Compatibility
Compatible with Unity 2020.3 LTS and newer. Supports Built-in, URP, and HDRP pipelines.
Installation & Initial Setup
To install Backbone – Localization from the Asset Store:
- Open your Unity project.
- Go to the Asset Store tab or open Unity Asset Store in your browser.
- Search for “Backbone – Localization” and click Download (if you’ve already purchased it) or Buy.
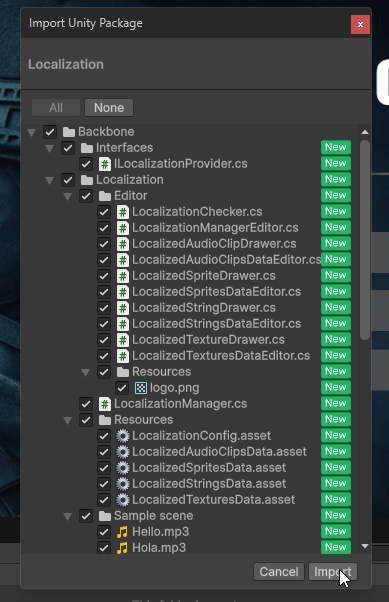
- Once downloaded, click Import in Unity. Unity will display a list of files included in the package.
- Confirm by clicking Import again to bring all necessary assets, scripts, and editor tools into your project.

Once imported, you’ll find the system under a folder named Assets/Backbone/Localization. All scripts, resources, and editor tools are organized for easy access.
Defining Available Languages
When you install the asset, a default configuration file is automatically created at Assets/Backbone/Localization/Resources/LocalizationConfig.asset
This file contains the list of languages available in your project and serves as the central configuration point for the entire localization system.
What if I delete it?
If the LocalizationConfig.asset file is accidentally deleted, you can easily create a new one. Simply right-click on the Resources folder and select Create → Localization → LocalizationConfig.
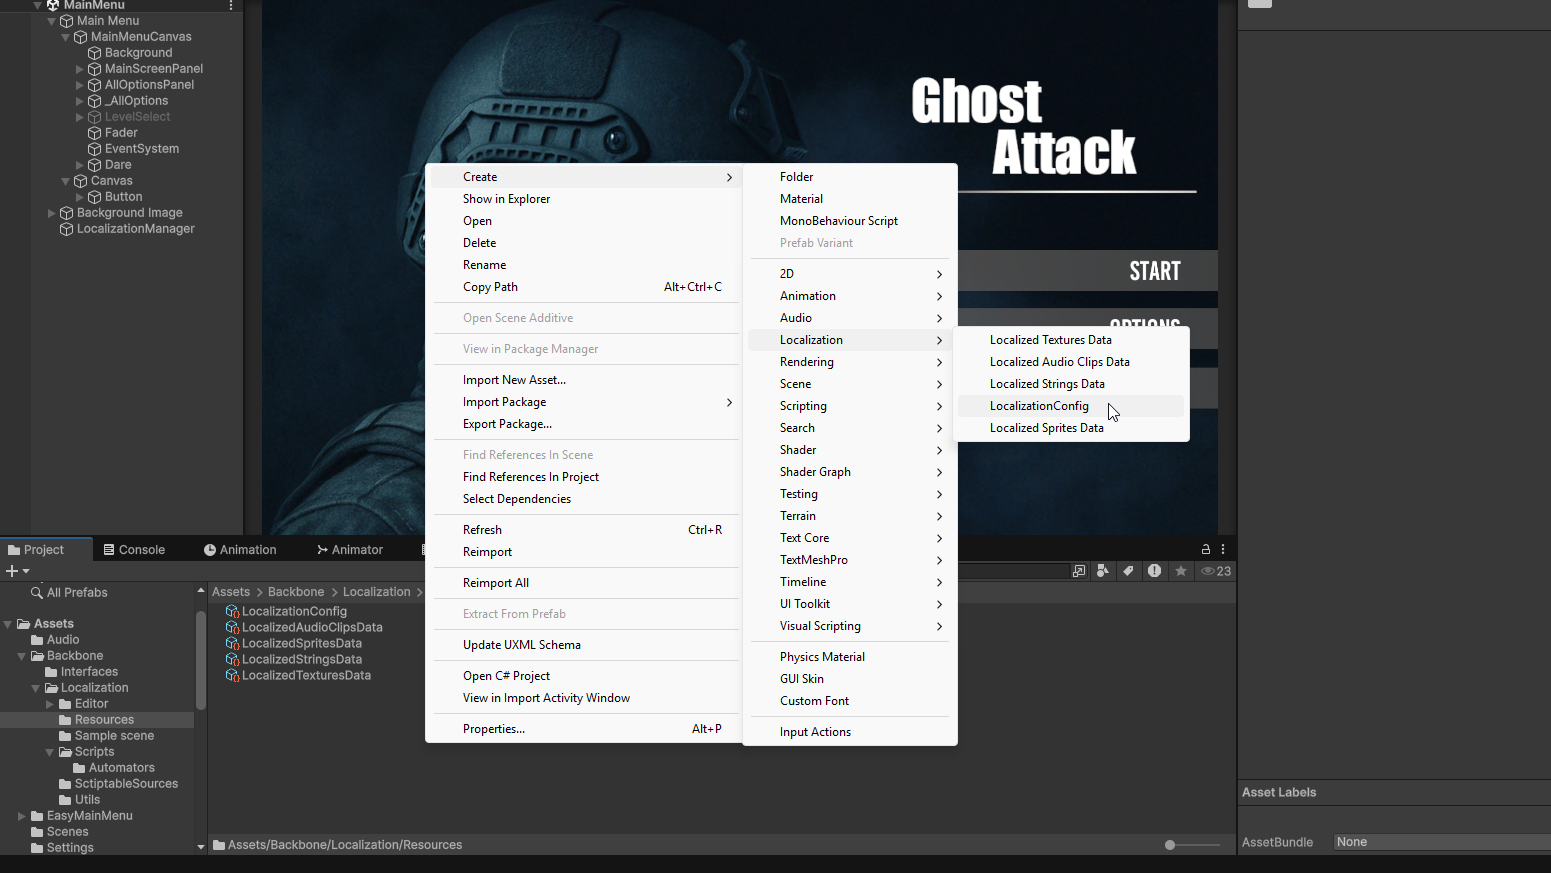
This will regenerate the configuration file so you can continue working without issues.
How to define the languages
To define the languages you want to support:
- Select the
LocalizationConfig.assetfile in the Project window. - In the Inspector, you’ll see a list of languages.
- Use the [+] button to Add Language.
- Use the [-] button to Remove existing one.
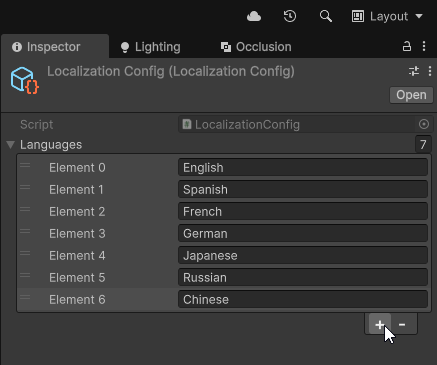
You can add as many languages as you need. Each one is represented by a string, which can be a code (e.g., en, es, fr-FR) or a name (e.g., English, Spanish, French). Keep in mind that this string will be used later to select the language in scripts or settings, so choose names that are clear and representative.
The first language in the list will be treated as the default language. This means:
- It will be used the first time the game runs.
- It will act as a fallback whenever a localized value is missing for the current language.
You can reorder the list to change which language is used as default. Simply drag the language entry, move it to the desired position, and drop it — the first language in the list will be treated as the default for the system.
And that’s it — no more setup needed. You’re now ready to start localizing your game.
Add a LocalizationManager to Each Scene
To ensure the localization system works properly at runtime, you must add a LocalizationManager to every scene that uses localized content.
How to do it:
- In the Hierarchy, right-click and select Create Empty.
- Rename the GameObject to something like LocalizationManager.
- Click Add Component and select LocalizationManager.
This component is responsible for:
- Initializing the system when the scene loads
- Applying the current language to all localized components
- Listening for language changes during gameplay
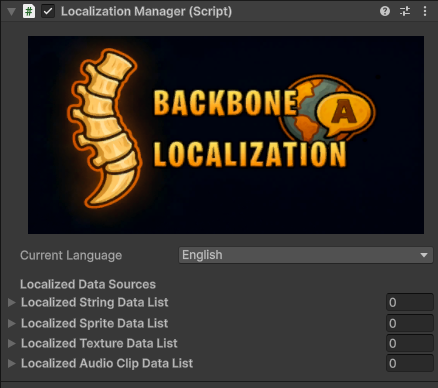
You only need one LocalizationManager per scene. If it's missing, localized content may not update correctly at runtime.
Real-Time Language Switching
Backbone – Localization allows you to switch languages at runtime easily. You can trigger the change either via code (for full control) or directly from the Unity Editor using a UI Button’s OnClick() action — no extra scripts required.
When the language changes, the system automatically:
- Updates all localized components in the scene
- Applies the correct values for text, images, audio, materials, etc.
- Propagates the change immediately — no reloads, no delays
Option 1: Call from Code
Use this if you want to change the language from a script, based on custom logic or events, for example:

LocalizationManager.Instance.SetLanguage("es");The string must match the identifier defined in your LocalizationConfig (e.g., "en", "es", "fr-FR", "English", "Spanish").
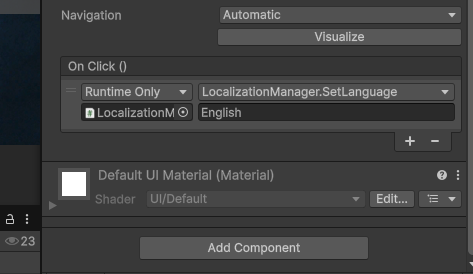
Option 2: Use Unity’s OnClick() in the Editor
You can also trigger a language change from a UI Button without writing any code.
Steps:
- Select the button in the Hierarchy.
- In the
OnClick()section, click the “+” button. - Drag the GameObject with the
LocalizationManagerinto the object field. - From the dropdown, select:
LocalizationManager → SetLanguage(string) - Enter the language string in the text field (e.g.,
es,en,ja).
Whether you choose the script-based approach or the visual one, Backbone makes language switching instant, clean, and fully automatic.
Mode 1: Quick Setup with Components
This is the fastest and most visual way to localize your content — no coding, no manual lists, just drag, drop, and assign directly in the Unity Inspector.
Ideal for:
- Prototypes or small/medium-sized games
- Developers or designers who prefer working visually
- Projects where content is mostly static and already placed in scenes
How It Works
You simply add a localization component to any GameObject that contains localizable content. Then, in the Inspector, assign the values for each language directly.
The number of languages shown in the component depends on your LocalizationConfig. You can add or remove languages at any time, and all components will automatically update to reflect the current list.
The system will:
- Detect the current language
- Apply the correct content
- Update the GameObject when the language changes, at runtime
This makes it easy to work visually: what you see in the Inspector always matches the languages you’ve defined — no extra steps needed.
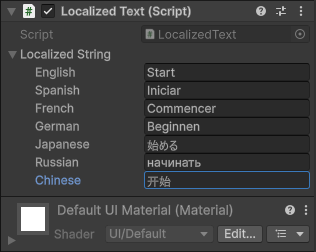
NOTE: Text component fully supports Unicode characters, meaning you can safely use foreign scripts like Japanese, Russian, Chinese, Arabic, or any other — the values will display correctly both in the Editor and in-game.
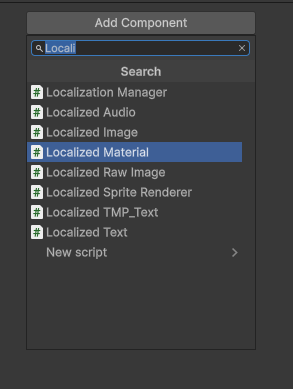
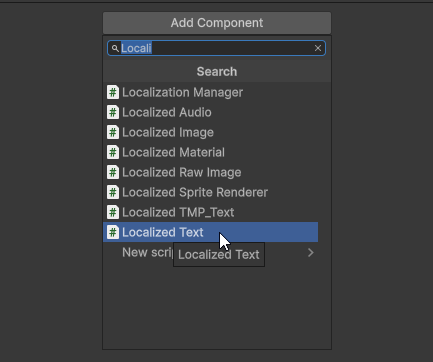
Available Components
These components are ready to use and can be added directly from the Add Component menu in the Unity Editor:
LocalizedAudio– LocalizesAudioSourceclips.LocalizedImage– LocalizesImagecomponents (UI).LocalizedMaterial– Localizes materials onRendererorGraphiccomponents.LocalizedRawImage– For UIRawImagecomponents (e.g., for video textures or custom images).LocalizedSpriteRenderer– For 2DSpriteRenderercomponents in world space.LocalizedText– For classicText(Unity UI).LocalizedTMP_Text– ForTextMeshProUI elements (TMP_Text).
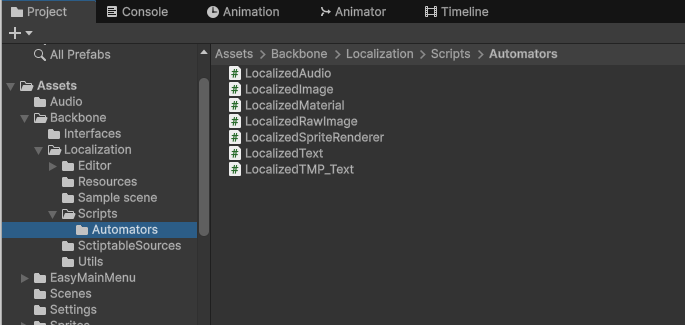
Each component will automatically show the list of languages you've defined, with an input field for each one. Simply assign the value you want for each language, and the system will handle the rest.
How to Add and Configure
How to Add and Configure a Component: Step-by-step guide
In this section, we’ll walk through a step-by-step guide to localize a UI Text element, using the LocalizedText component as an example.
Adding localized content to your GameObjects is quick and intuitive. Here’s how you can do it entirely from the Unity Editor — no coding required.
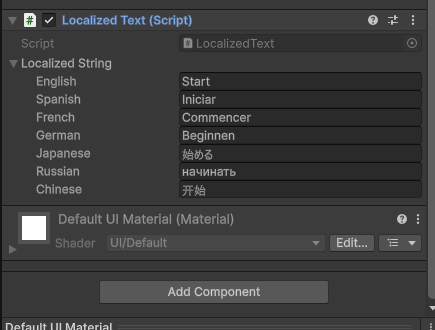
- Select the GameObject that contains the content you want to localize (in this case a UI Text component).
- In the Inspector, click Add Component, and search for and select the appropriate localization component — in this case,
LocalizedText. - Once added, the component will automatically display one field for each language defined in your
LocalizationConfig. - Enter the localized values directly in the Inspector.
Mode 2: Key-Based Lists
This workflow is ideal for teams, scalable pipelines, or projects where localization is handled externally (e.g., by translators or localization managers).
Instead of assigning localized values directly in each GameObject, you define a set of localization keys in central lists. These keys are then referenced by components or scripts throughout your project.
This method improves consistency, reuse, and collaboration — especially in large games with a lot of content.
Introduction to Key-Based Localization
A localization key is a unique identifier (usually a short string like main_menu.play or dialog.intro_01) that represents a specific piece of content. Instead of writing the actual text or selecting the image/audio in every place it’s used, you just reference the key.
Each key maps to a set of values — one per language.
Advantages of This Approach
- Centralized control over all localized content
- Avoids duplication (same key used in multiple places)
- Easy to update or revise without touching scenes
- Perfect for collaboration with translators using CSV
- Great for games with many scenes, dialogs, menus, or re-used UI elements
List Editor
Backbone – Localization provides a set of specialized editors to manage your localized content in centralized, structured lists. Each list type is tailored to a specific kind of data and is fully compatible with CSV import/export.
You can find four main types of data lists:
LocalizedStringsDataLocalizedAudioClipsDataLocalizedSpritesDataLocalizedTexturesData
Each of these lists can be created via:
Right-click in the Project → Create → Localization → [List Type]
All list editors share the same features:
- Search bar to filter entries by key
- Expand/Collapse All to navigate large datasets
- Multiline field support (for text content)
- Import/Export to CSV for batch work
- One field per language, based on your
LocalizationConfig
As you add entries, the editor automatically groups them by prefix. For example, keys like Menu.Start, Menu.Options, and Menu.Quit will be grouped under "Menu", improving readability and organization.
Grouping is purely visual and doesn’t affect the keys at runtime.
These tools are designed to scale. Whether you’re managing a few UI labels or hundreds of dialogue lines, the experience remains smooth and organized.
LocalizedStringsData
Use this list to manage localized text strings.
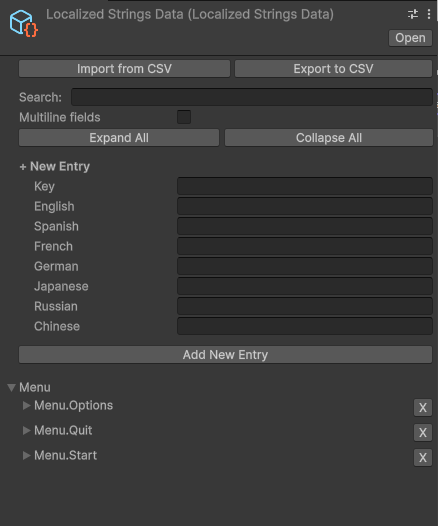
Each entry consists of:
- A Key (e.g.,
Menu.Start) - A value per language (e.g., English: Start, Spanish: Iniciar, etc.)
You can enable multiline editing for your entries using the checkbox labeled “Multiline fields” at the top of the editor. This is especially useful for:
- Dialog lines
- Long descriptions
- Subtitles or story content
LocalizedAudioClipsData
Use this list to localize AudioClip references. Each entry allows you to assign a different clip per language.
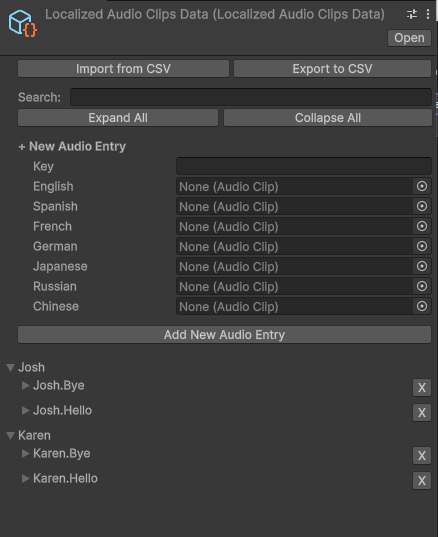
Example use cases:
- Voice lines in different languages
- UI feedback sounds with localized voice
- Language-specific narration or ambience
Each field accepts any AudioClip in your project.
LocalizedSpritesData
Use this list to localize 2D sprites, such as:
- Icons
- Buttons
- Inventory items
- UI symbols that change per language or region
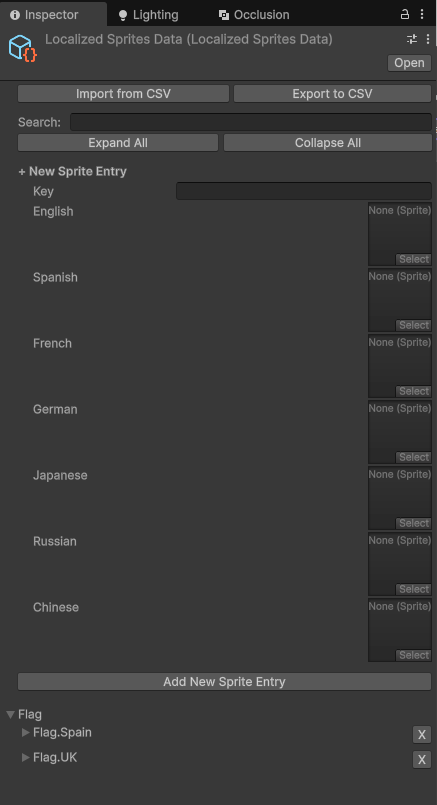
Just enter a key and assign one Sprite per language. These will be loaded and applied automatically at runtime.
LocalizedTexturesData
Use this list for 3D textures, especially in:
- Materials
- Environment props
- Banners, screens or texture-based UI in-world
Each field allows assigning a different Texture per language, enabling visual localization at the material level.
Using Keys with Localization Components
When working with key-based lists, the automatic localization components (LocalizedText, LocalizedTMP_Text, LocalizedAudio, LocalizedImage, etc.) continue to work exactly as before — the only difference is that you now provide a key instead of entering the localized value directly.
- For most components, you’ll see a Key field in the Inspector. Simply enter the localization key you’ve defined in your list (e.g.,
Menu.Start,Dialog.Intro_01, etc.). - The component will automatically fetch the appropriate content from the assigned
LocalizationManagerbased on that key and the current language.
This makes switching from direct values to key-based localization effortless — just assign the key and you’re done.
Special case: LocalizedText and LocalizedTMP_Text
These two components don’t have a dedicated Key field. Instead, you enter the key name in the first language field (usually under "English").
The system will detect that you’re using keys instead of direct values, and resolve the localized content from the list accordingly.
This hybrid approach gives you flexibility: use direct values for small elements, or keys for shared or dynamic content — even mix both within the same project.
Organize Your Lists However You Like
You’re free to create as many lists of each type as you need. For example, you might have:
- One text list per UI screen (
MainMenuTexts,InventoryTexts,DialogTexts) - Separate audio lists for narration and UI sounds
- Independent sprite or texture lists by category or system
In each scene, you assign the relevant lists directly in the LocalizationManager component. Just drag and drop the list assets into the appropriate fields:
- Localized String Data List
- Localized Sprite Data List
- Localized Texture Data List
- Localized Audio Clip Data List

This gives you full control over what content is loaded in each scene, allowing for better memory usage and clean project structure. Whether your project is small or massive, this flexible system adapts to your needs.
This highly flexible setup adapts to any kind of project — from small mobile games to large-scale multi-scene productions.
Importing & Exporting CSV Files
One of the most powerful features of Backbone Localization is the ability to export and import all localization lists via CSV. This is ideal for collaborating with translators, content teams, or managing large-scale projects.
Exporting a CSV
All list types can be exported:
- String lists will include the actual localized text for each language.
- Asset lists (Audio, Sprite, Texture) will include the relative path to the asset in your Unity project (e.g.,
Assets/Audio/VO/Intro/en.wavorAssets/Sprites/UI/en/play_icon.png).
To export:
- Select the list asset (e.g.,
UIText.asset). - Click Export to CSV in the Inspector.
- Choose the location and filename.
The resulting file will contain:
- One row per localization key.
- One column per language.
- For strings: direct text values.
- For assets: the file path used in the Unity project.
This allows teams to work on translations or file assignments in parallel, using familiar spreadsheet tools like Excel or Google Sheets.
Importing from CSV
To import:
- Select the target list asset.
- Click Import from CSV.
- Select the file containing the updates.
The system will:
- Match keys and languages.
- Update existing entries accordingly.
- Leave untouched any keys/languages not present in the file.
For asset-based lists: ensure that the file paths specified in the CSV match actual asset locations in your project. The system will try to resolve them automatically on import.
Why This Matters
- Enables external translation workflows without needing Unity access.
- Allows for version control and collaboration using standard tools.
- Makes it easy to maintain naming consistency, by letting you plan and revise file names and keys in bulk.
- Works great with custom pipelines, localization agencies, or automated tools.
You have full control: structure your data how you want, name assets consistently, and maintain a clean workflow across large teams or multilingual projects.
Mode 3: Full API Control via Code
For developers who need precise and dynamic control over localization, Backbone – Localization provides a clean and extensible API that allows you to access localized content directly from code.
This mode is ideal for:
- Runtime UI generation
- Dynamic menus or dialog systems
- Non-Inspector-driven workflows
- Tools and gameplay logic that require localized values on demand
The central entry point is the LocalizationManager class, which acts as a singleton and provides access to all localized data based on keys.
Accessing Localized Strings
To retrieve a string by key:
string value = LocalizationManager.Instance.GetLocalizedString("Menu.Start");Or, to do it safely:
if (LocalizationManager.Instance.TryGetLocalizedString("Menu.Start", out string value)) {
		// use value
	}
Accessing Localized Sprites
To retrieve a sprite by key:
Sprite icon = LocalizationManager.Instance.GetLocalizedSprite("Icons.Play");With a safety check:
if (LocalizationManager.Instance.TryGetLocalizedSprite("Icons.Play", out Sprite icon)) {
		// use icon
	}
Accessing Localized Textures
To retrieve a texture by key:
Texture tex = LocalizationManager.Instance.GetLocalizedTexture("UI.Background");Or safely:
if (LocalizationManager.Instance.TryGetLocalizedTexture("UI.Background", out Texture tex)) {
		// use tex
	}
Accessing Localized AudioClips
To retrieve an audio clip by key:
AudioClip clip = LocalizationManager.Instance.GetLocalizedAudioClip("VO.Intro");Or safely:
if (LocalizationManager.Instance.TryGetLocalizedAudioClip("VO.Intro", out AudioClip clip)) {
		// use clip
	}
Summary of Available API Methods
GetLocalizedString(string key)TryGetLocalizedString(string key, out string result)GetLocalizedSprite(string key)TryGetLocalizedSprite(string key, out Sprite result)GetLocalizedTexture(string key)TryGetLocalizedTexture(string key, out Texture result)GetLocalizedAudioClip(string key)TryGetLocalizedAudioClip(string key, out AudioClip result)
This API gives you full control over how, when, and where you load and apply localized content. It's perfect for advanced runtime behaviors and logic-driven UI.
Full API Documentation
Everything you need to use the API is already explained here. The full technical reference is only for advanced users who want to deeply customize the asset's behavior.
→ View full API documentation (advanced use only)
Conclusion & Support
Backbone – Localization was built with one clear goal: make localization in Unity effortless, scalable, and powerful — without forcing you into a rigid workflow.
Whether you're a solo developer working directly in the Inspector, or part of a larger team managing multilingual assets and translations via CSV, Backbone adapts to your needs.
- Visual and direct for small projects
- Modular and centralized for large ones
- Fully scriptable for developers who want control
- Seamlessly integrated into Unity’s workflow
From UI text to images, audio clips and even materials — all in one consistent, flexible system.
A localized game is a game without borders. With Backbone, that boundary disappears.
For help or questions, please contact at:
- Email: backbonegamelabs@gmail.com