Asset Store Link
→ Get Backbone Persistence from the Asset StoreBackbone Persistence
Introduction
When we develop a game, we often focus on graphics, mechanics, or sound. But if we want people from different countries to play it, we need something more: they need to understand it.Persistence in a video game refers to the ability to save and later restore the state of the game. At its core, a game can be seen as a state machine — a system that evolves from one state to another based on player actions, internal logic, or external triggers. Persistence allows the game to remember and recover these states even after the application has been closed or the player has moved to a different scene.
This is essential for modern games where players expect their progress, settings, and interactions to be preserved across play sessions. Whether it's the position of a character, the number of collected items, or the result of a decision made in a dialogue, persistence enables continuity and coherence in gameplay.
What is Backbone Persistence
Backbone Backbone Persistence is a modular, attribute-based save system designed to make saving and loading in Unity simple, scalable, and efficient. Whether you're building a narrative adventure or an open-world MMORPG, it allows you to persist the state of your game with minimal code and maximum control.
By simply marking fields in your scripts with [GamePersistent] or [ScenePersistent], you can instruct Backbone to handle the storage and retrieval of those values behind the scenes. It supports complex types, editor integration, and custom converters — all optimized for Unity developers who want powerful functionality and simplicity.
Backbone also includes built-in persistence handlers for scene objects, allowing you to automatically track and restore the position, rotation, and active state of GameObjects without writing extra code. These handlers simplify common use cases such as reactivating collected items, restoring moved objects, or toggling visibility across sessions. Additionally, Enum-based arrays — such as EnumBoolArray
What is NOT Backbone Persistence
Backbone Persistence is not a magical asset that automatically saves what you think should be saved in your game.
Managing persistence requires planning and design. You need to:
- Decide which elements of your game should be persistent and which shouldn't.
- Distinguish between data that is global (across the whole game) and scene-specific.
- Understand that not everything can or should be restored automatically.
Some systems require a manual setup after loading, such as initializing animations, reestablishing references, or syncing complex game logic.
Backbone gives you powerful tools — but you must still think critically about what should be saved and restored, how, and when.
Key Benefits
Backbone Persistence is a complete and adaptable solution for managing persistent game state — it’s a flexible, production-ready framework designed to help you manage game state across sessions and scenes with minimal setup and maximum clarity.
Whether you’re developing a small indie prototype or a large-scale commercial title, this system gives you the tools to control and recover the full state of your game effortlessly.
Here’s why developers love it:
- Minimal Setup: Just add
[GamePersistent]or[ScenePersistent]attributes to your fields or classes and they’ll be automatically saved and restored — no boilerplate required. - Scene Object Handlers: Automatically track the position, rotation, and active state of GameObjects using built-in handlers — perfect for collectibles, doors, switches, or puzzle elements.
- Custom Type Support: Includes converters for serializable classes and complex types like
Vector3,Quaternion, and more. Easily extend it to support your own types. - Editor Integration: Full Inspector support with custom drawers for persistent fields and enum-based arrays. Makes configuration intuitive and transparent.
- Enum-Based Arrays: Define serializable arrays indexed by enums, like
EnumBoolArray<MyEnum>, to make logic clearer, safer, and editor-friendly. Ideal for status flags, skill trees, unlocked items, etc. Enum-Based Arrays drastically improve the clarity and maintainability of your code. - Modular and Extensible: Use it as-is or integrate it into your own architecture. Advanced users can implement
ISavableandILoadableinterfaces for custom behaviors. - Lightweight and Clean: Designed to be easy to understand, easy to debug, and easy to remove or replace — no hidden dependencies or black-box behaviors.
Unity Version Compatibility
Compatible with Unity 2020.3 LTS and newer. Supports Built-in, URP, and HDRP pipelines.
Installation
To install Backbone – Persistence from the Asset Store:
- Open your Unity project.
- Go to the Asset Store tab or open Unity Asset Store in your browser.
- Search for “Backbone – Persistence” and click Download (if you’ve already purchased it) or Buy.
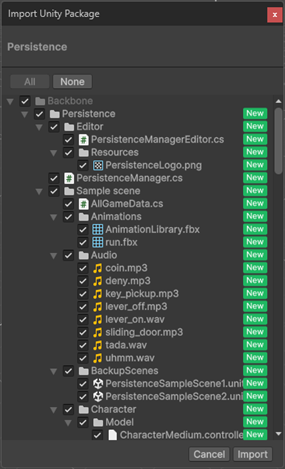
- Once downloaded, click Import in Unity. Unity will display a list of files included in the package.
- Confirm by clicking Import again to bring all necessary assets, scripts, and editor tools into your project.

Once imported, you’ll find the system under a folder named Assets/Backbone/Persistence. All scripts, resources, and editor tools are organized for easy access.
How to use the system
Backbone Persistence is built around a simple principle: you decide what to persist by marking it explicitly. This makes the system transparent, controllable, and easy to maintain.
There are two main types of persistent data in Backbone:
- Game-wide persistent data: Survives across scenes and sessions.
- Scene-specific persistent data: Only applies to objects in the scene where they were saved.
[GamePersistent] and [ScenePersistent] Attributes
These attributes are used to mark specific fields in your scripts that you want Backbone to persist. By adding [GamePersistent] or [ScenePersistent] above a variable, you’re telling the system to automatically save and restore its value when the game is saved or loaded.
Any field marked with these attributes will appear in the Unity Inspector with a small disk icon, visually indicating that the value is persistent and will be included in save/load operations.
Global Save ([GamePersistent])
Use the [GamePersistent] attribute to mark any field that should be saved across the entire game and restored in any scene.
✅ Example:
These values will be stored globally and restored regardless of the scene the player is in.
This is ideal for:
- Game settings (language, difficulty)
- Player stats (score, total collectibles)
- Inventory or global quest progress
Scene Save ([ScenePersistent])
Use the [ScenePersistent] attribute for data that only makes sense within the context of a specific scene.
These values will only be restored when the player returns to the same scene where they were saved.
This is ideal for:
- Puzzle states
- Local object positions
- Door switches, chests, and similar scene-bound logic
Saving and Loading with Slots
Backbone Persistence supports multiple save slots, making it easy to offer players separate game files or checkpoints.
To save the game, simply call:
PersistenceManager.Instance.Save(slot);To load a previously saved game, call:
PersistenceManager.Instance.Load(slot);What is a Slot?
A slot is just a numeric index (e.g., 0, 1, 2...) used to distinguish different save files. Each slot is stored using a separate file, with the number appended to the base filename.
For example:
- Slot 0 →
GameName_0.dat - Slot 1 →
GameName_1.dat - Slot 2 →
GameName_2.dat
This allows you to easily manage and switch between different save files. Use it to implement features like:
- Manual save/load slots
- Auto-save vs quick-save
- Separate profiles for different players
💡 Tip: If no slot is specified, the system defaults to slot 0.
Using ILoadable and ISavable
Backbone Persistence provides two simple but powerful interfaces — ILoadable and ISavable — that allow you to hook into the save and load process of your game.
- ISavable: Any class that implements this interface must define an
OnSave()method. This method will be called right before the game state is serialized. It's the ideal place to prepare or update persistent variables based on the current state of the game or scene. For example, you may want to read the UI status or compute a value to store just before saving. - ILoadable: Any class that implements this interface must define an
OnLoad()method. This is called after the saved state has been deserialized and loaded into memory. It is commonly used to apply loaded values to your scene, such as updating UI counters, changing animation states, or activating GameObjects based on the restored data.
These interfaces give you control over the transition between runtime and saved data, helping bridge the gap between raw persistence and scene logic. They are especially useful for syncing runtime behaviors (like UI, animations, or logic branches) with persistent data that has just been restored from disk.
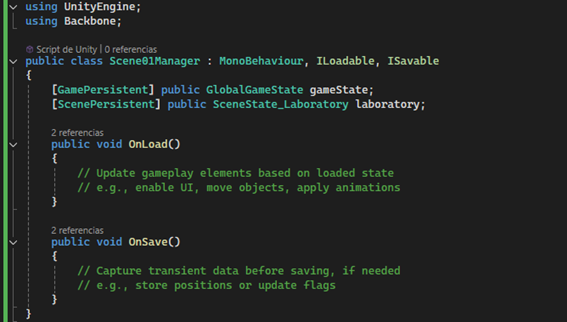
In practice, a typical scene controller (e.g., Scene01Manager) would implement both interfaces. This ensures the scene can save any necessary data and reconfigure itself properly once it's loaded, creating a smooth, consistent experience for the player.
Serializable State Classes for Global and Scene Data
In Backbone Persistence, a recommended and powerful pattern is to separate the data from the logic. You define your game and scene state using plain [Serializable] data classes, and then use a MonoBehaviour class to manage them and implement ILoadable and ISavable.
The recommended approach is to create:
- One global state class that persists across the whole game.
- One scene state class per scene, for local data only relevant in that context.
Step 1: Define Your Data Structures
Use [System.Serializable] to create clean data-only classes:
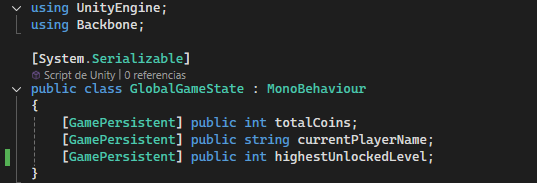
This class can be stored in a central manager or passed directly to PersistenceManager. It's designed to keep game-wide data that must survive across all scenes.
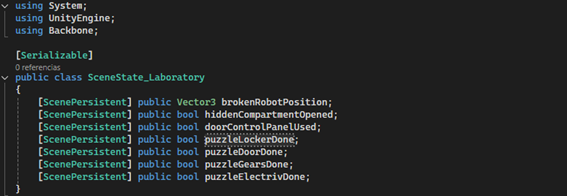
This scene-specific class can be instantiated and managed when the "Laboratory" scene is loaded. When you switch scenes, only this scene's state will be stored and restored.
Step 2: Create a Scene Manager that Implements ISavable and ILoadable
Now use a MonoBehaviour to reference those state classes and handle game logic when loading or saving.
Why This Pattern Works
- You keep state and logic cleanly separated.
- You gain centralized control of what happens on load/save.
- You can easily expand the system by adding new state classes.
- It integrates naturally with the rest of your game architecture (e.g.,
GameManager,SceneController).
This pattern is highly recommended for professional projects and scales well from small prototypes to large games.
One of the key advantages of this pattern is that it gives you full visual access to your game's state directly in the Unity Inspector. During development, you can inspect the values of both global and scene-specific state at any time — even during Play mode. This makes it incredibly easy to debug game logic, verify what is being persisted, and ensure that everything behaves as expected across save/load cycles.
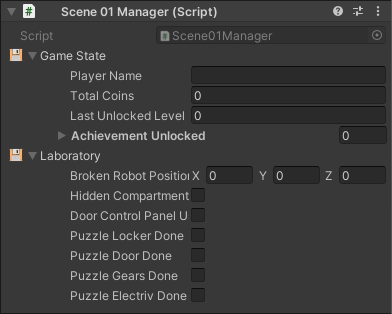
Having a structured and visible state system also helps designers and programmers collaborate more effectively, since the data is explicit, organized, and editable when needed.
Scene Object Handlers
Although it’s technically possible to persist the transform and visibility of GameObjects using [ScenePersistent] fields and then restoring them manually in a custom post-load setup, experience shows that in most cases, all you really need is to remember an object's position, rotation, and whether it's active or not.
To simplify this common scenario, Backbone includes dedicated components — called Scene Object Handlers — which take care of this automatically. These handlers are purpose-built to track and restore key properties of GameObjects without requiring explicit variable declarations, reducing boilerplate and improving reliability.
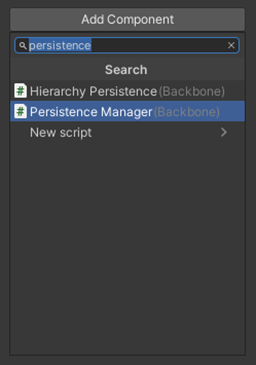
Backbone Persistence provides two powerful components to persist the transform and visibility state of GameObjects within a scene: PersistentObjectState and HierarchyPersistence.
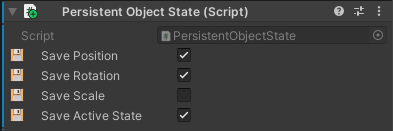
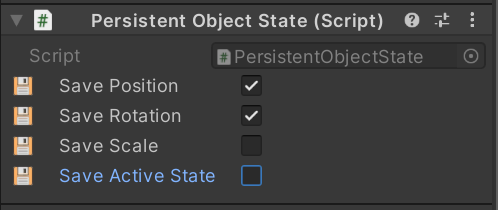
PersistentObjectState
Attach this component to any GameObject whose position, rotation, scale or active state you want to persist automatically. This component automatically calls its OnSave() and OnLoad() methods when the game is saved or loaded.
It supports the following options:
- savePosition: saves and restores the object's world position.
- saveRotation: saves and restores the object's world rotation.
- saveScale: optional — saves and restores local scale.
- saveActiveState: saves and restores the active (
SetActive) state.
✅ Example use case:
- A collectible item that should not reappear once picked up.
- A crate or movable object that should stay in its new location.
HierarchyPersistence
Use this component when you need to persist the active state of a GameObject and all its children. It works by storing the hierarchy path of each child and its current active state, allowing you to restore their visibility on load. This ensures that even deeply nested children keep their visibility state between sessions.
✅ Example use case:
- The most common and recommended pattern is to group all persistable elements under a single parent (e.g.,
"PersistentObjectsRoot"), and add aHierarchyPersistencecomponent to that parent. This way, you don’t need to add aPersistentObjectStatecomponent to each individual object.
You lose fine-grained control over what is saved per object but the setup becomes significantly simpler and is usually sufficient in many gameplay scenarios.
⚠️ Note: If a child is missing during load (e.g., renamed or removed), a warning is logged but the process continues.
Discovering Available Save Slots
Backbone Persistence makes it easy to implement flexible save systems using slots—numbered save files like save0.dat, save1.dat, etc. But what if you want to display a list of existing saves to the player (e.g., in a load-game menu)? The system includes a built-in method to do just that.
Use the following method to retrieve a list of available slots from disk:
List<int> availableSlots = PersistenceManager.Instance.GetAvailableSaveSlots();
This will return a list of integers corresponding to the slot numbers of valid save files currently stored in the system’s persistent data folder. Backbone automatically scans for files matching the save*.dat pattern and extracts their numeric indices.
Example Output:
If the persistent folder contains:
save0.datsave2.datsave4.dat
The method will return:
[0, 2, 4]
This is ideal for building save-slot UIs that only show valid saves, or for letting the player choose from a list of previously saved games.
Full Example:
List<int> slots = PersistenceManager.Instance.GetAvailableSaveSlots();
foreach (int slot in slots)
{
    Debug.Log("Save slot found: " + slot);
}
This functionality is compatible with both encrypted and non-encrypted saves, and works out of the box with no additional configuration.
Tip: You can safely call this method at any time, including from menus or before entering gameplay scenes.
Minimal Example
Before diving into more complex use cases, let’s look at a minimal example to understand how Backbone Persistence works. In this example, we’ll focus on a very common use case: saving and restoring the position and rotation of the player across sessions. We'll demonstrate two different approaches:
- Manual Persistence using
[ScenePersistent]fields to storeVector3values for position and rotation. - Automatic Persistence using the built-in
PersistentObjectStatecomponent that handles everything under the hood.
Both methods achieve the same result, but each serves different needs. The manual approach gives you full control over how data is stored and used, while the automatic handler dramatically simplifies setup for common object-based persistence needs.
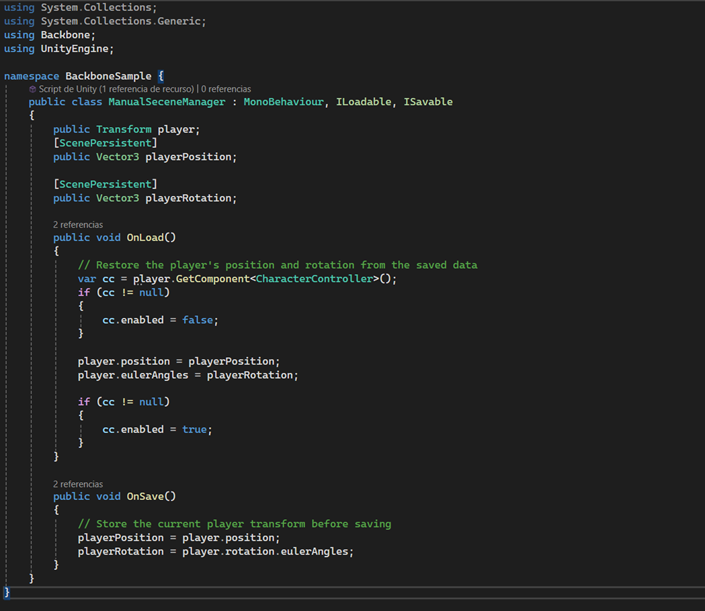
Manual Setup Using [ScenePersistent] Fields
In this example, we'll implement a very simple persistence system where the player's position and rotation are saved and restored across scene changes. To keep things as straightforward as possible, we won't separate the data model from the logic. Instead, we'll encapsulate everything into a single MonoBehaviour.
We'll use Backbone’s [ScenePersistent] attribute to mark the fields that should be saved for this scene. This attribute tells the system to store and reload the values whenever the scene state is persisted or restored.
Important: Don't forget to add a PersistenceManager component to the scene. Without it, the persistence system won't be active.
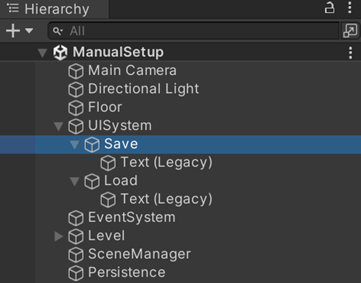
Steps to set it up:
- Create a new empty GameObject in your scene and name it SceneManager (or similar).
- Attach the script
ManualSceneManagerto that object. You will see the fields we tagged as[ScenePersistent]with a disk icon on the left. - Assign the player field in the inspector, dragging the player object into the reference.
- Ensure there's a
PersistenceManagerin the scene. Create an empty GameObject and attach the component from the Backbone package if it's not already present. If you want to encrypt your saved data, simply enter a password in the Password field. Leave it empty if you prefer to store the data as plain JSON — ideal during development for debugging and inspection. - Mark the fields to persist using the
[ScenePersistent]attribute — in this case, the player’s position and rotation. - Implement the
OnLoad()andOnSave()methods from theILoadableandISavableinterfaces to read/write the data.


Here’s the full implementation of the ManualSceneManager class:
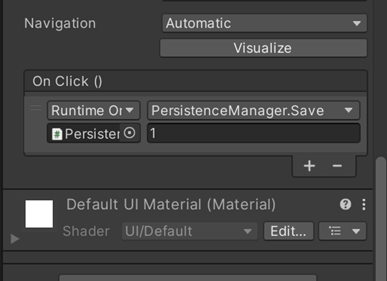
To test the system, we’ve added two simple UI buttons to the scene. One triggers a load operation, and the other triggers a save operation using slot 1. These buttons are wired to call the Load(1) and Save(1) methods from the PersistenceManager, respectively. This setup allows you to quickly test persistence functionality during runtime without having to reload the scene manually or build additional logic.
Tip: You can easily extend this setup to support multiple save slots by passing different indices to the Save(int slot) and Load(int slot) methods.
Run the scene and try to save and load in different positions and rotations of the player. This approach is perfect for cases where you only need to persist a few specific values and want full control over what is saved and how it’s restored. In the next section, we’ll show how to achieve the same result in an even simpler way using PersistentObjectState.
Simplified Setup Using PersistentObjectState
The second approach skips the need to write any custom state or logic. Instead, we’ll add the PersistentObjectState component directly to the player GameObject.
Steps:
- Select the player GameObject in your scene.
- Add the
PersistentObjectStatecomponent. - Enable the checkboxes for Position and Rotation to specify what should be persisted.
- Make sure the GameObject has a unique name in the scene hierarchy.
- Add a
PersistenceManagercomponent to the scene to enable automatic saving and loading.
Similar to the previous scene, we’ve added two simple UI buttons to the scene for testing purposes. One triggers a load operation and the other a save operation, both using slot 2. These buttons are wired to call the Load(2) and Save(2) methods from the PersistenceManager, respectively. This setup allows you to quickly test persistence functionality at runtime without manually reloading the scene or implementing additional logic. We’ve chosen slot 2 in this case to avoid overwriting any previous save data from the earlier scene.
With this setup, Backbone will automatically track and restore the player’s transform state between sessions — no additional code required.
A Simple Game with Real Persistence
This section demonstrates how to implement real game persistence using Backbone Persistence through a simple, self-contained example.
The sample project consists of a basic 3D platformer divided into two levels. In each level, the player controls a character who can jump between platforms, collect coins, and interact with levers to reach keys that open doors to the next scene.
At first, the game has no persistence system implemented. When the player collects coins or obtains a key, these actions appear to work — but as soon as the player changes scenes or reloads the game, all progress is lost. Coins reappear, keys are reset, and the player starts over each time a scene is loaded. This behavior is common in prototypes but inadequate for production-ready games.
We will now walk through how to integrate Backbone Persistence into this example to preserve relevant state between scenes and sessions.
Step 1 — Add a PersistenceManager to Each Scene
To ensure the persistence system works properly at runtime, you must add a PersistenceManager to every scene that uses localized content.
How to do it:
- In the Hierarchy, right-click and select Create Empty.
- Rename the GameObject to something like
PersistenceManager. - Click Add Component and select
PersistenceManager.
This component is responsible for:
- Initializing the system when the scene loads
- Applying the current language to all localized components
- Listening for language changes during gameplay
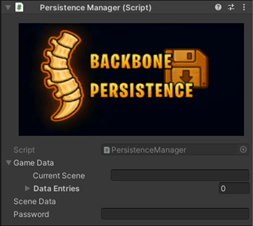
You only need one PersistenceManager per scene. If it's missing, you cannot load or save persistent content.
Step 2 — Define What to Persist
Before implementing any persistence system, it’s essential to identify what should be saved — and how. Persistence is not just about storing data, but about selectively preserving meaningful changes in the game state that are driven by the player’s actions.
A good persistence design starts with a clear separation between global data, which must survive across scenes and sessions, and scene-specific data, which only matters within a particular level. Anything not directly tied to progression or player intent can usually be left out, reducing complexity and avoiding bloated save files.
Let’s break down the different categories:
Global (Cross-Scene) Data
Global data represents the player's overall progress and inventory — data that must remain consistent no matter which scene is currently loaded. Examples include:
- ✅ Total number of coins collected across the entire game
- ✅ Keys collected by the player (e.g., red key, yellow key)
- ✅ Achievements, unlocked abilities, or permanent upgrades
- ✅ The current checkpoint or level index
This data should be stored in a dedicated class decorated with [GamePersistent], and typically handled by a global manager (e.g., a GameManager that survives scene transitions).
Scene-specific data:
Some information is only relevant within a specific scene and does not need to be remembered once the scene is completed — unless the player can return to it later. Examples include:
- ✅ Which coins or keys have already been collected in this scene
- ✅ Whether a door has been unlocked
- ✅ Custom triggers that should only activate once
This kind of data is ideal for [ScenePersistent] fields. Each scene can have its own SceneManager that tracks and applies this state during load and save operations.
Non-persistent (resettable) elements:
Not everything should be saved. Some gameplay elements are intentionally designed to reset between sessions or scene loads:
- ❌ Moving platforms, levers, or temporary puzzles
- ❌ Particle systems, animations, or VFX triggers
- ❌ Enemy patrols or transient NPCs
- ❌ Runtime-only timers or temporary UI messages
Unless these elements are critical to progression, it’s often best to exclude them from persistence. This keeps the system lean and avoids unexpected behaviors caused by restoring volatile runtime states.
Once you've clarified which data needs to persist — and whether it belongs to the game or the scene — you can proceed to create structured data classes that will hold this information in a reliable, serializable format.
Let me know si quieres que redacte directamente el siguiente paso con los serializable data classes o prefieres repasar antes el setup de SceneManager y GameManager.
Step 3 — Implement Persistent Scene Objects
Once you've decided what data should persist in each scene, the next step is to make sure the actual GameObjects in the scene can reflect those saved states properly. This includes things like collected coins, opened doors, or used keys — all of which should behave consistently across sessions.
Backbone provides two main strategies to handle persistent scene objects in a clean and efficient way:
🅰️ Option A — PersistentObjectState (Fine-Grained Control)
This component is designed for individual GameObjects whose state must be tracked precisely. It allows you to persist:
- The GameObject’s active state (whether it is enabled or disabled)
- Its position, rotation, and scale, if desired
This is the preferred option when you need per-object control. For example:
- A specific coin that disappears when collected
- A key that should remain gone once picked up
- A door that must stay open after being unlocked
How to use:
- Select the object you want to persist (e.g., a Coin prefab).
- Click Add Component and choose PersistentObjectState.
- Optionally configure which aspects (active state, transform) should be tracked.
✅ Advantages:
- Precise, object-by-object control
- Supports both visibility and transform changes
⚠️ Considerations: Slightly more setup effort for many objects.
🅱️ Option B — HierarchyPersistence (Batch Simplicity)
If you have many similar objects — like dozens of coins — and don’t need to track their transform individually, HierarchyPersistence offers a faster setup. Just group all related objects under a parent and attach a single component to that parent.
This component will automatically:
- Track the active state of all child objects under the parent
- Restore their states on load
It’s ideal for:
- Large groups of static collectibles (coins, pickups)
- Groups of destructibles or traps that simply disappear once triggered
How to use:
- Create an empty GameObject (e.g., CoinGroup) and place all relevant children under it.
- Add the HierarchyPersistence component to the parent.
- That’s it — no need to touch each child.
✅ Advantages:
- Super fast to set up
- Clean hierarchy with minimal components
⚠️ Important warnings:
- Do not rename or reorder children after a save has been made.
- Ensure no duplicate child names exist under the same parent — names are used as unique keys.
🎯 What We’ll Persist in Our Example
In our demo project, we’ll apply persistence only to coins and keys, as these represent meaningful player progress. Once collected, they should not respawn when the player re-enters the scene.
To implement this efficiently, we’ll use the HierarchyPersistence component. All coins and keys in a scene will be grouped under parent GameObjects (e.g., Coins, Keys), and each parent will have a single HierarchyPersistence component attached.
This approach avoids the need to attach individual persistence components to every item while still ensuring their active state is tracked and restored correctly across load/save operations.
Transient elements like platforms, levers, or temporary animations are not persisted in this example, as they are intended to reset on scene reload to maintain challenge and replayability.
By using HierarchyPersistence for coins and keys, we strike a balance between simplicity and functionality — keeping the persistence system lean, while ensuring that essential gameplay progress is preserved.
Additionally, we want to persist whether doors in the scene have been opened. However, unlike coins or keys — which can be handled automatically by simply deactivating GameObjects — doors typically include animations, colliders, and internal logic that cannot be restored reliably just by toggling their active state.
Because of this, we will not use PersistentObjectState or HierarchyPersistence for doors. Instead, we’ll persist a simple bool flag per door in the scene’s persistent data, and the logic to open or keep closed each door will be centralized in the SceneManager.
That manager will inspect the saved data during OnLoad() and manually open the doors that were previously unlocked, by invoking their public methods.
This approach keeps the door logic modular while ensuring full control over their behavior during load and save operations — without coupling each individual door to the persistence system.
Step 4 — Define Serializable Data Classes
To persist meaningful data between scenes and game sessions, we need to create structured classes that act as containers for that data. In Backbone Persistence, this is done using standard [System.Serializable] classes decorated with the [GamePersistent] or [ScenePersistent] attributes on each field you wish to track.
This separation of concerns makes it easy to distinguish between global game data and scene-specific state, while keeping your code clean, modular, and scalable.
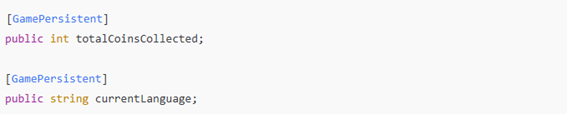
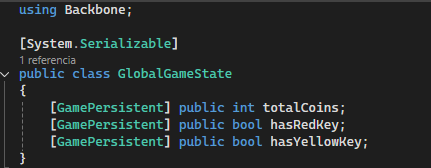
Global State — GlobalGameState:
Global data includes values that must persist across all scenes, regardless of which level is currently active. In our example, this consists of:
- The total number of collected coins
- Whether the red and yellow keys have been picked up
Here is the class:
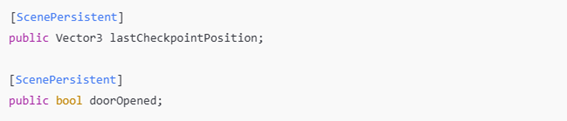
Scene-Specific Data — SceneState_Level1
Each scene will have its own state class to track elements that only matter within that level. For Level 1, we want to persist:
- Whether the door to Level 2 has been opened
Here is the class:
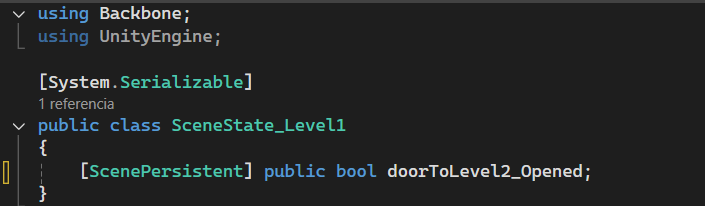
These values will be loaded by the SceneManager for Level 1, which will use them to control door logic and player spawn points.
Scene-Specific Data — SceneState_Level2
For Level 2, we persist the following:
- Whether the door back to Level 1 is open
- Whether the final door has been unlocked
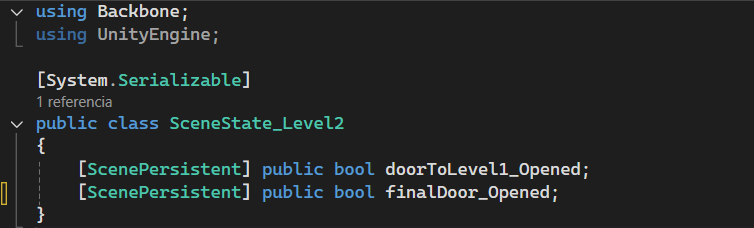
Each of these flags allows us to restore the state of doors and player position correctly when reloading the level.
These data classes act purely as passive containers — they don’t contain any logic. Instead, they are read and written by SceneManagers or GameManagers, which interpret their contents and apply the relevant changes to the scene (such as unlocking doors, restoring checkpoints, or updating UI).
✅ Good Practice: Keep your persistent data and game logic separate. Use plain [Serializable] classes for data, and managers for behavior.
Although in a small project like this we could have combined data and logic into a single class for simplicity, we’ve intentionally chosen to follow a clean separation of concerns to demonstrate best practices. This architectural pattern scales much better and mirrors what you'd want in a more complex or commercial game, where keeping logic modular and data portable becomes critical.
With your persistence data structures in place, you're now ready to create scene managers that handle the actual saving and loading at runtime.
Step 5 — Create Scene and Game Managers
With the persistent data structures now defined, the next step is to implement the components that will apply and manage that data during gameplay. These are the scripts that bridge the gap between the saved data and the actual scene logic.
We’ll use two types of managers:
- A Scene Manager per level, responsible for local, scene-specific state.
- A single Game Manager, responsible for global, cross-scene data and UI representation.
Both will implement ILoadable and ISavable, the two interfaces used by Backbone to hook into the load/save cycle.
Scene Managers — Level-Specific Logic
Each scene should contain its own MonoBehaviour that:
- Holds a reference to its scene state class (
SceneState_Level1,SceneState_Level2, etc.) - Implements
ILoadableandISavable - Uses the scene data to apply or restore gameplay elements (open doors, move player to checkpoint, etc.)
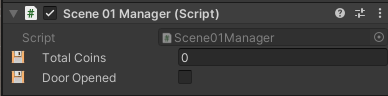
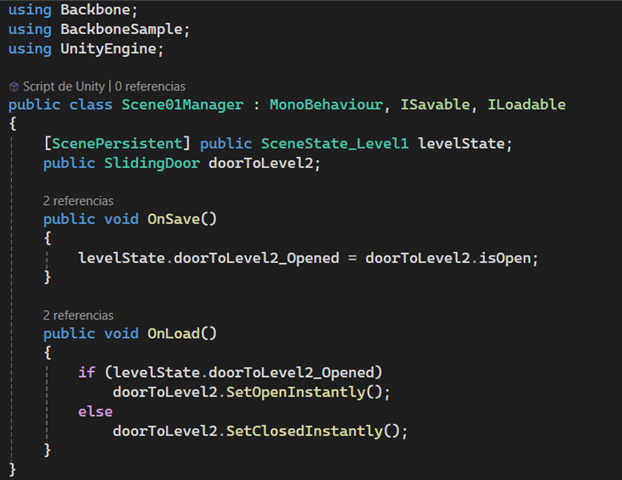
Scene 01 Manager
In the first scene, we need to track the state of the sliding door that leads to Level 2. The Scene01Manager class is responsible for doing exactly that:
- On save, it reads the state of the door (open or closed) and stores it in the
SceneState_Level1structure. - On load, it applies that state using
SetOpenInstantly()orSetClosedInstantly()to ensure the door reflects the correct condition immediately when the scene loads.
Scene 02 Manager
Scene 2 is slightly more complex, as it contains two sliding doors: one leading back to Level 1, and another final door that concludes the game. The Scene02Manager tracks both.
- In the
OnSave()method, it captures the current open/closed state of each door. - In the
OnLoad()method, it restores those states using the same instant methods, guaranteeing a consistent scene state every time the level is loaded.
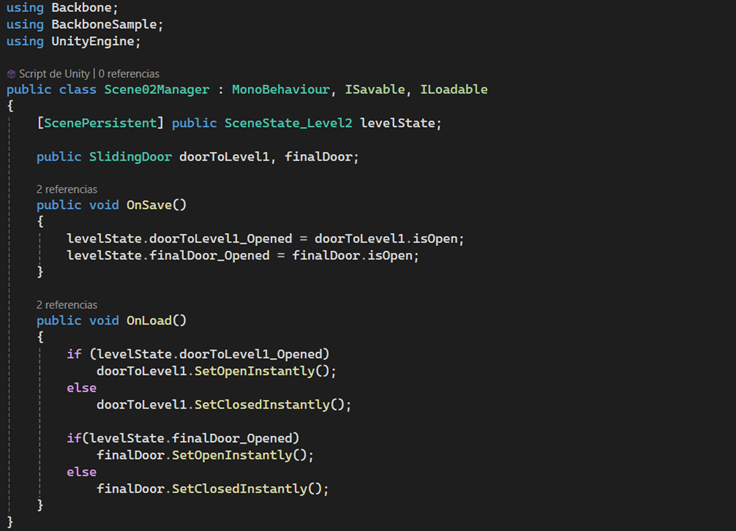
This approach keeps persistence logic highly readable and centralized. It ensures that even interactive elements with internal behavior, like animated doors, are restored correctly using controlled logic — rather than relying on assumptions or default object states.
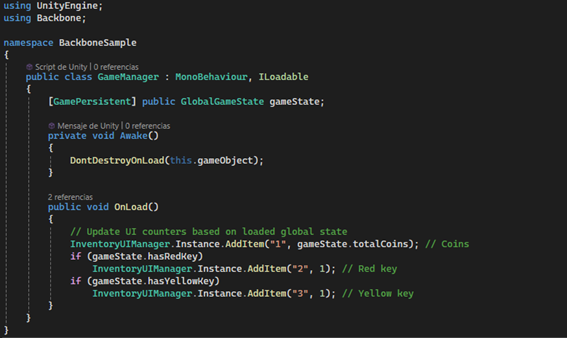
Game Manager — Global Data and UI Sync
While it's technically possible to manage global data (such as collected keys or coin counters) directly from each SceneManager, doing so often leads to code duplication and fragmented logic.
A better approach is to create a dedicated GameManager MonoBehaviour that exists throughout the entire game lifecycle (typically using DontDestroyOnLoad). This component is responsible for representing global state in the UI and keeping all persistent gameplay elements in sync.
For example, the GameManager can:
- Display the current number of coins and collected keys in the HUD.
- Update inventory icons when the player picks up items.
- Reflect persistent progress across all scenes, such as completed objectives.
This separation of concerns improves maintainability and avoids bloating your scene-specific managers with repeated logic. The GameManager can simply bind to the GlobalGameState instance and react accordingly whenever values change — especially after a load operation.
✅ Good Practice:
- Keep global logic centralized in a
GameManager, and useSceneManagersonly for scene-specific elements.
This architectural pattern leads to cleaner, more modular code — especially in games with multiple scenes and persistent gameplay elements.
Bonus Feature — Enum Arrays for Structured Data Access
In games where you need to track multiple related values — like puzzle states, player stats, spawn points, or item flags — it's easy to fall into the trap of using raw arrays or dictionaries indexed by strings or integers. This works, but it quickly becomes messy, error-prone, and hard to maintain.
Backbone offers a clean alternative: Enum Arrays — strongly-typed, serializable structures that map an enum to a collection of values. They come in five variations:
EnumIntArray<TEnum>EnumFloatArray<TEnum>EnumBoolArray<TEnum>EnumStringArray<TEnum>EnumVector3Array<TEnum>
Each one is built to provide fast, readable, and error-proof access to structured data. Additionally, all EnumArray types fully support Backbone's [GamePersistent] and [ScenePersistent] attributes. This means they can be serialized and persisted across game sessions just like any standard field — making them ideal for structured, persistent game data.
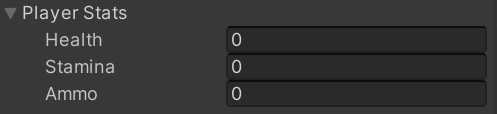
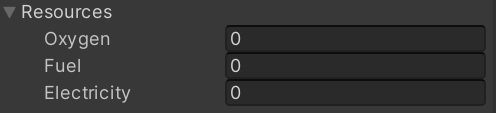
All Enum Arrays include built-in custom editor drawers that integrate seamlessly into the Unity Inspector. This makes it extremely easy to inspect, edit, and debug the data directly in the editor — even during Play mode. Instead of working with raw arrays or cryptic indexes, you’ll see labeled fields clearly associated with their enum values, making development faster and more reliable.
Why Use Enum Arrays?
Here are the main benefits of using Enum Arrays:
- ✅ Type safety: You can only access valid enum-defined entries — no typos or invalid keys.
- 🧠 Readability:
playerStats[StatType.Health]is clearer thanplayerStats[0]. - 🛠️ Ease of maintenance: Changing enum names or order doesn’t break the code.
- 🎮 Editor support: They serialize nicely in Unity and can be customized with an editor drawer.
- 🧩 Cleaner code: Avoids scattered magic strings or undocumented integer indices.
Enum Array Types and Their Use Cases
Backbone includes several variations of Enum Arrays, each tailored to a specific type of data. Whether you're tracking numeric stats, boolean flags, positions, or even resource names, there's a specialized array structure to match your needs. Below is a breakdown of each type, along with common use cases to help you decide which one fits best in your context.
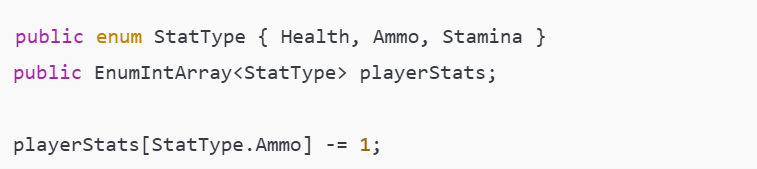
EnumIntArray<TEnum>
A simple array of integers indexed by an enum.
Use cases: ammo counts, player scores, unlock levels, stat levels.
Example:
Editor view
EnumFloatArray<TEnum>
Same as above, but with floating point numbers.
Use cases: percentages, timers, fill amounts, smooth stats.
Example:

Editor view
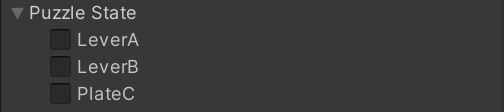
EnumBoolArray<TEnum>
An array of booleans to track on/off flags.
Use cases: puzzle levers, toggles, triggers, “has seen this object” checks.
Example:
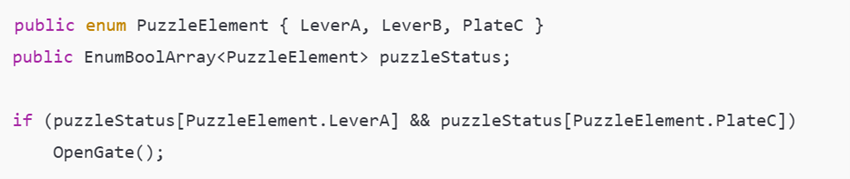
Editor view
EnumStringArray<TEnum>
A string-based array for any kind of identifier or textual data.
Use cases: resource paths, UI labels, dialogue IDs.
Example:

Editor view
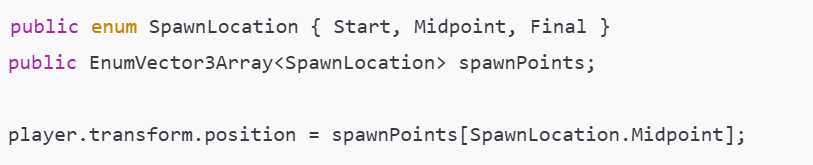
EnumVector3Array<TEnum>
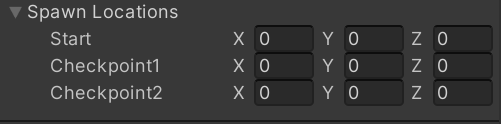
Maps each enum to a Vector3, ideal for storing positions or directions.
Use cases: spawn points, camera positions, movement vectors.
Example:
Editor view
Final Thoughts
Enum Arrays offer a clean and scalable way to organize collections of related values using named keys instead of numeric indices. This improves code clarity, reduces bugs, and ensures that adding new enum entries automatically expands the array structure without manual adjustments.
One of the key advantages of all EnumArray types — whether EnumIntArray, EnumBoolArray, EnumStringArray, EnumVector3Array, or EnumFloatArray — is that they fully support Backbone's [GamePersistent] and [ScenePersistent] attributes. This means they can be directly serialized and used as part of your persistence system, making them ideal for tracking game progress, player stats, level states, item collections, and much more across scenes and sessions.
By combining the flexibility of enums with the power of Backbone's save/load system, EnumArrays give you a powerful tool for managing structured game data in a clean and maintainable way.
Full API Documentation
Everything you need to use the API is already explained here. The full technical reference is only for advanced users who want to deeply customize the asset's behavior.
→ View full API documentation (advanced use only)
Conclusion & Support
Backbone Persistence stands out as a robust, flexible, and developer-friendly solution for managing game state across scenes and sessions in Unity. Whether you're building a small prototype or a full-scale production title, Backbone provides the tools and architecture to handle persistence with clarity and control.
Here’s why Backbone Persistence is an excellent choice:
- ✅ Minimal setup, maximum power: Just mark your data with attributes or add a component — no complex boilerplate or third-party dependencies.
- ✅ Scene and global state support: Easily separate and manage data that is local to a scene versus game-wide information.
- ✅ Clean architecture patterns: Encourages best practices with serializable data models and modular managers.
- ✅ Custom load/save logic: Interfaces like
ILoadableandISavablegive you precise control over runtime behavior. - ✅ Automatic object tracking: Built-in components like
PersistentObjectStateandHierarchyPersistencemake it easy to manage scene objects. - ✅ Editor integration: Clear visual indicators and serialized inspector fields streamline development and debugging.
- ✅ Support for structured data: EnumArrays make it easy to organize complex sets of game data with full persistence support.
By using Backbone Persistence, you not only reduce development overhead, but also gain confidence in how your game handles saves, loads, and continuity. It’s designed to be intuitive for beginners, extensible for advanced users, and maintainable for long-term projects.
In short: Backbone doesn’t just save your data — it saves you time, effort, and future headaches.
For help or questions, please contact at:
- Email: backbonegamelabs@gmail.com