Backbone AssetVault
Find any game asset in seconds — with local AI. Point it at your asset folders once, then search by meaning, by sound, or by dragging an image. Everything runs on your own machine: no cloud, no accounts, no fees, ever.
How to Get Backbone AssetVault
Backbone AssetVault will be coming soon to Steam. Stay tuned — this page will be updated with the store link as soon as it is available.
Part 1 — Quick Start ⚡
1. What is AssetVault?
If you make games, chances are you own far more assets than you can remember.
Humble Bundle packs, itch.io bundles, asset-store sales… they pile up fast: tens of
thousands of sprites, tilesets, icons, UI kits, sound effects and music tracks,
spread across hundreds of folders with names like dfg_01_b.PNG or
Event 14.mp3. The assets are all there, bought and paid for — but when you
actually need "a blue magic potion" or "rain with distant thunder", finding it
means opening folder after folder, squinting at thumbnails, and double-clicking
audio files one by one. Many developers give up and buy (or draw) the asset
again, even though a perfectly good one was sitting on their disk all along.
AssetVault turns that pile into a searchable library. You point it at your asset folders once. It then walks through every image, every sound and every 3D model, and uses AI models running entirely on your own machine to look at and listen to each file: every image gets a written description and a set of tags ("potion", "icon", "pixel art", "medieval fantasy style"…), every sound is classified the same way ("footsteps", "explosion", "calm peaceful music"…), and every 3D model is rendered from several angles so it can be searched just like an image. Everything is stored in a local database next to the app.
From that moment on, you search the way you think, not the way your files are named. Type "blue magic potion" and this is what comes back:
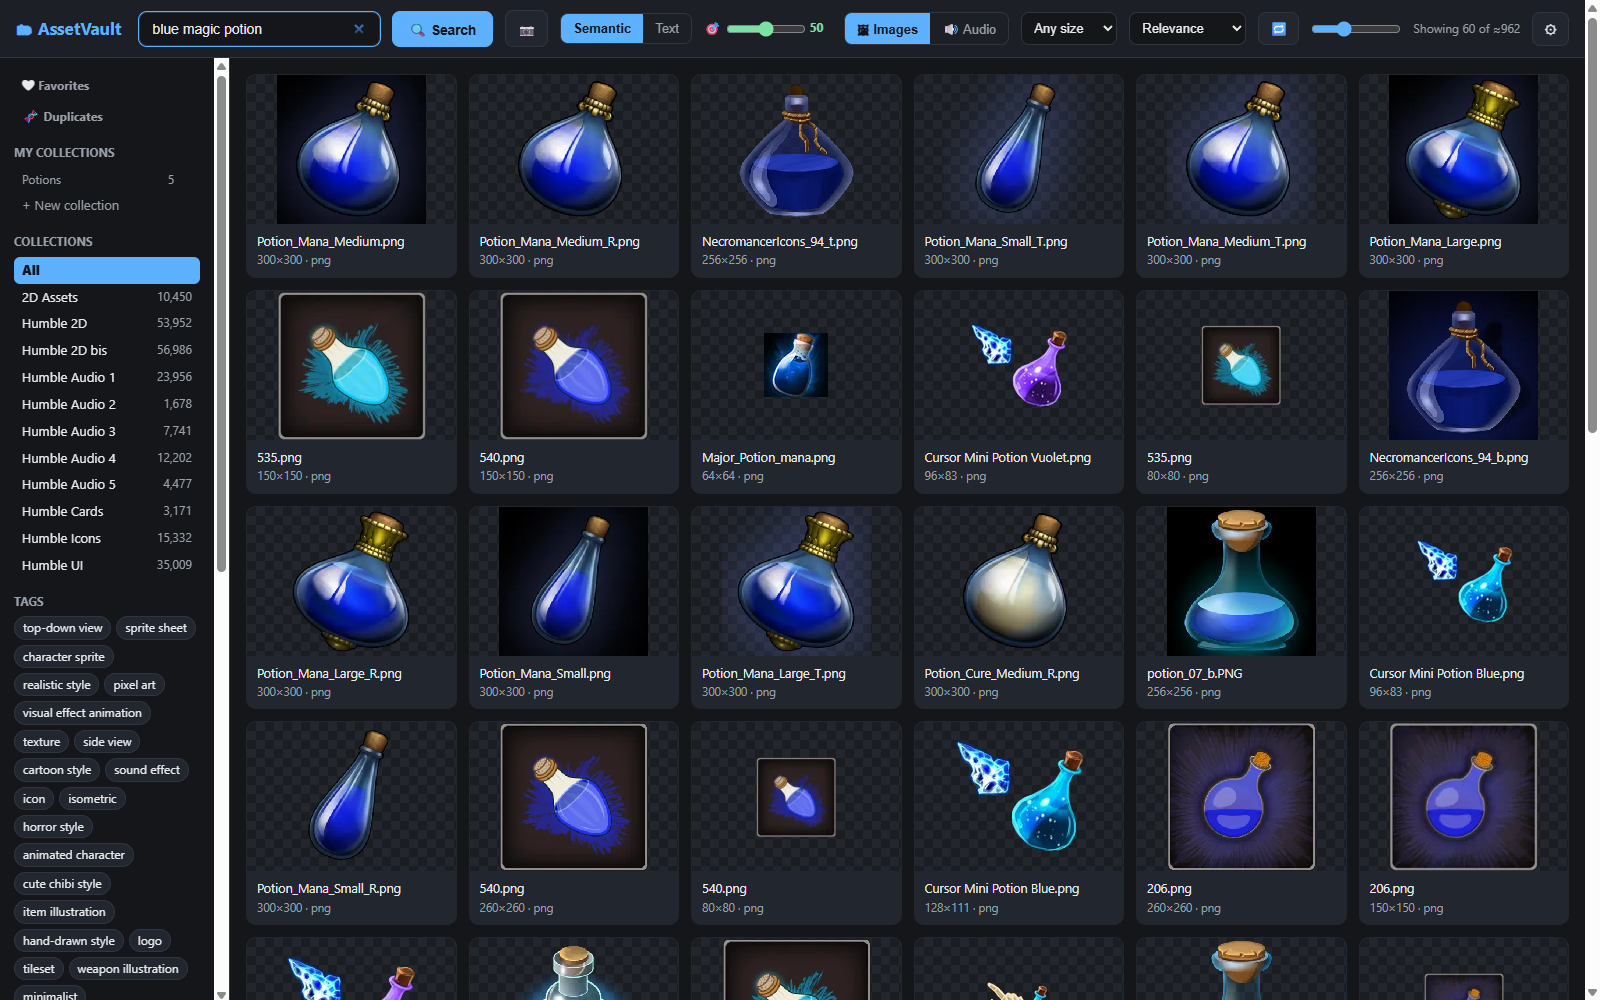
Notice what just happened in that screenshot:
- The results are actual blue potions — even though not a single file is
named "blue magic potion". The AI understood the meaning of the query and
matched it against what each image actually shows. Files called
535.pngorNecromancerIcons_94_t.pngwere found purely by their content. - The counter says "Showing 60 of ≈962": out of 168,000 images, AssetVault narrowed it down to the ~1,000 relevant ones, ranked from most to least similar — and a precision slider (🎯) lets you tighten that to just the closest matches.
- On the left, the library is already organized for you: your collections and favorites, every source bundle with its asset count, and a cloud of AI-generated tags you can filter with.
Sound works exactly the same way. Flip the Images | Audio switch, describe what you want to hear — say, "healing spell magic" — and AssetVault plays matchmaker with your sound library:
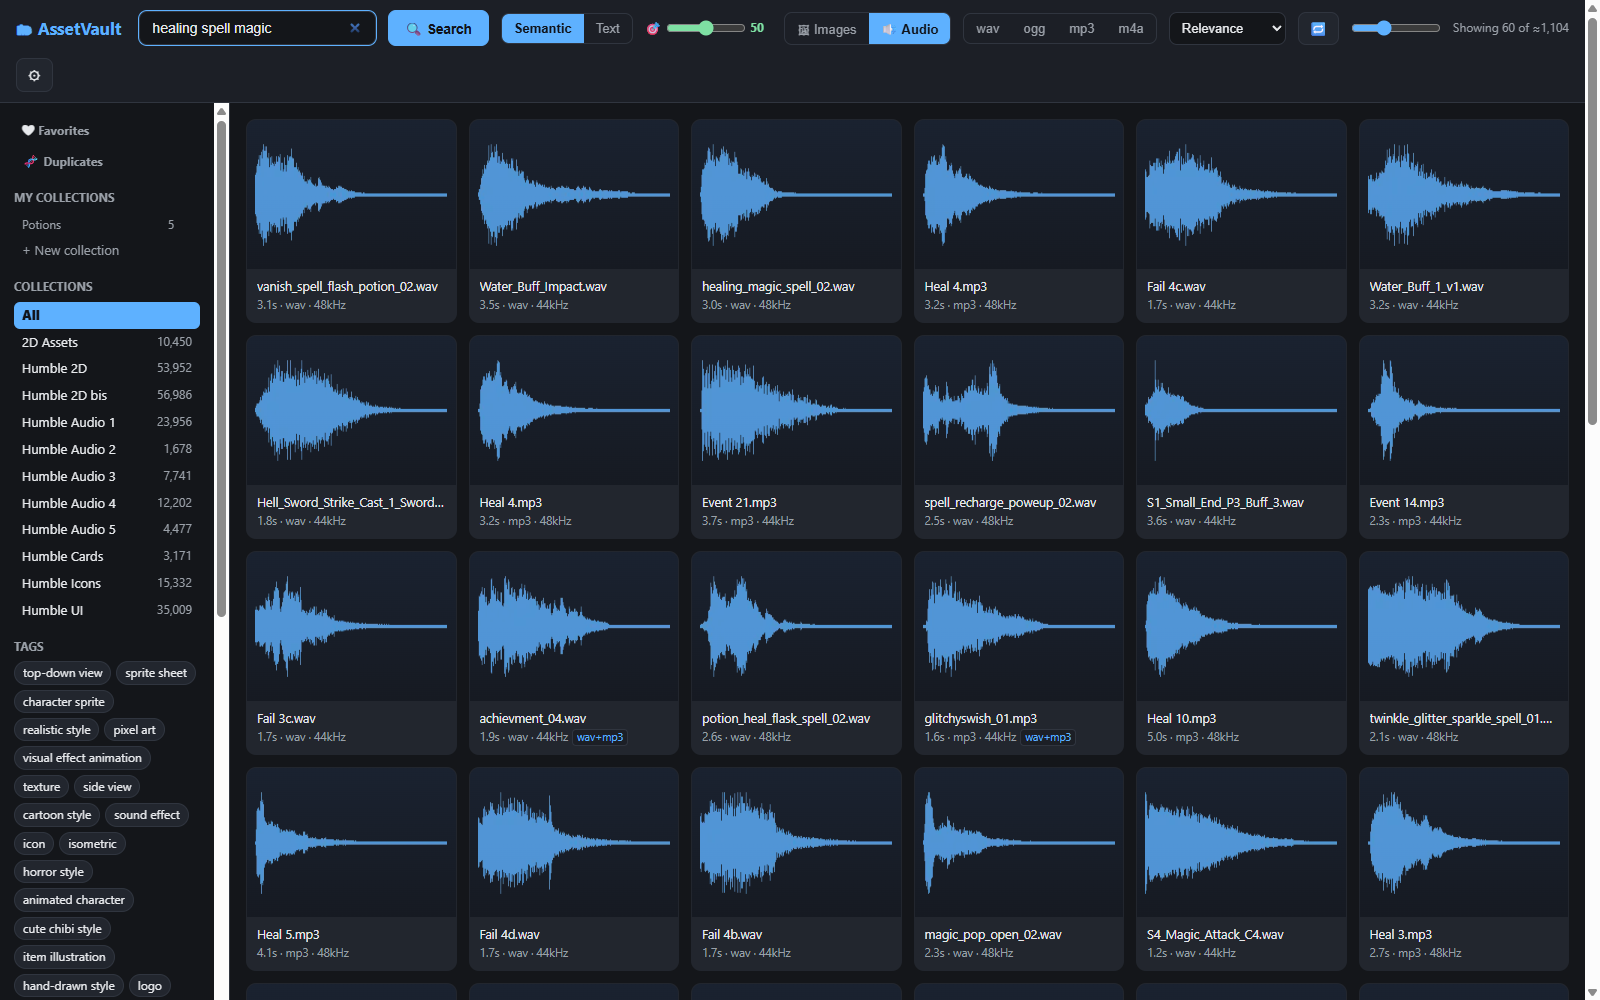
Every result shows its waveform and plays with a single click. Notice the
little wav+mp3 badges: when a pack ships the same sound in several formats,
AssetVault shows it as one card instead of three duplicates — you pick the
format you need when you use it.
And it does the same for 3D models. Switch to 🧊 3D, search "medieval building house", and your FBX and OBJ files come back too — each rendered with its textures, showing its triangle count, and openable in a viewer you can rotate with the mouse:
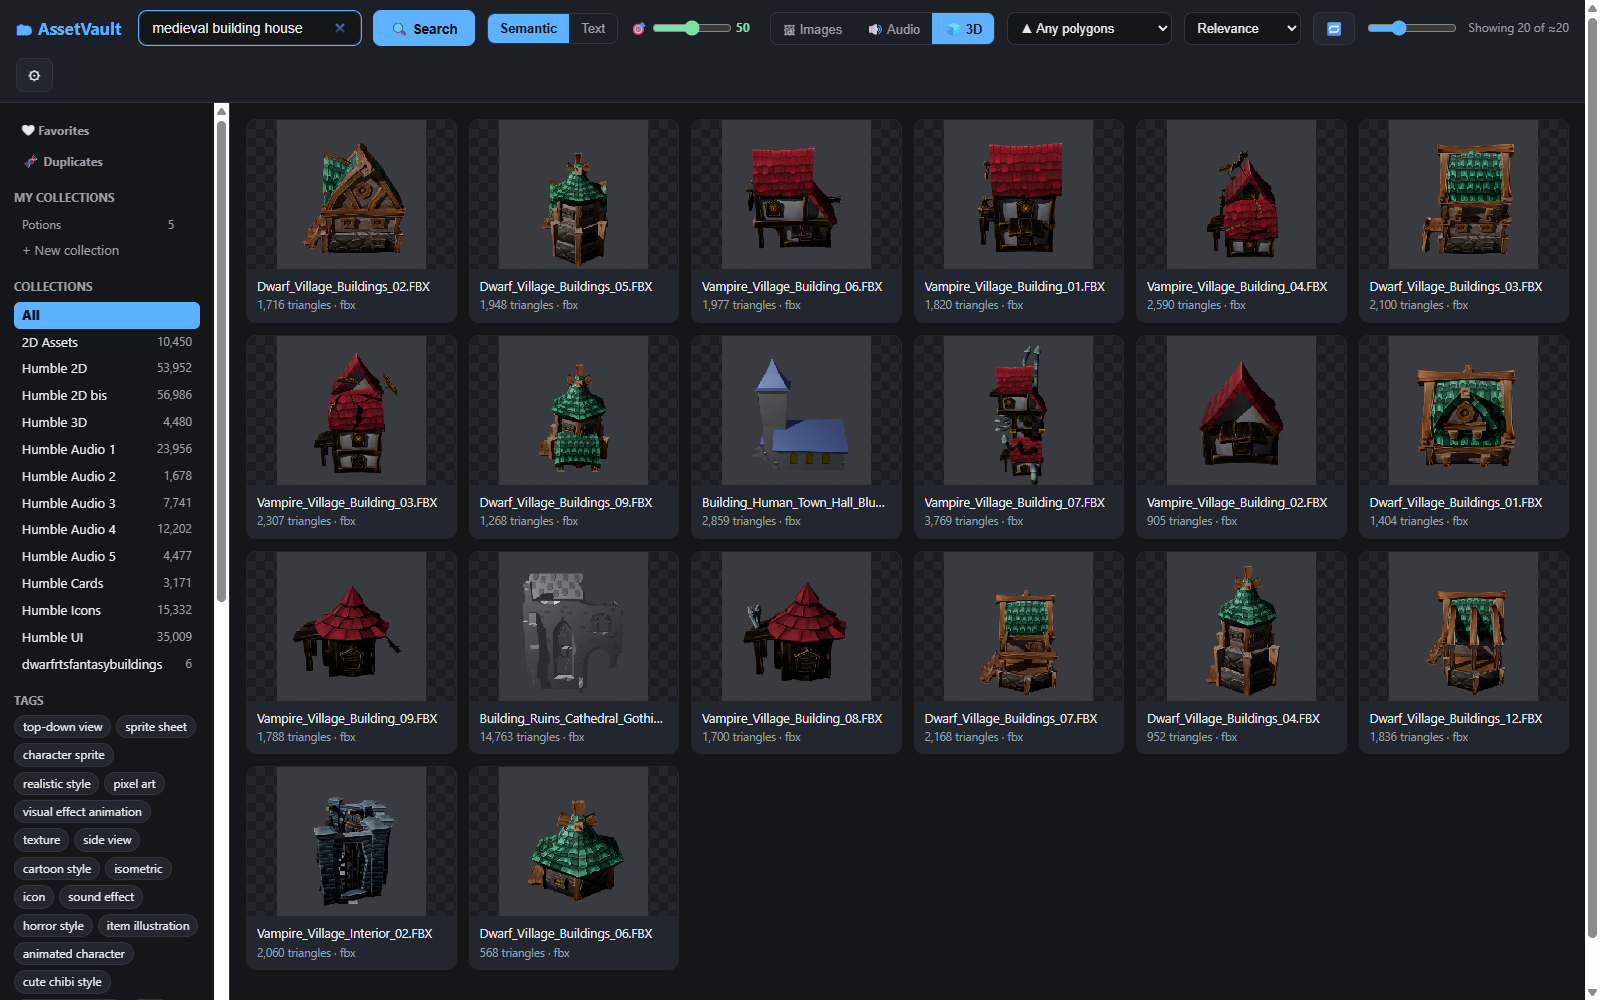
Images, sound, 3D — one search box, one library. (The 3D side has its own part later in this manual: see Part 6.)
A few important things to know from the start:
- Everything is local and private — and completely free to run. The AI models run on your PC, using your own graphics card. There is no cloud AI involved at any point: no API keys to sign up for, no tokens or credits being consumed, no per-search cost, no subscription, no account. Index a million assets, search ten thousand times a day — the bill is always zero. Your files are never uploaded anywhere, and the app works completely offline after installation.
- Your files are never touched. AssetVault only reads your folders. It never moves, renames or modifies an asset. If you delete the app, your library is exactly as it was.
- Indexing happens once. The AI pass over your library takes a few hours the first time (it runs in the background — you can already search while it works). After that, only new files are processed.
The rest of this manual shows you how to get there: install in three steps, add your folders, and master every search and organization tool in the app.
2. Requirements
The short version: a reasonably modern Windows PC and some free disk space. Everything else, the installer sets up for you.
| Required | Notes | |
|---|---|---|
| Operating system | Windows 10 or 11 (64-bit) | |
| Free disk space | ~10 GB | Breakdown below |
| Graphics card | NVIDIA GPU with 4 GB+ VRAM recommended | Only affects indexing speed — see below |
| Memory | 8 GB RAM minimum, 16 GB recommended | |
| Internet connection | Only during installation | To download dependencies and AI models. After that, AssetVault works fully offline |
What you do not need to install yourself. AssetVault is built on Python
and uses ffmpeg to read audio files — but you don't need to know or care what
those are. When you run the installer, it checks whether they are present and,
if not, offers to install them for you (one keypress; it uses winget,
Windows' built-in package manager). The same goes for everything else: the
isolated Python environment, the AI libraries (~2.5 GB) and the AI models
(~3 GB) are all downloaded and verified automatically.
Prefer to install the prerequisites yourself? If you'd rather set up Python and ffmpeg manually — to control versions, paths or any other detail — these are the exact commands the installer would run:
powershell
winget install Python.Python.3.12
winget install Gyan.FFmpeg
Any Python 3.11+ and any ffmpeg reachable from your
PATHwill do; the installer detects them and skips those steps. That said, we recommend letting the assisted installer handle it — it is the tested, zero-thought path.
Where the ~10 GB goes:
- ~3 GB — the three AI models (image understanding, image description, audio understanding), downloaded once.
- ~3 GB — the Python environment with the AI libraries, created once.
- ~2–4 GB — your library's index: thumbnails and the search database. This is the only part that grows with your collection (roughly 2 GB per 200,000 assets). Your original asset files stay wherever they are and are not duplicated.
About the graphics card. The GPU is used for one thing only: the initial AI indexing of your library (and of new packs you add later). With an NVIDIA card, indexing runs at roughly 7–10 assets per second — a 100,000-asset library takes an afternoon, unattended. Without one, indexing falls back to the CPU and is many times slower (think days instead of hours for a big library) — still possible, just slow. Searching, browsing and everything else is light and works the same on any machine, GPU or not, because the heavy AI work happens only once, at indexing time.
About cost, one more time. None of the above involves any online service: no API keys, no accounts, no tokens, no subscription. The models are free, open-license, and run on your hardware. Once installed, AssetVault costs exactly zero to use, forever.
3. Install in 3 steps
Step 1 — Unzip
Unzip AssetVault-x.y.z.zip wherever you want the app to live — for example
C:\AssetVault. That folder is AssetVault's permanent home: it will contain
the app itself and, later, your library's index (the database and thumbnails).
Pick a drive with the ~10 GB of free space from the previous section.
Step 2 — Run the installer
Open the folder, and in the address bar of the Explorer window type
powershell and press Enter — a blue console opens right there. Then run:
powershell -ExecutionPolicy Bypass -File install.ps1
Step 3 — Answer the questions and wait
The installer walks through five stages and asks for confirmation before doing anything on your system (installing a missing prerequisite, enabling autostart, launching the app). Answering y to everything is a perfectly good default. This is what a typical installation looks like:
[1/5] Checking prerequisites
  Python: OK (Python 3.12.10)
  ffmpeg: OK
  NVIDIA GPU: OK

[2/5] Creating the Python environment
  Environment created.

[3/5] Installing dependencies (PyTorch is ~2.5 GB - this can take a while)

[4/5] AI models
  Downloading and verifying the 3 models (~3 GB, first time only)...
  [1/3] SigLIP (image/text search)...
  [2/3] Florence-2 (image descriptions)...
  [3/3] CLAP (audio)...
  Models downloaded and verified.

[5/5] Shortcuts
  Start Menu: AssetVault
  Start AssetVault with Windows? (y/n): y

Installation complete.
Launch AssetVault from the Start Menu; a tray icon will appear.
Open the app (double-click the icon), press the gear, add your asset folders.

Launch AssetVault now? (y/n): y
If Python or ffmpeg are missing, stage 1 will simply ask "Install Python 3.12 automatically now? (y/n)" — press y and carry on.
How long does it take? Stages 3 and 4 download about 5.5 GB in total, so it depends on your connection — typically 10–20 minutes, unattended. The installer is safe to re-run at any time: anything already done is detected and skipped, so an interrupted installation just resumes where it left off.
Tip for unattended installs:
install.ps1 -Yesanswers yes to every question automatically.
When it finishes you have an AssetVault entry in your Start Menu and, if you chose to launch it, a new icon next to your clock. That icon is the subject of the next section.
4. First launch
The tray icon
Start AssetVault from the Start Menu (or let the installer launch it). You won't see a window — instead, a small magnifying-glass icon appears in the system tray, next to the Windows clock:
 |
 |
|---|---|
| Grey-blue: idle | Green: indexing in progress |
That icon is the application. It quietly runs AssetVault's local engine in the background and gives you a small menu on right-click:
- Open AssetVault — opens the app in your browser (double-clicking the icon does the same).
- Start with Windows — toggle autostart on or off at any time.
- Quit — stops AssetVault completely (the engine included).
Hover the icon while an indexing run is active and the tooltip shows live progress: "AssetVault — Indexing images: 43 % · ~2 h left".
Opening the app
Double-click the tray icon. Your default browser opens at
http://127.0.0.1:8977 — and here is the one concept worth understanding:
AssetVault's interface is a web page, but it is not on the web. That
address (127.0.0.1) always means "this very computer": the page is served
by the engine running behind the tray icon, your browser is just the window,
and nothing is reachable from the internet. You can bookmark the address, open
it in several tabs, or use it from any browser installed on your PC.
What you'll see the first time
A brand-new library looks like this:
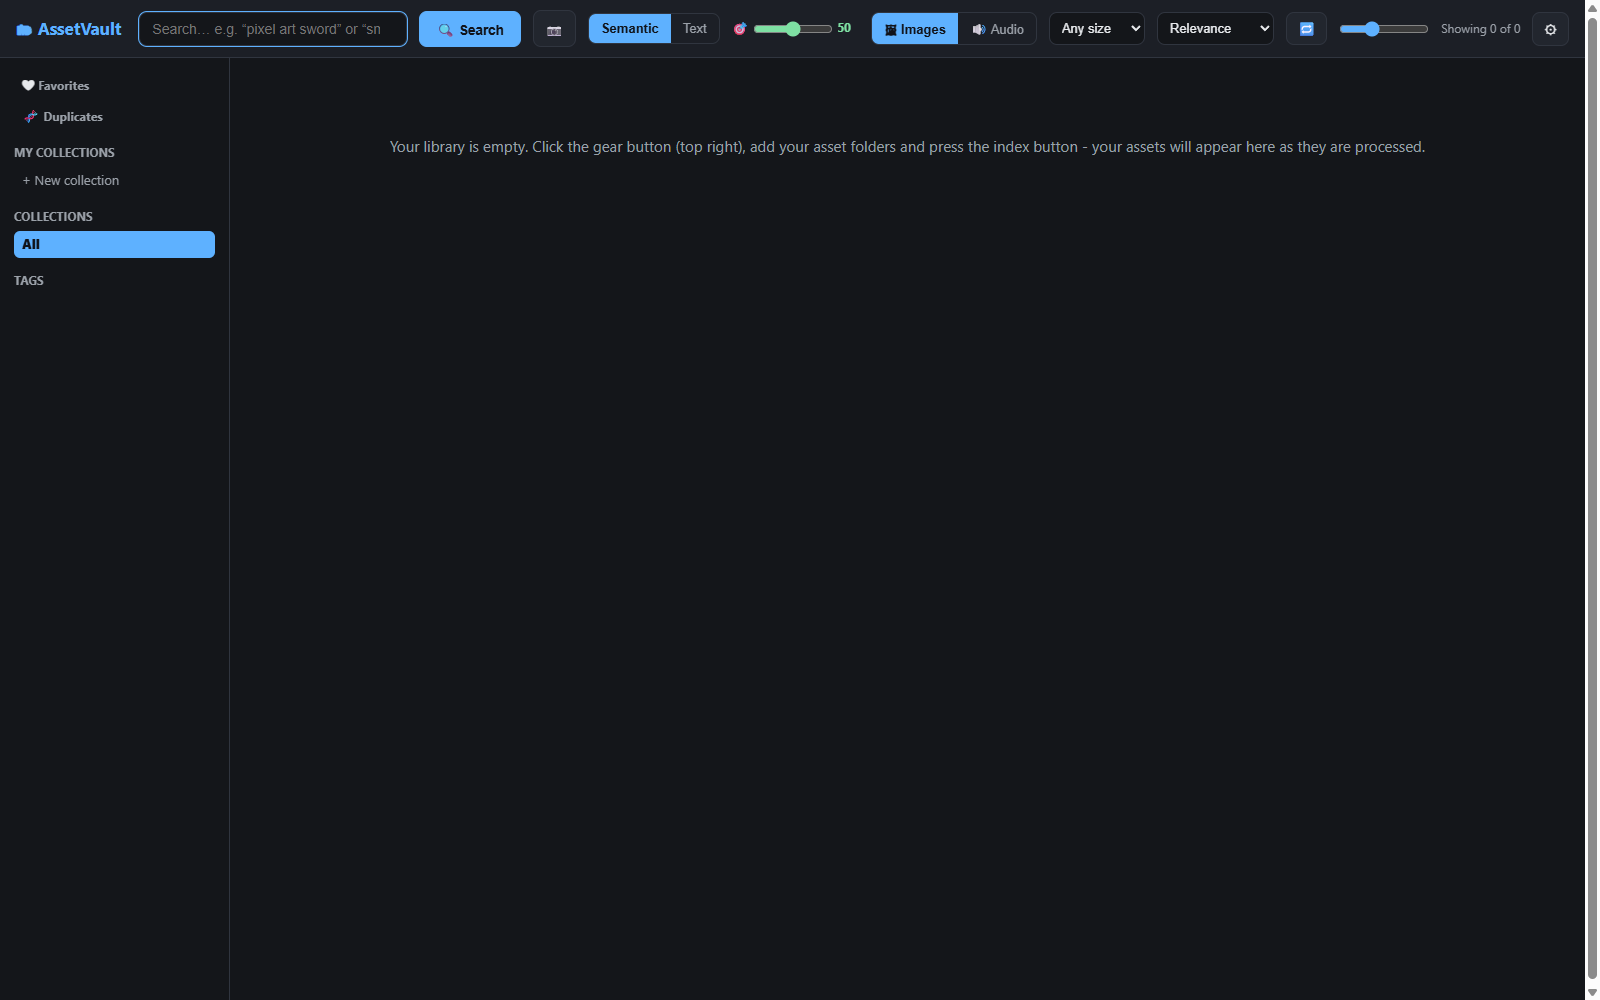
Everything is in place — search box, filters, the sidebar for favorites and collections — but the counter reads "Showing 0 of 0" and the welcome message points you to the next step: the ⚙ gear button in the top-right corner, where you'll register your asset folders. That's the next section.
5. Add your first folder
Register the folder
Click the ⚙ gear button in the top-right corner to open the
Administration panel. Under Indexed folders, type (or paste) the full
path of a folder that contains assets — for example
F:\MyAssets\Platformer World — and click + Add folder:
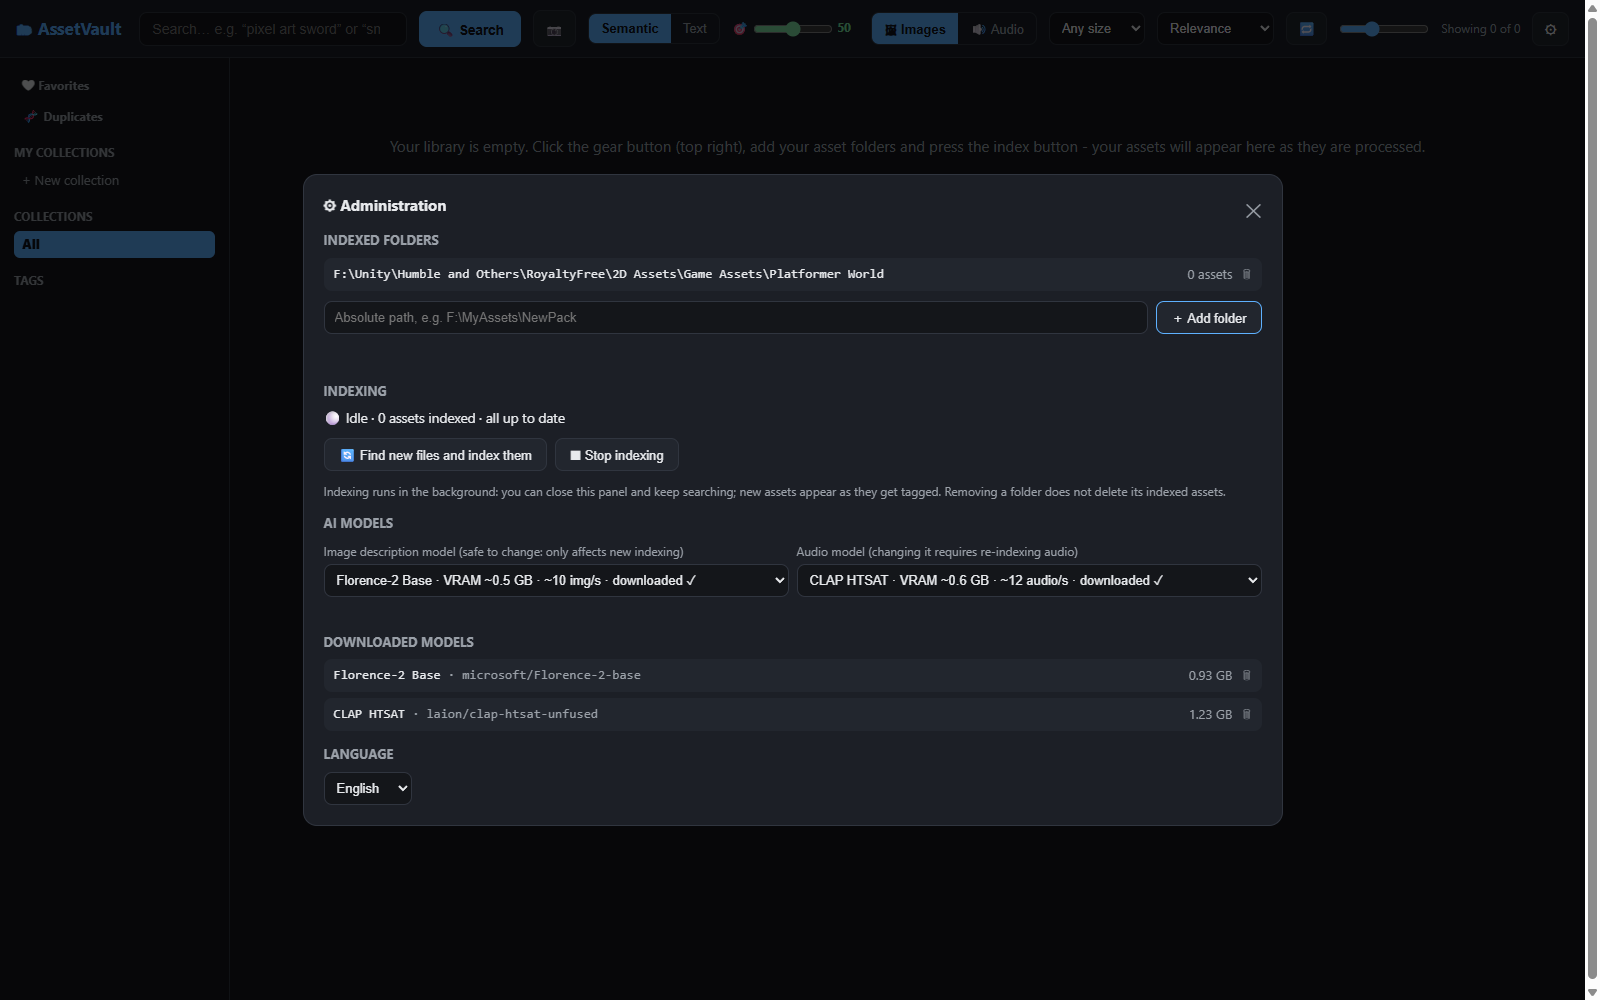
A few things worth knowing:
- You can register as many folders as you like, on any drive, and add more later. Point AssetVault at the top of an asset collection (the folder that contains your packs) rather than at each pack individually — everything inside is found recursively.
- The path must be typed or pasted: copy it from the Explorer address bar.
- Removing a folder (🗑) only stops future indexing of it; assets already in the library stay searchable.
- AssetVault will only ever read these folders. Nothing inside them is moved, renamed or changed.
Press the index button
Still in the Administration panel, press 🔄 Find new files and index them. Two things happen, in order:
- A fast scan (hundreds of files per second): every image and sound is registered, thumbnails are generated, and technical data (dimensions, duration, formats) is extracted.
- The AI pass (roughly 7–10 files per second on a typical NVIDIA GPU): each file is looked at / listened to, described and tagged. This is the part that takes hours on a big library — and it doesn't need you at all.
You can now close the panel. The progress bar at the top keeps you informed, and — this is the part people love — the app is fully usable while it indexes:
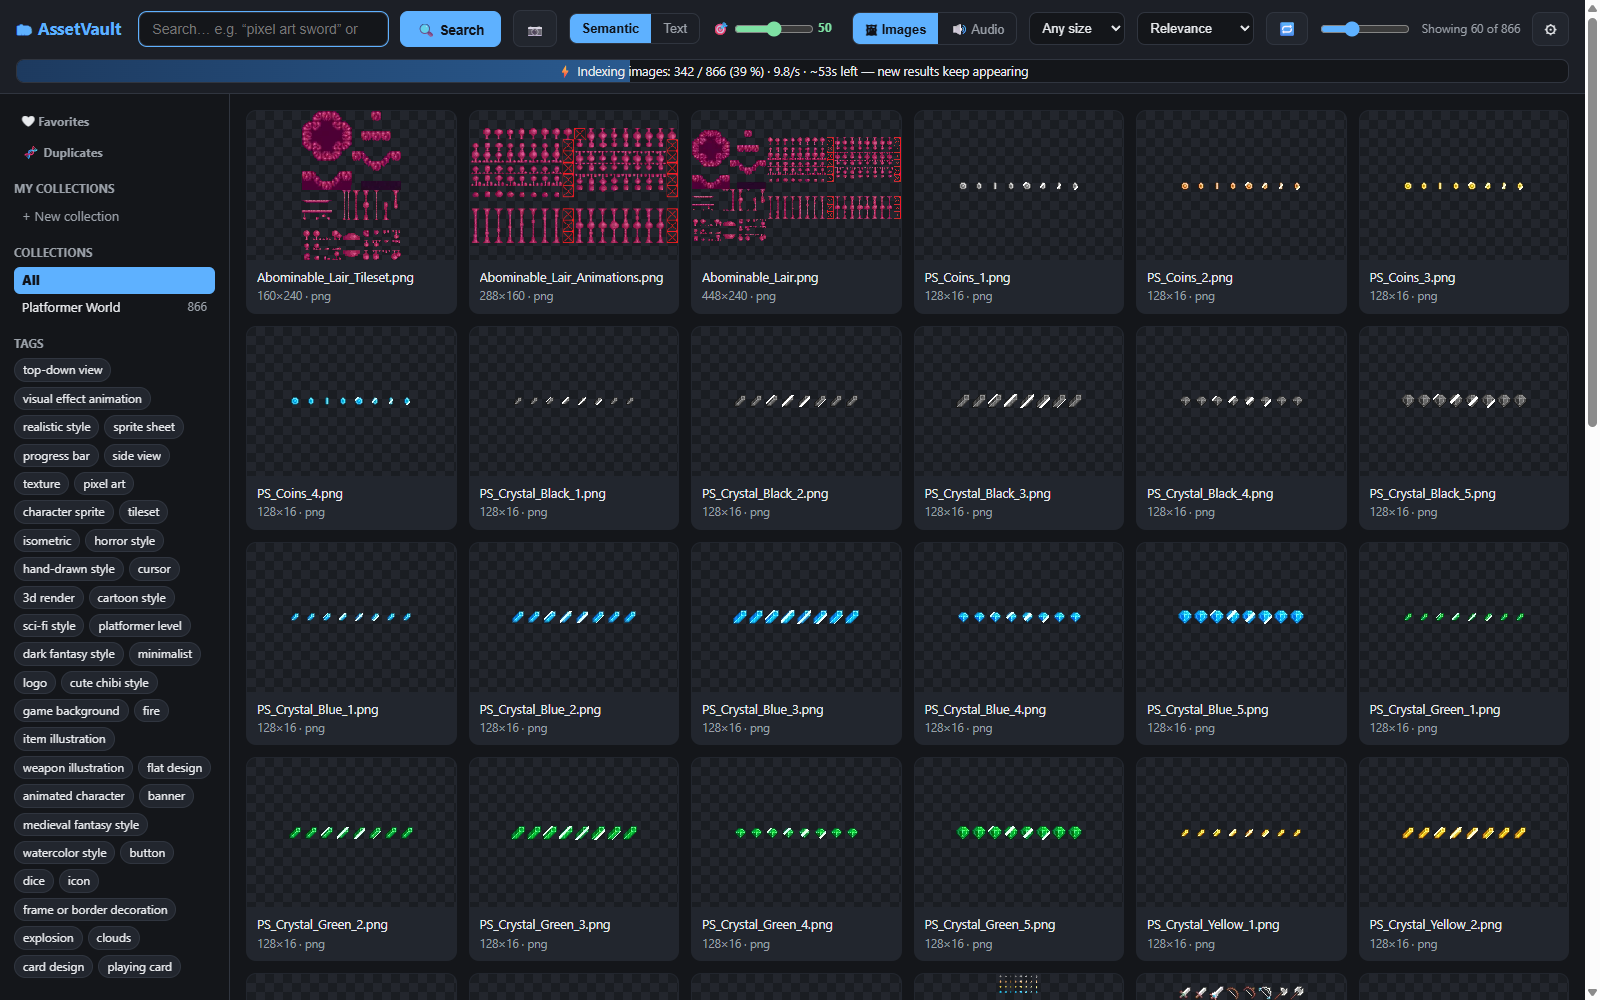
The bar reads "Indexing images: 342 / 866 (39 %) · 9.8/s · ~53s left — new results keep appearing". Every asset becomes searchable seconds after the AI processes it: you can search, play sounds, browse and organize from the very first minute, with results simply getting more complete as indexing advances. The tray icon turns green for the duration and shows the same progress in its tooltip.
Buying new packs later
This same button is all you'll ever need again. Indexing is incremental: when you copy a new pack into one of your registered folders (or register a new folder), press 🔄 Find new files and index them and only the new files are processed — minutes, not hours. Files that are already in the library are never re-processed.
6. Your first searches
Your library is indexed. Time for the fun part — the complete loop of finding an asset, previewing it and dropping it into your project.
Describe what you want to see
Make sure Semantic and 🖼 Images are selected (they are, by default), type a description of the thing you need, and press Search (or Enter). The trick that takes ten seconds to learn: describe what the image should show, the way you'd describe it to a person — object, colors, style:
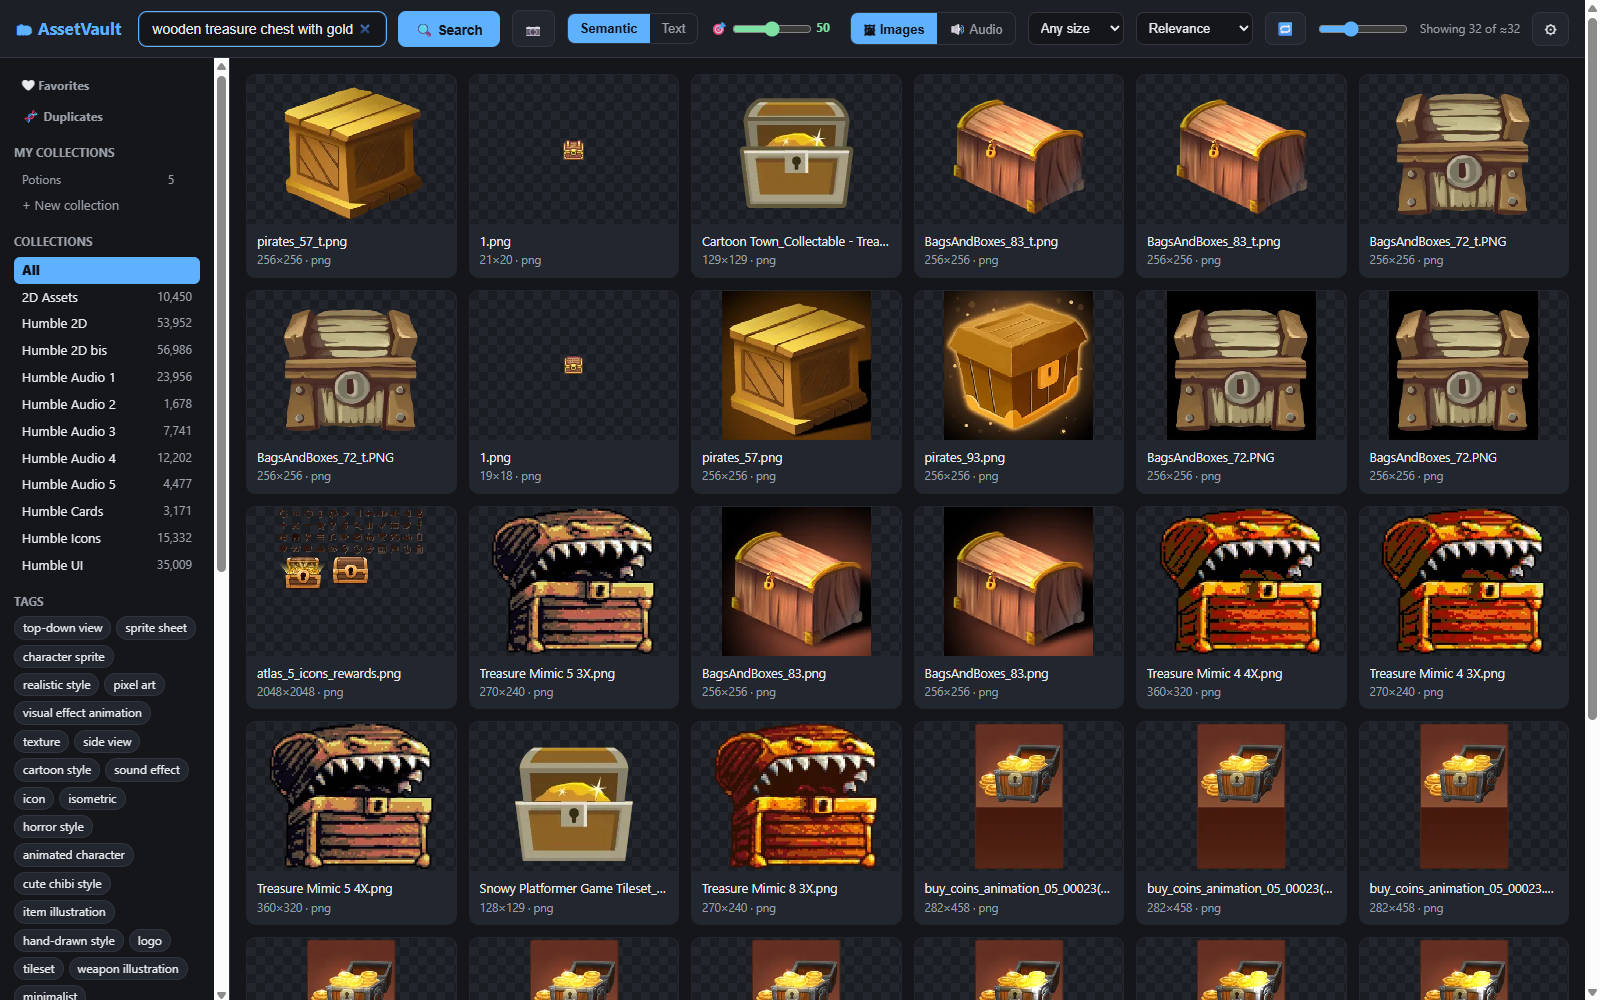
"wooden treasure chest with gold" finds exactly that: wooden chests, open and closed, glowing loot, even treasure-mimic monsters — across every pack you own, whatever the files are called. Some phrasing tips:
- Add style words when it matters: "pixel art", "cartoon", "hand-drawn", "realistic", "isometric" — the AI understands them.
- Too much noise in the results? Drag the 🎯 precision slider up and the loose matches drop away (more on this in section 8).
- Looking for a file you know by name? Switch Semantic to Text — that mode searches file names, descriptions and tags literally.
Click any result to open it
Click a card and the detail view opens:
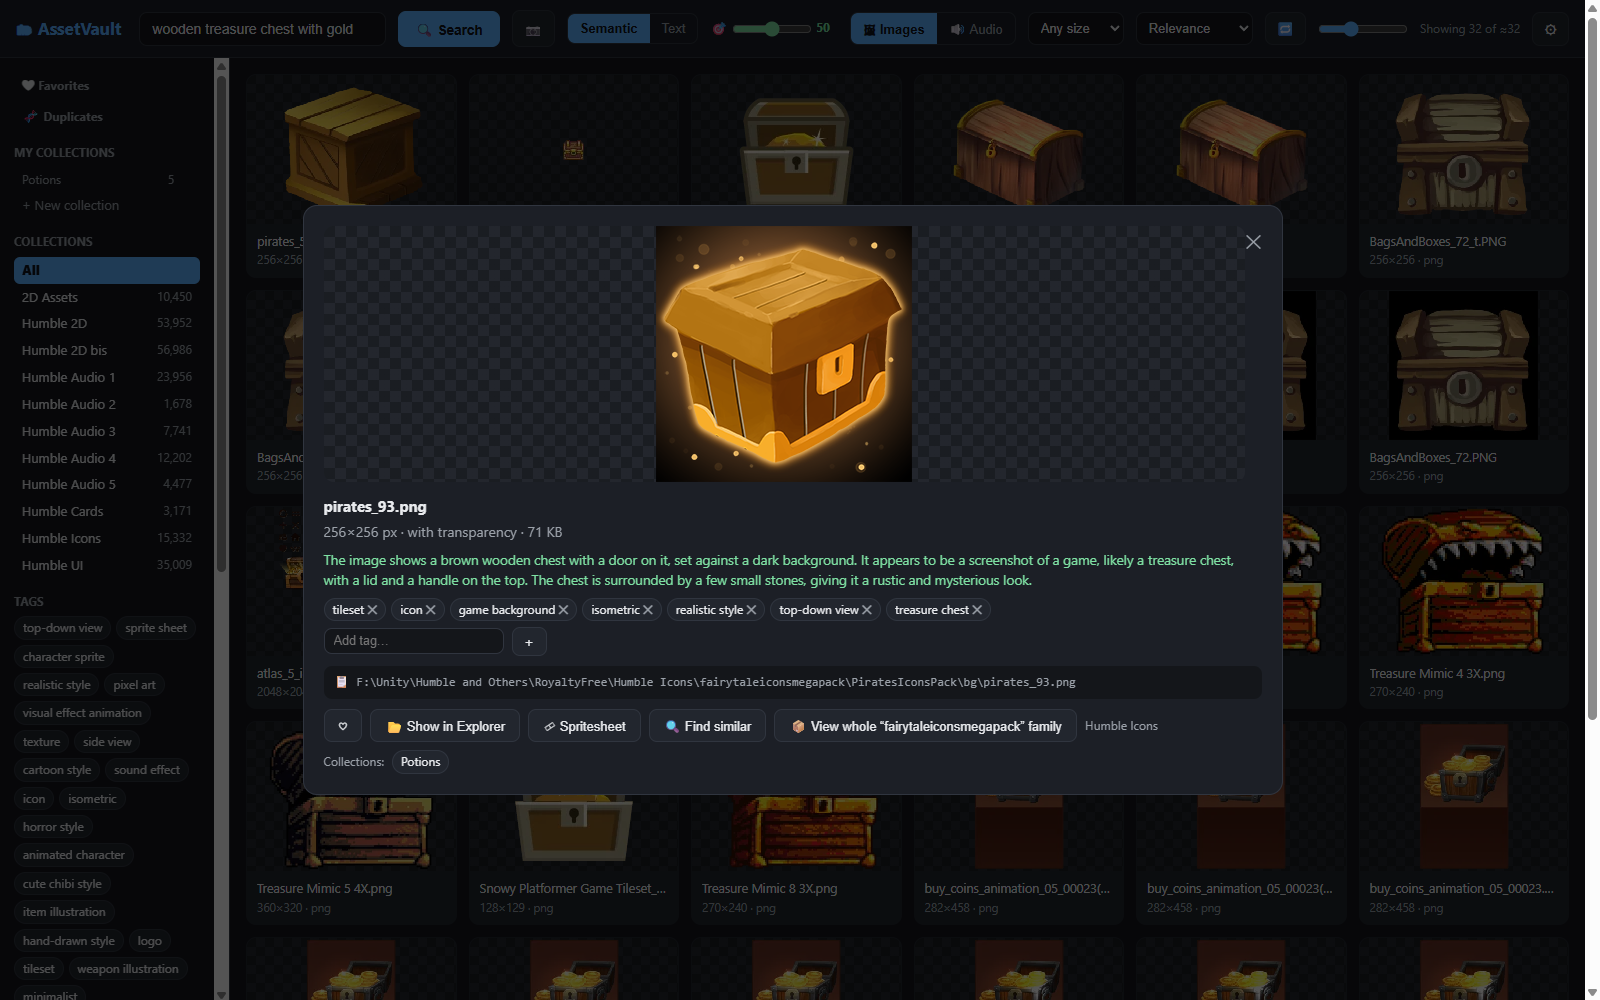
Everything AssetVault knows about the asset is here: a large preview (the checkerboard means transparency), its dimensions and size, the description the AI wrote when it looked at the image, and its tags — all of it searchable. The row of buttons is your toolbox (each gets its own section later): favorite ♡, Show in Explorer, spritesheet viewer, find similar, and the asset's whole family. For now, the two you'll use immediately:
- 📋 The path bar — one click copies the full file path to your clipboard, ready to paste wherever you need it.
- 📂 Show in Explorer — opens the file's folder with the file selected, so you can drag it straight into Unity, Unreal, Godot or your project folder. Remember: AssetVault never moves your files — you're always working with the originals, exactly where they live.
Hear your sound effects instantly
Switch to 🔊 Audio and search the same way — describe the sound: "coins dropping on a table", "heavy wooden door closing", "calm forest ambience". Then just click any waveform to play it; click again to stop:
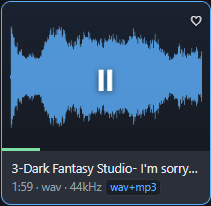
No download, no external player, no digging through folders — audition sounds as fast as you can click. A thin progress line runs along the bottom of the card while it plays, and the 🔁 button in the header makes playback loop (perfect for checking that a music loop is seamless). One search tip for audio: it responds best to English descriptions — image search understands several languages, but the audio AI was trained on English.
That's the Quick Start. You can install, index and search — the essential loop. Everything that follows goes deeper: sharper searches, organizing tools, and the tweaks that make a 200,000-asset library feel small.
Part 2 — Searching in Depth 🔍
The Quick Start showed you the basics. This part covers the search tools in full, so you can go from "somewhere in here there's the right asset" to the exact file in a couple of clicks.
7. Semantic vs. Text search
The two buttons next to the search box — Semantic and Text — are two completely different ways of searching. Knowing when to use each is the single most useful thing in this manual.
Semantic search (the default) understands meaning. It doesn't look at file names at all — it matches your words against what each image actually depicts and what each sound actually contains, using the AI's understanding built during indexing. This is what you want almost always: "nervous heartbeat sound", "cozy tavern interior", "angry red boss monster". The results are ranked by how well they match, best first.
A standout feature: for images, semantic search is multilingual. Type in Spanish, French, German, Chinese or Japanese and it works just as well — here's "puerta de madera medieval con herrajes" (Spanish for "medieval wooden door with metal fittings"):
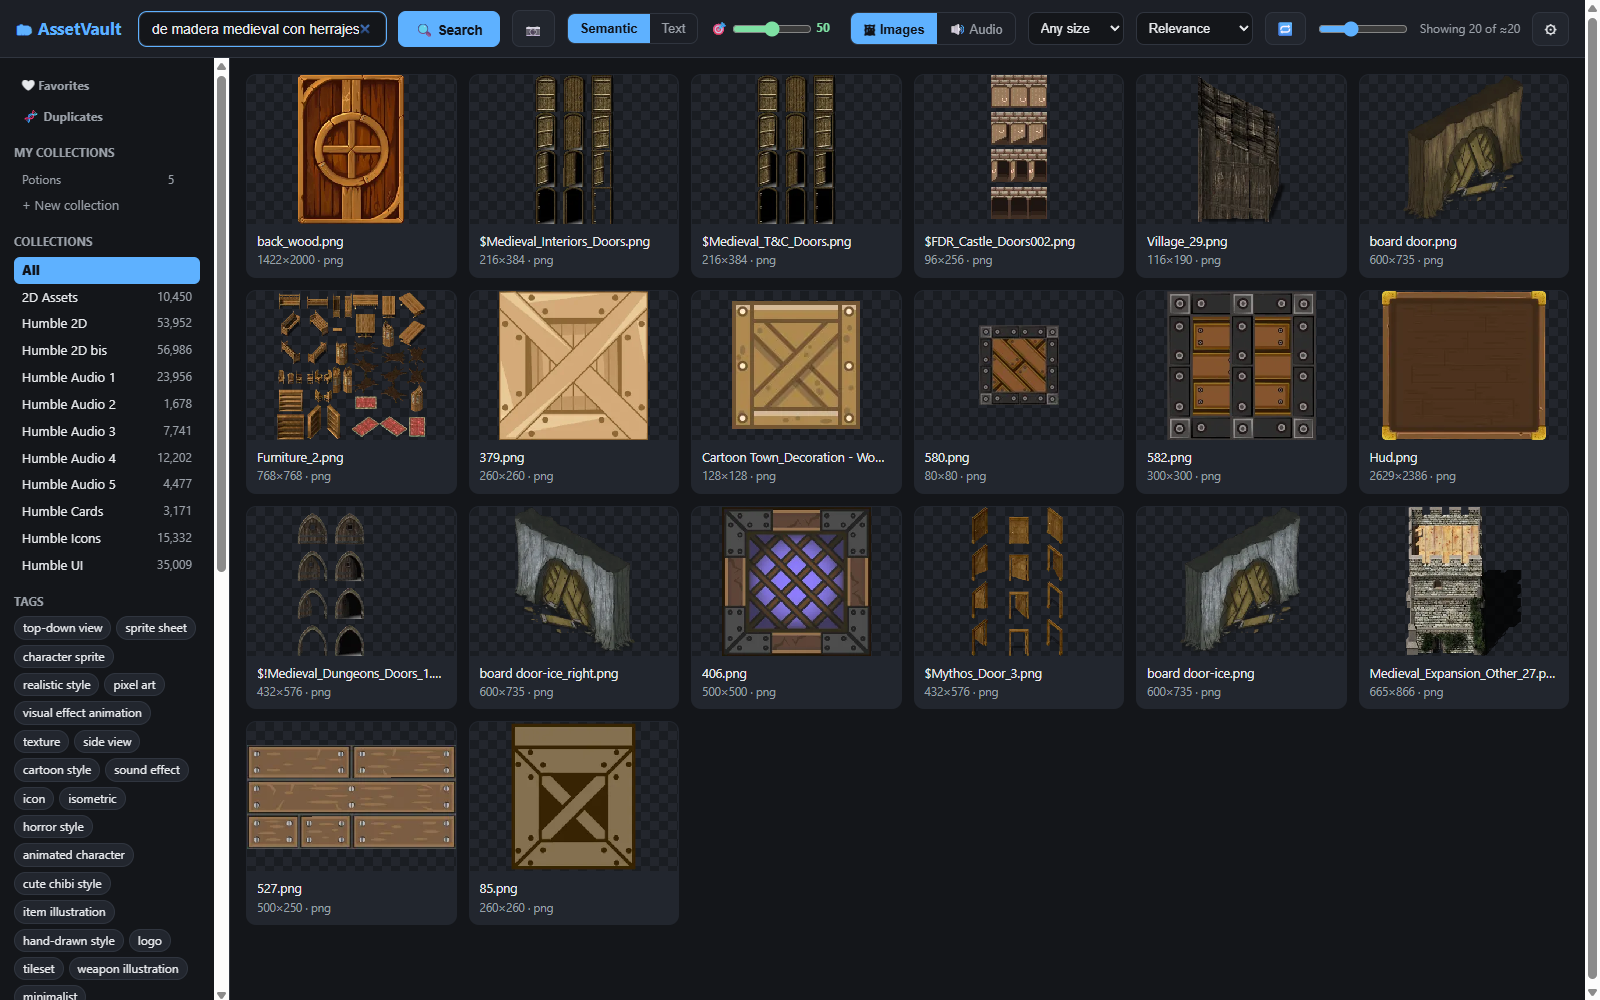
Note: this multilingual magic applies to image search. Audio search understands English best, because the audio AI was trained on English descriptions. Searching sounds in English will always give you the best results.
Text search is the classic kind: it matches your words literally against
file names, the AI descriptions and the tags. Switch to it when you already
know part of a name or a specific term and want every asset containing it. For
example, typing Potion_Mana in Text mode returns every file whose name,
description or tags contain those words — an entire sprite family at once:
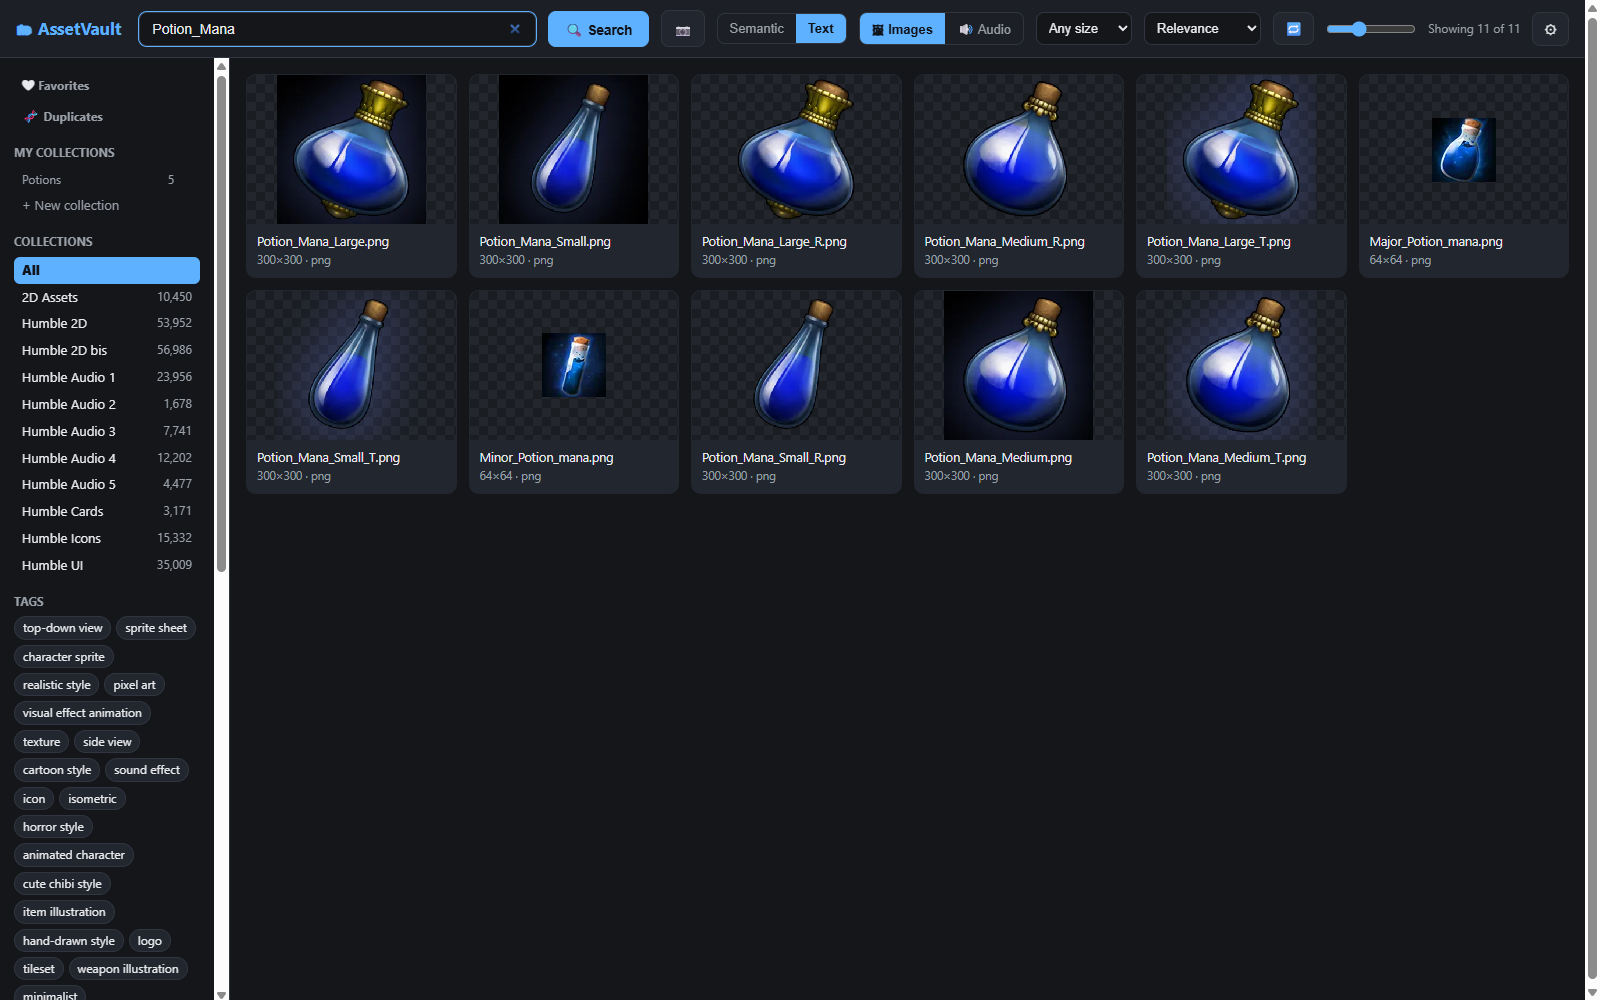
Rule of thumb: exploring by idea → Semantic. Hunting a name or exact word you already know → Text.
8. The precision slider 🎯
Semantic search always ranks results best-first, but "good enough to show" is a judgement call — and that call is yours to make, with the 🎯 precision slider next to the search mode buttons (it appears only in Semantic mode).
Think of it as how picky the search should be:
- Low precision (0–30): casts a wide net. More results, including loose associations. Good when you want to browse everything remotely related.
- Medium (the default, 50): a sensible balance.
- High precision (70–100): only the closest matches survive. Perfect when the first results are right but there's noise further down.
The earlier "blue magic potion" search returned around a thousand results at the default. Push the slider to 90 and only the tightest matches remain — about 70 assets, essentially all of them blue potions, with the red and green ones that merely resembled potions filtered out:
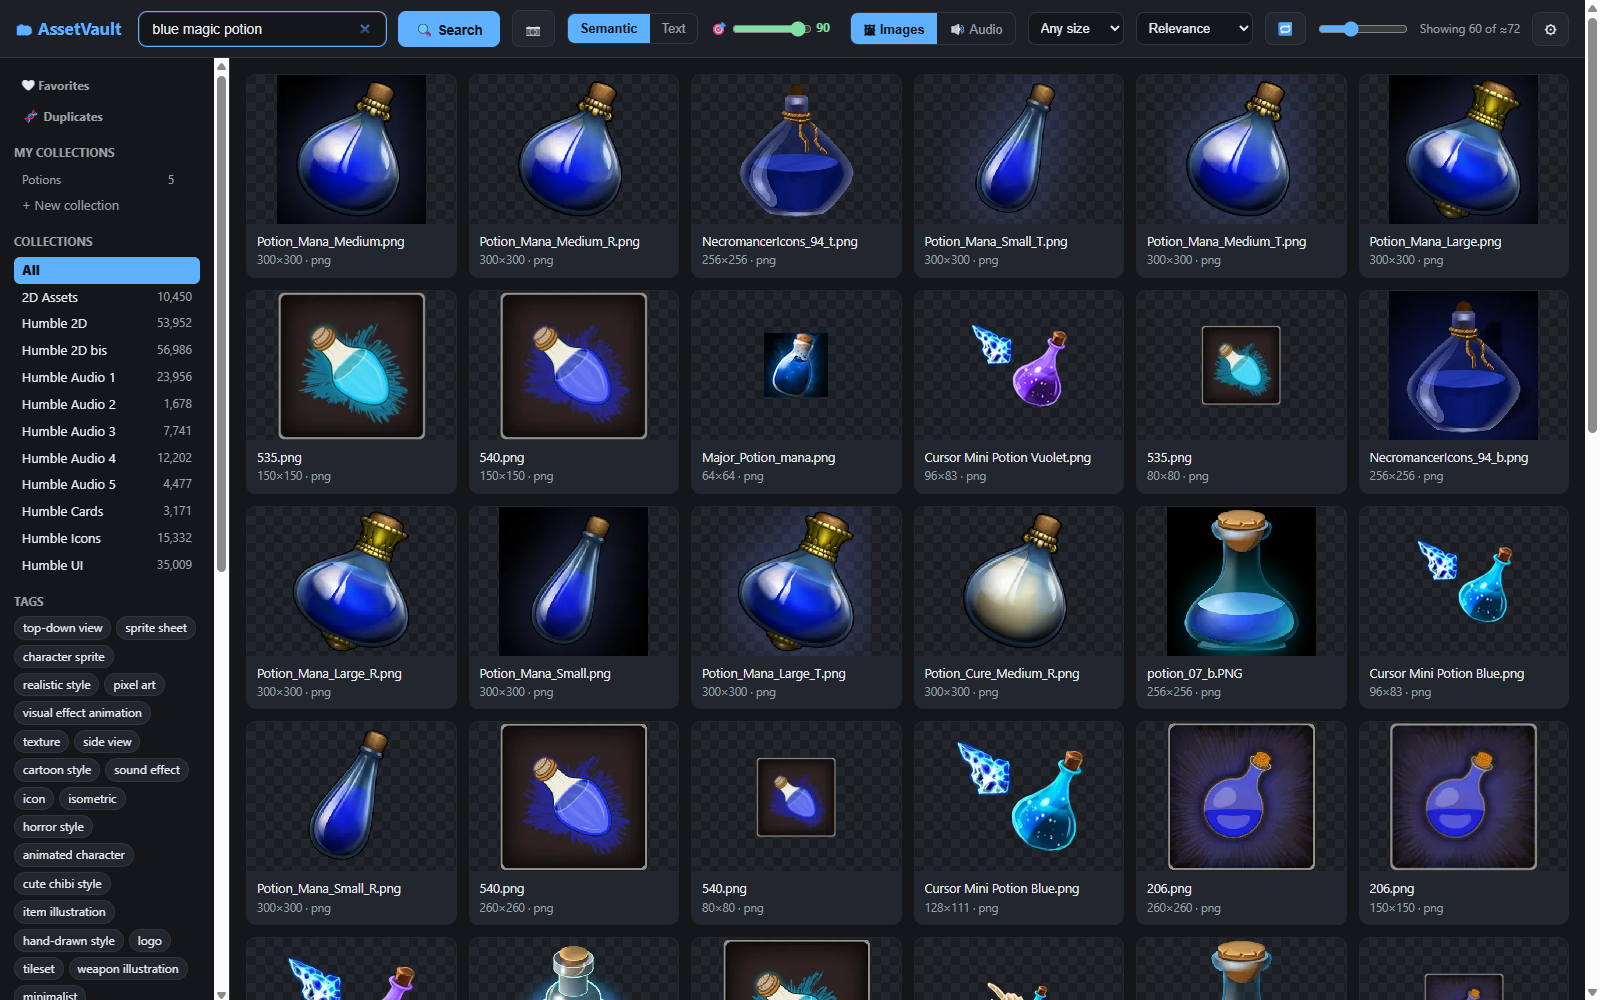
The result counter updates to match (here, "Showing 60 of ≈72"), and your setting is remembered between sessions. If a search feels like it's burying the good stuff under near-misses, reach for this slider first.
9. Search with a reference image 📷
Sometimes the fastest way to describe what you want is to show it. If you have a picture — a concept sketch, a screenshot, an asset from another pack — AssetVault can find the visually closest matches in your library.
Two ways to start (both only in 🖼 Images mode):
- Drag any image file onto the page — from Explorer, from a browser, from anywhere. A drop zone appears; release to search.
- Or click the 📷 button next to Search and pick a file.
The reference stays visible as a chip in the header (hover it to enlarge, click to remove). Here we dropped a fiery explosion sprite, and AssetVault returned the other explosions and glowing burst effects across the whole library:
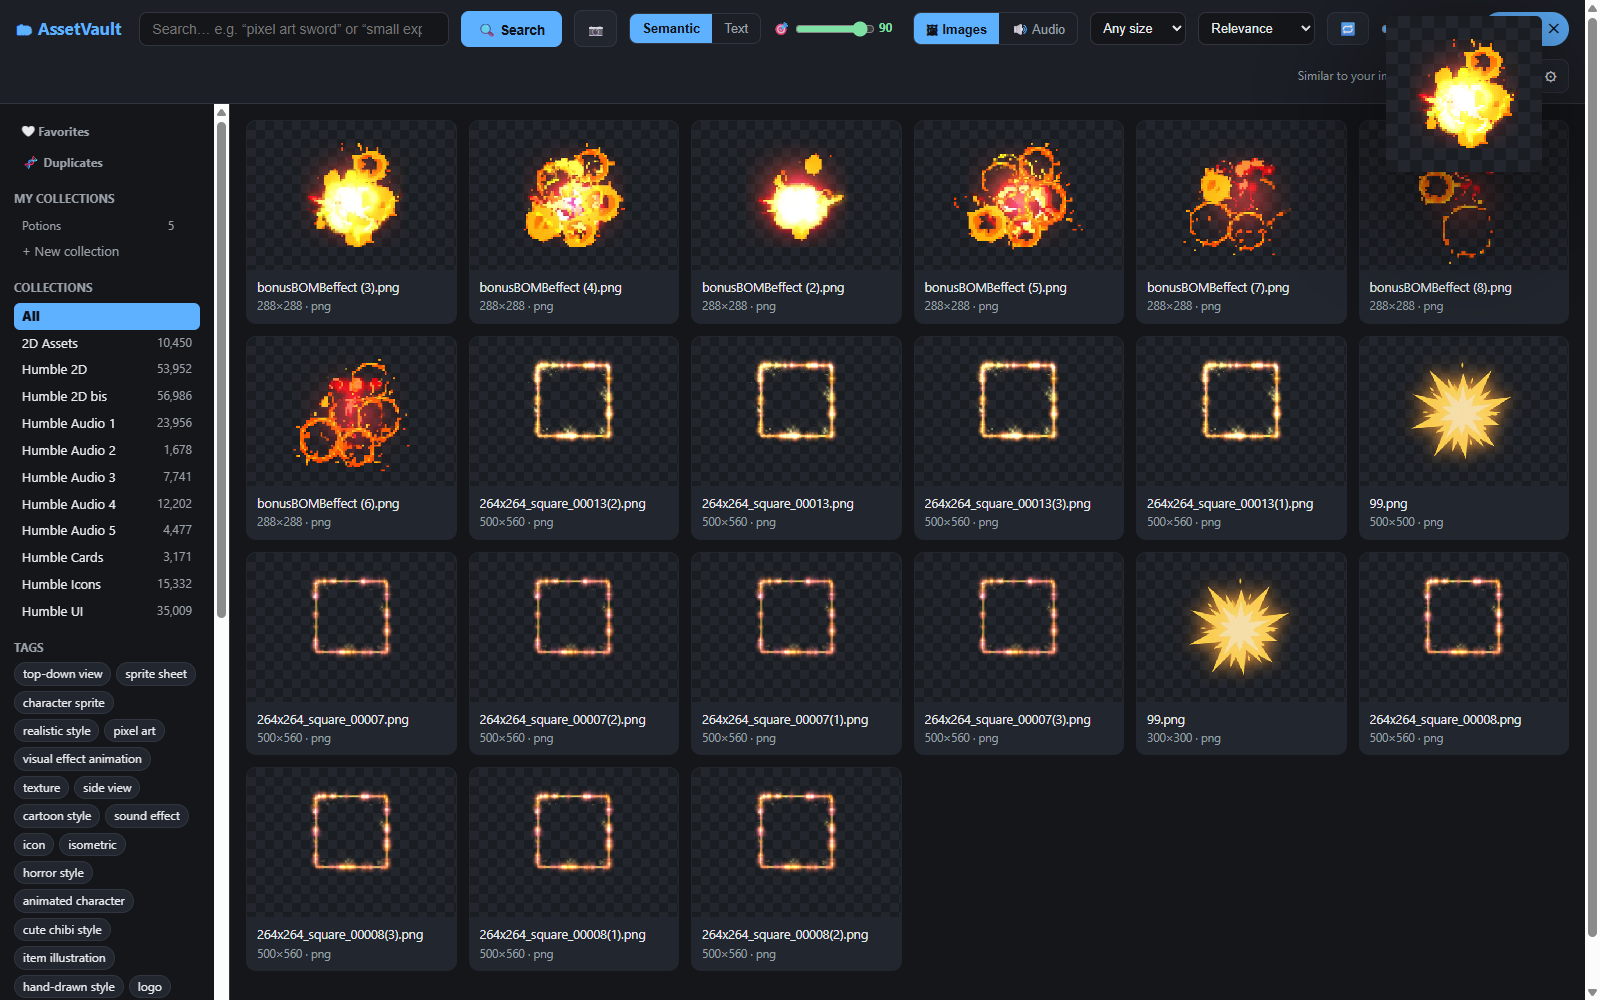
Everything you've learned still applies: the 🎯 precision slider tightens or loosens the visual match, the filters (collection, minimum size…) narrow it further, and sorting reorders it. It's the same powerful search — just started from a picture instead of words.
10. Filters
Filters narrow any search — semantic, text or by-image. They live in the header and only the ones relevant to the current type are shown:
- 🖼 Images / 🔊 Audio — the master switch. A search is always for one or the other (you're looking for a sprite or a sound, never both at once).
- Minimum image size (images only) — the "Any size" dropdown. Set it to ≥256, ≥512, ≥1024 px… to hide tiny icons when you need something large. It requires both width and height to meet the threshold.
- Audio formats (audio only) — the
wav / ogg / mp3 / m4abuttons. Click any combination to show only those formats (e.g. only losslesswav).
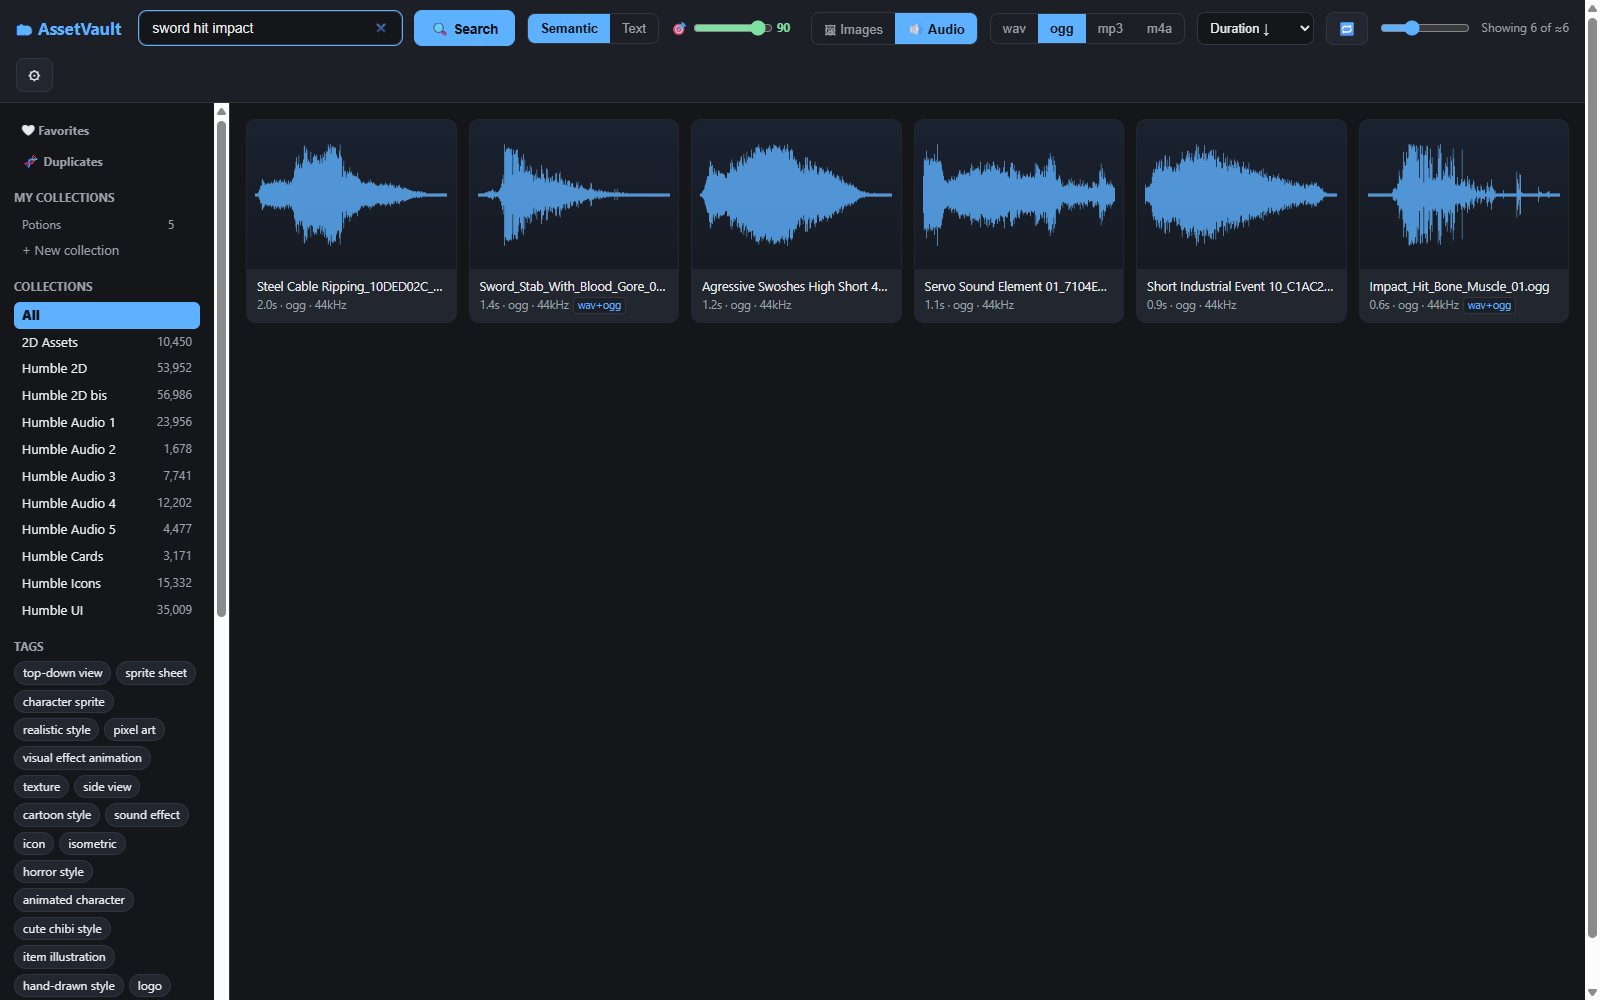
Filters combine with each other and with the search. Below, an audio search for "sword hit impact" is filtered to ogg only — and, as we'll see next, sorted by duration:
11. Sorting
By default, results are ordered by Relevance — the best matches first, which is what you want when searching. But the sort dropdown lets you reorder them by:
- Name — alphabetical by file name.
- Size — largest file first.
- Dimensions — highest-resolution image first (images).
- Duration — longest clip first (audio).
In the screenshot above, the sword-impact sounds are sorted by Duration ↓, so the longest clips come first (2.0s down to 0.6s). Sorting works in every search mode: when you sort a semantic search, it reorders the relevant matches by the chosen field instead of by similarity — handy for questions like "of all the explosion sounds, which is the longest?".
12. Reading the results
A few things in the results view are worth a closer look.
The counter — "Showing X of Y". Top-right, it tells you how many results you're currently seeing out of how many matched. In text search, Y is an exact count. In semantic and by-image search it's preceded by a ≈ (for example "Showing 60 of ≈72"), because those searches select by relevance, not by an exact match — the ≈ is your reminder that it's a "roughly this many good matches" figure, tuned by the precision slider.
Load more. Results load in pages. When there are more, a Load more button appears at the bottom; each press adds another page and the counter's X grows. When X reaches Y and the button disappears, you've seen everything.
Format-variant grouping. Many audio packs ship the same sound as .wav,
.ogg and .mp3. Rather than showing three near-identical cards, AssetVault
groups them into one card with a small badge like wav+ogg (you saw these
in the audio screenshots above). Open the asset and you can pick which format
to copy or reveal — one entry in your results, all formats one click away.
Part 3 — Organizing Your Library 🗂
Searching finds an asset the moment you need it. Organizing means the assets you care about are one click away without searching — the ones you've chosen for a project, the ones you keep coming back to. Everything in this part is optional, private to you, and never touches your files.
13. Favorites ❤
The simplest tool. Hover any card in the grid and a small heart appears in the corner — click it to favorite the asset (it turns solid red ❤). Click again to un-favorite. You can also do it from the detail view with the ♡ button.
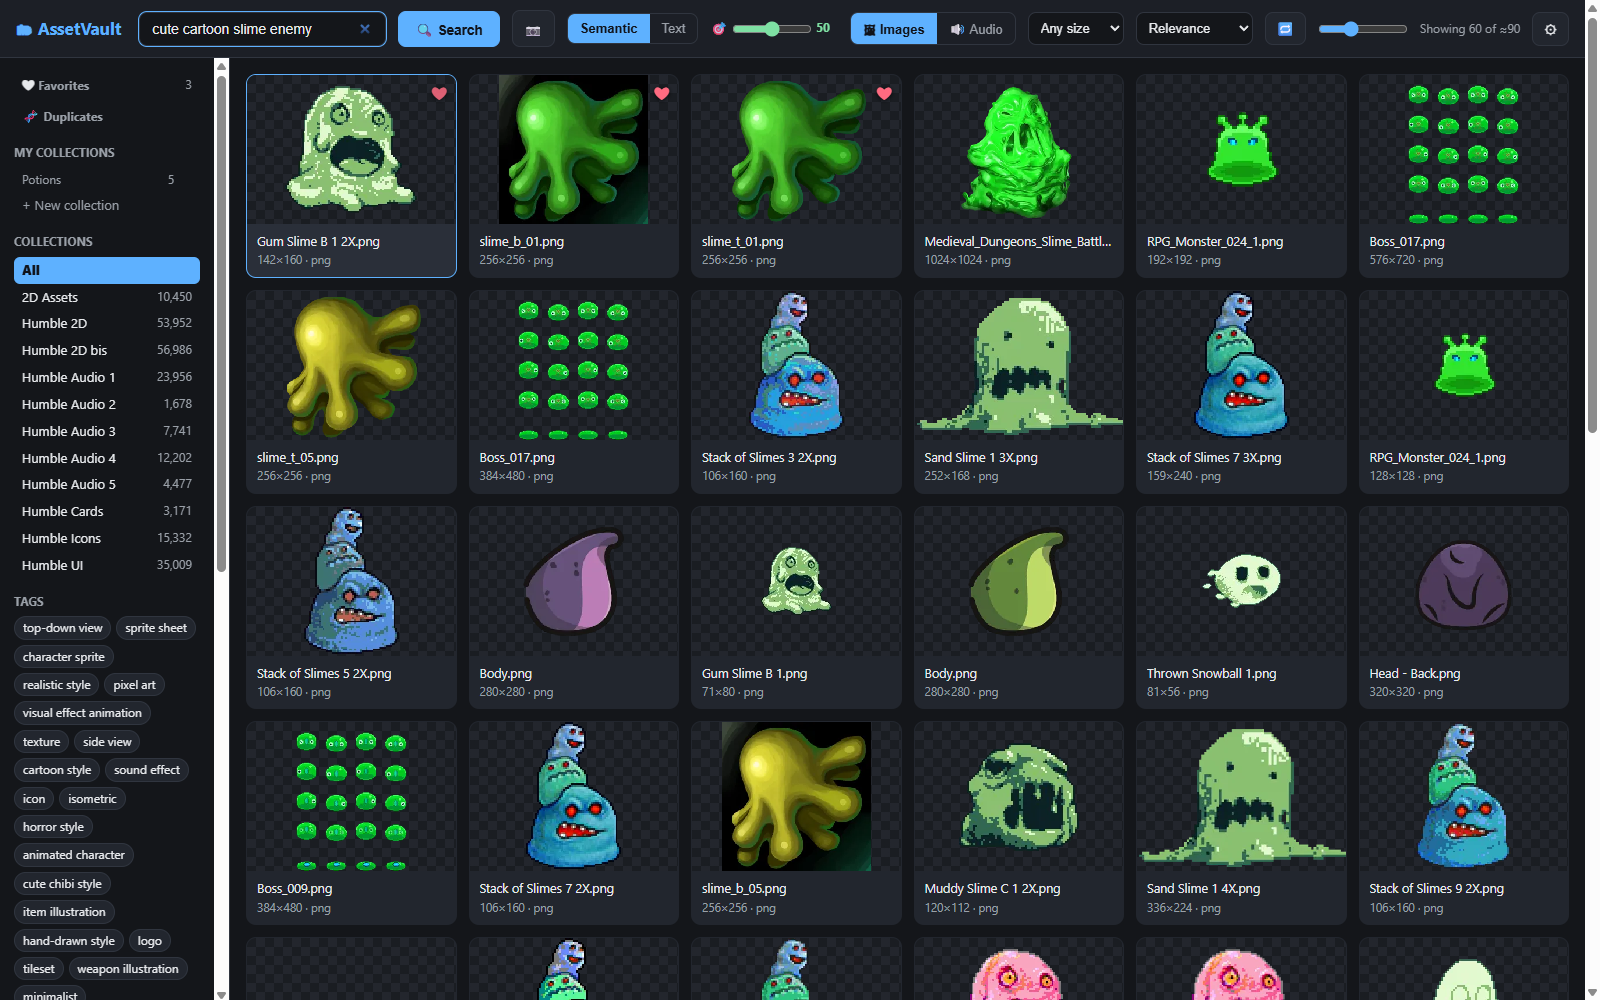
Your favorites count appears next to ❤ Favorites at the top of the sidebar. Click that entry at any time to see only your favorited assets — a quick shortlist that survives across searches and sessions. It's perfect for the "I'll want this later" moment: favorite it now, find it instantly whenever.
14. Collections
Where favorites are a single flat list, collections let you group assets into named sets — one per game, per level, per mood: "Tavern scene", "UI — main menu", "Boss fight SFX". An asset can live in several collections at once.
- Create one: click + New collection under My collections in the sidebar and give it a name.
- Add assets: open any asset and, at the bottom of the detail view, click a
collection chip to add or remove the asset from it. (You can see the
Collections: row with the
Potionschip in the screenshot in the next section.) - Browse one: click a collection in the sidebar to see only its assets. Its asset count is shown next to the name.
- Delete one: hover a collection and click the ✕. This removes the collection only — the assets themselves are never deleted, they simply stop belonging to that set.
Because a collection is just a set of references, adding an asset to ten collections costs nothing and duplicates nothing on disk.
15. Tags
Every asset gets a set of tags during indexing — short keywords the AI
assigns by looking at it: pixel art, character sprite, horror style,
treasure chest, and so on. Tags power a lot of AssetVault:
- Filter by tag: the Tags cloud at the bottom of the sidebar shows the most common tags in your library; click one to see every asset that has it. You can also click any tag inside an asset's detail view to filter by it.
- Edit them: the AI is good but not perfect, and sometimes you want your
own vocabulary. In the detail view, each tag has an ✕ to remove it, and an
Add tag… box to type your own. Here we've added a custom
boss-approvedtag to a boss sprite:
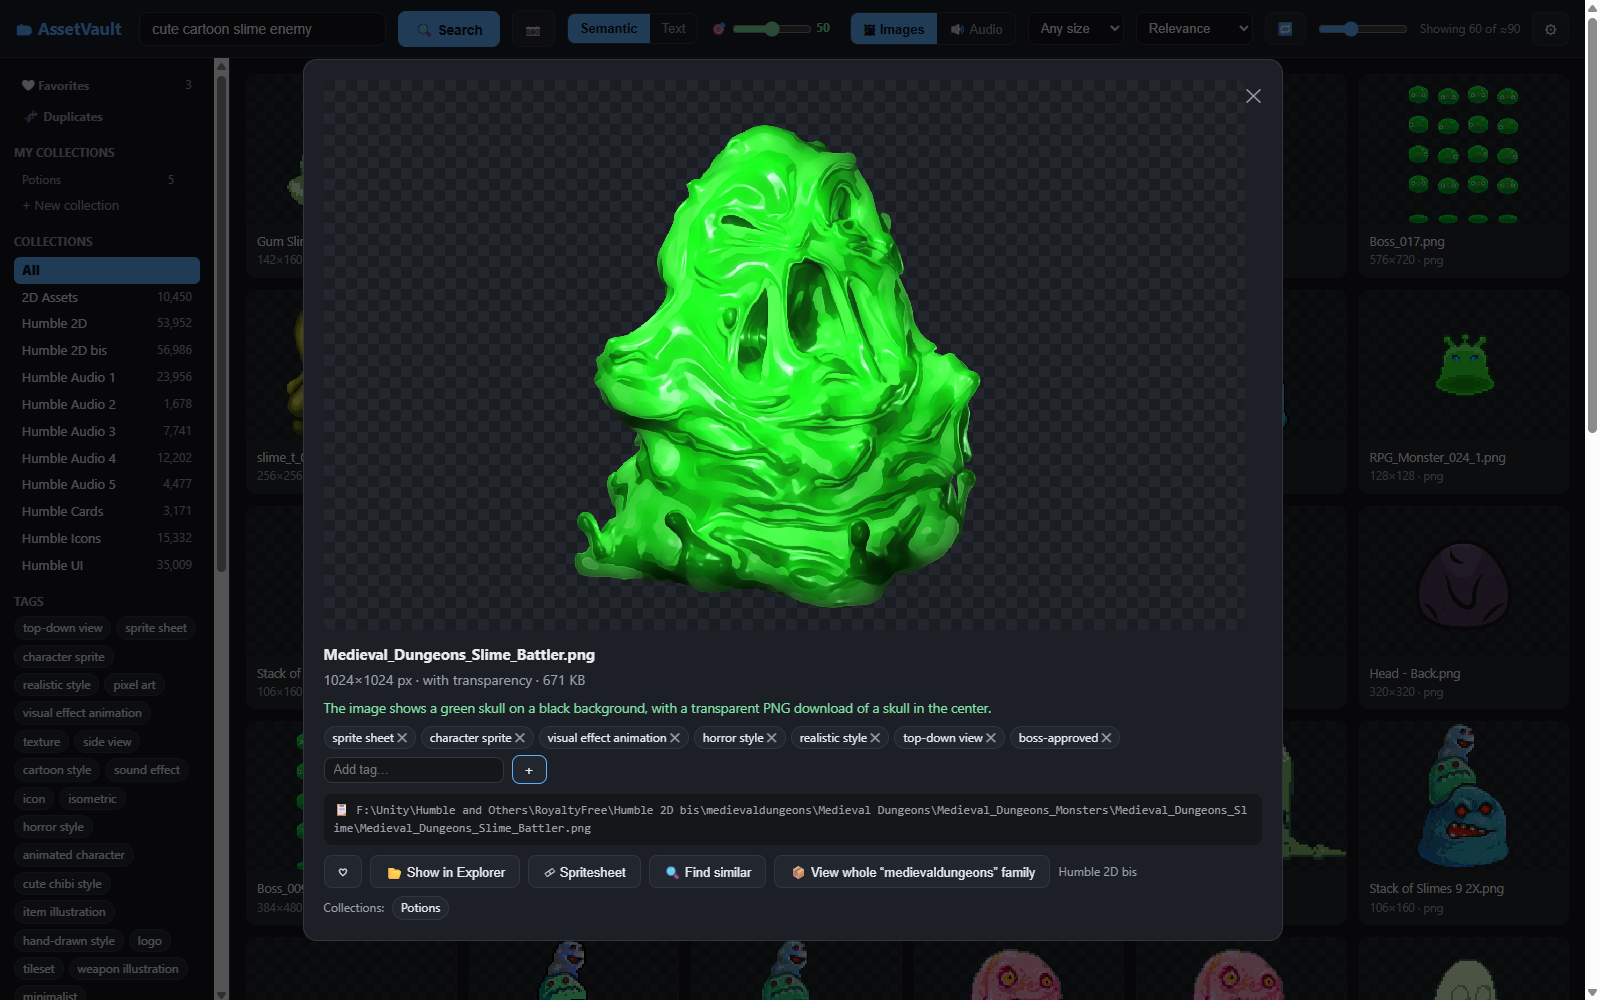
Your custom tags become searchable immediately, exactly like the AI ones — so
you can invent a private tagging scheme (level-1, needs-recolor,
client-approved) and filter your whole library by it.
16. Families 📦
Assets almost always come in packs — a themed set from one creator, bought together. AssetVault detects that grouping automatically and calls it a family (derived from your folder structure). It's one of the most useful ways to explore.
The scenario it's built for: you search for something, find one asset that's perfect, and think "if this pack is this good, what else is in it?". Open the asset and click 📦 View whole "…" family. AssetVault clears your filters and shows you the entire pack. Here, one green slime led to the whole 1,139-asset medievaldungeons pack — tilesets, characters, animations, props, all together:
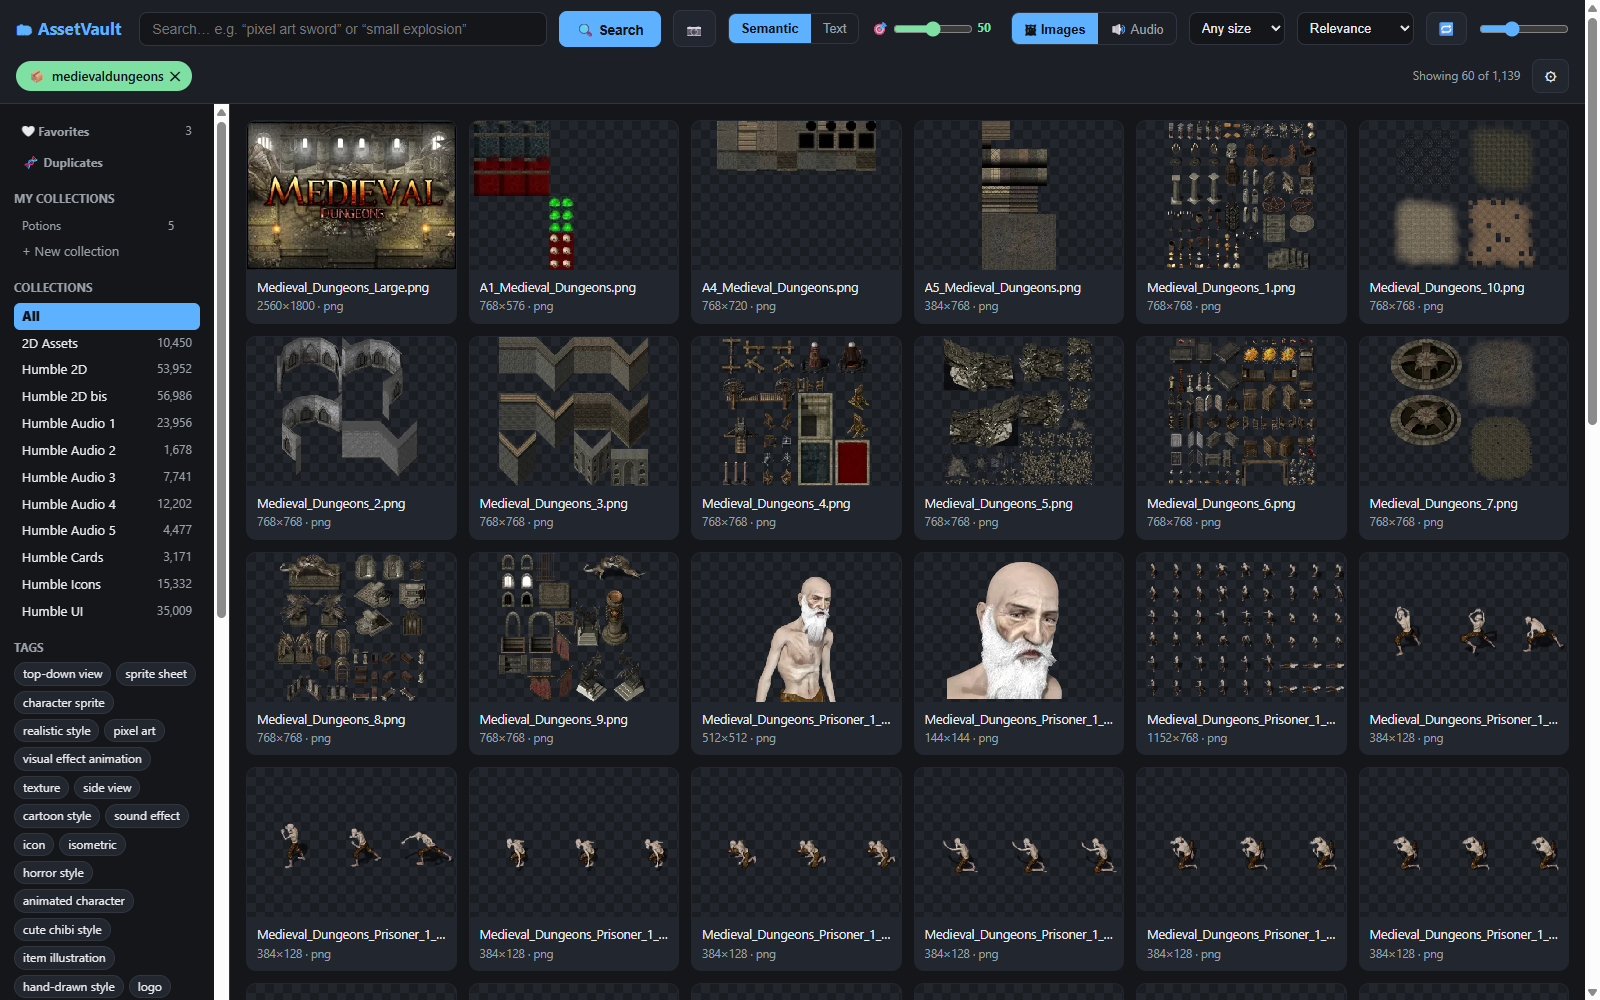
A green chip at the top shows which family you're viewing; click its ✕ to leave. While it's active you can even search within the family — type a word and you'll only get matches from that one pack.
17. Duplicates 🧬
Bundle collections repeat themselves a lot. The same sprite ships in two
bundles; the same music album appears both on its own and inside a "mega pack";
a sound is included as .wav, .ogg and .mp3. Over a big library this
adds up to gigabytes of exact copies.
Click 🧬 Duplicates in the sidebar to find them. AssetVault groups identical assets together — images by visual fingerprint, sounds by matching name and duration — and shows each group with a count and total size:
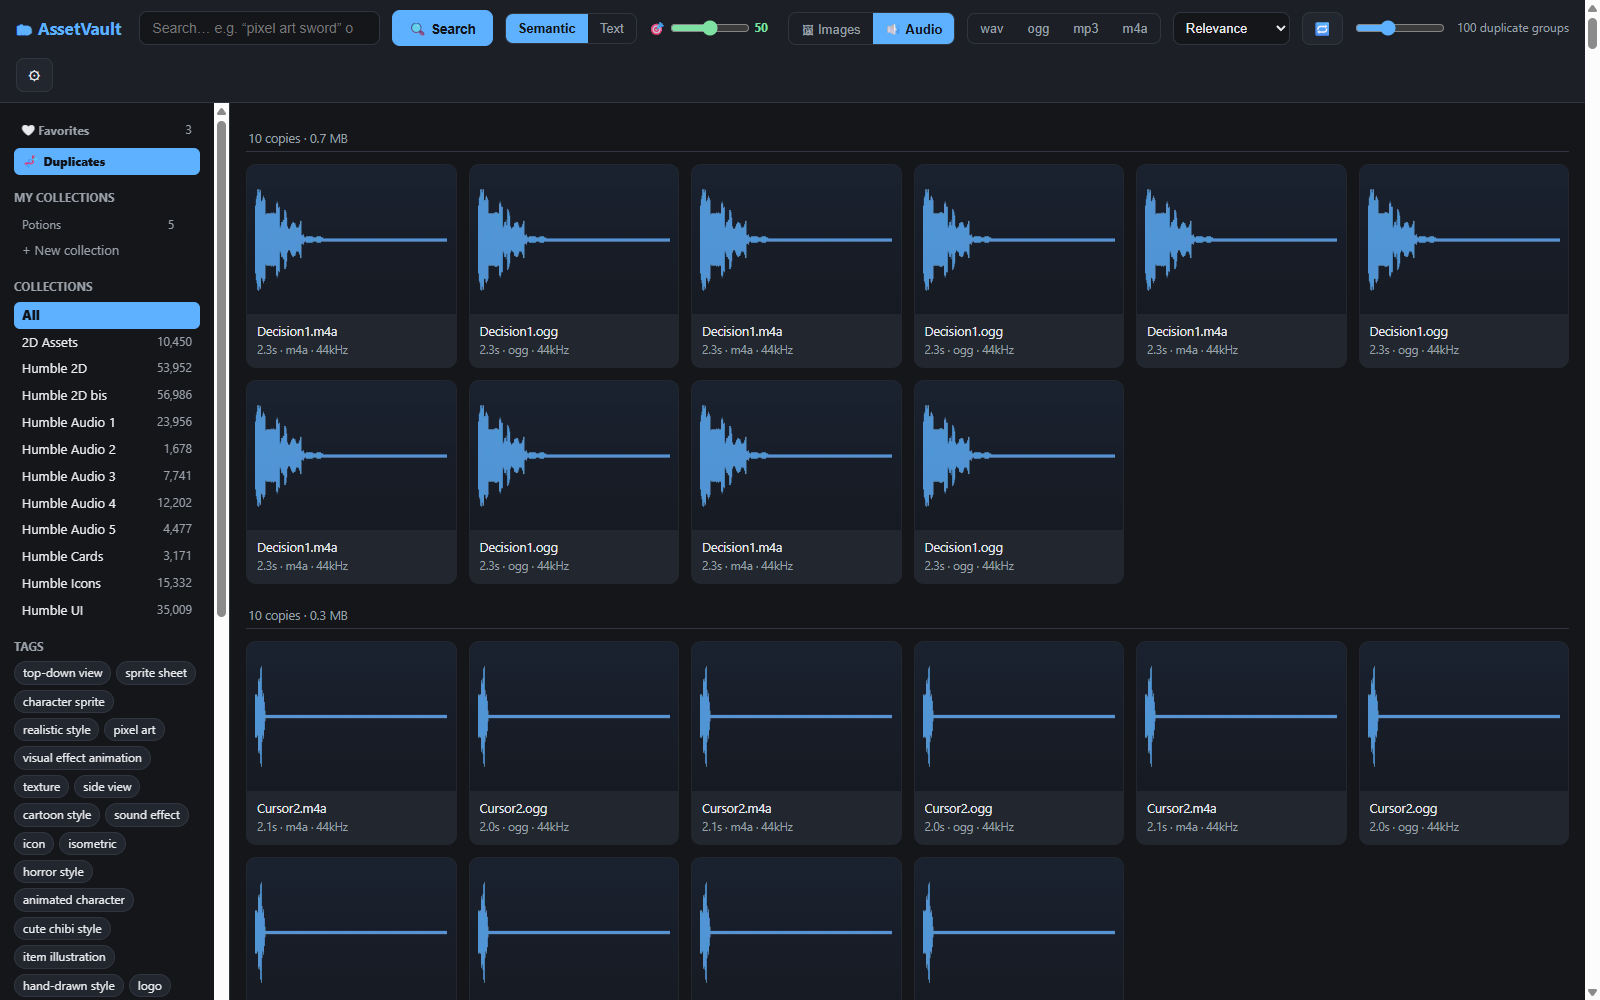
Use the 🖼 Images / 🔊 Audio switch to look at each type. Each group header tells you how many copies exist and how much space they take ("10 copies · 0.7 MB"). This is a review tool, not an automatic deleter — AssetVault will never delete your files. To clean up, open the copy you don't want and use 📂 Show in Explorer to delete it yourself, safely and deliberately.
Part 4 — Tools 🛠
The tools that turn AssetVault from "a search box" into a proper asset browser: the detail view and its actions, the spritesheet animator, the audio helpers, and the little conveniences that add up over a long session.
18. The asset detail view
Click any result to open its detail view — the hub for everything you can do with a single asset:
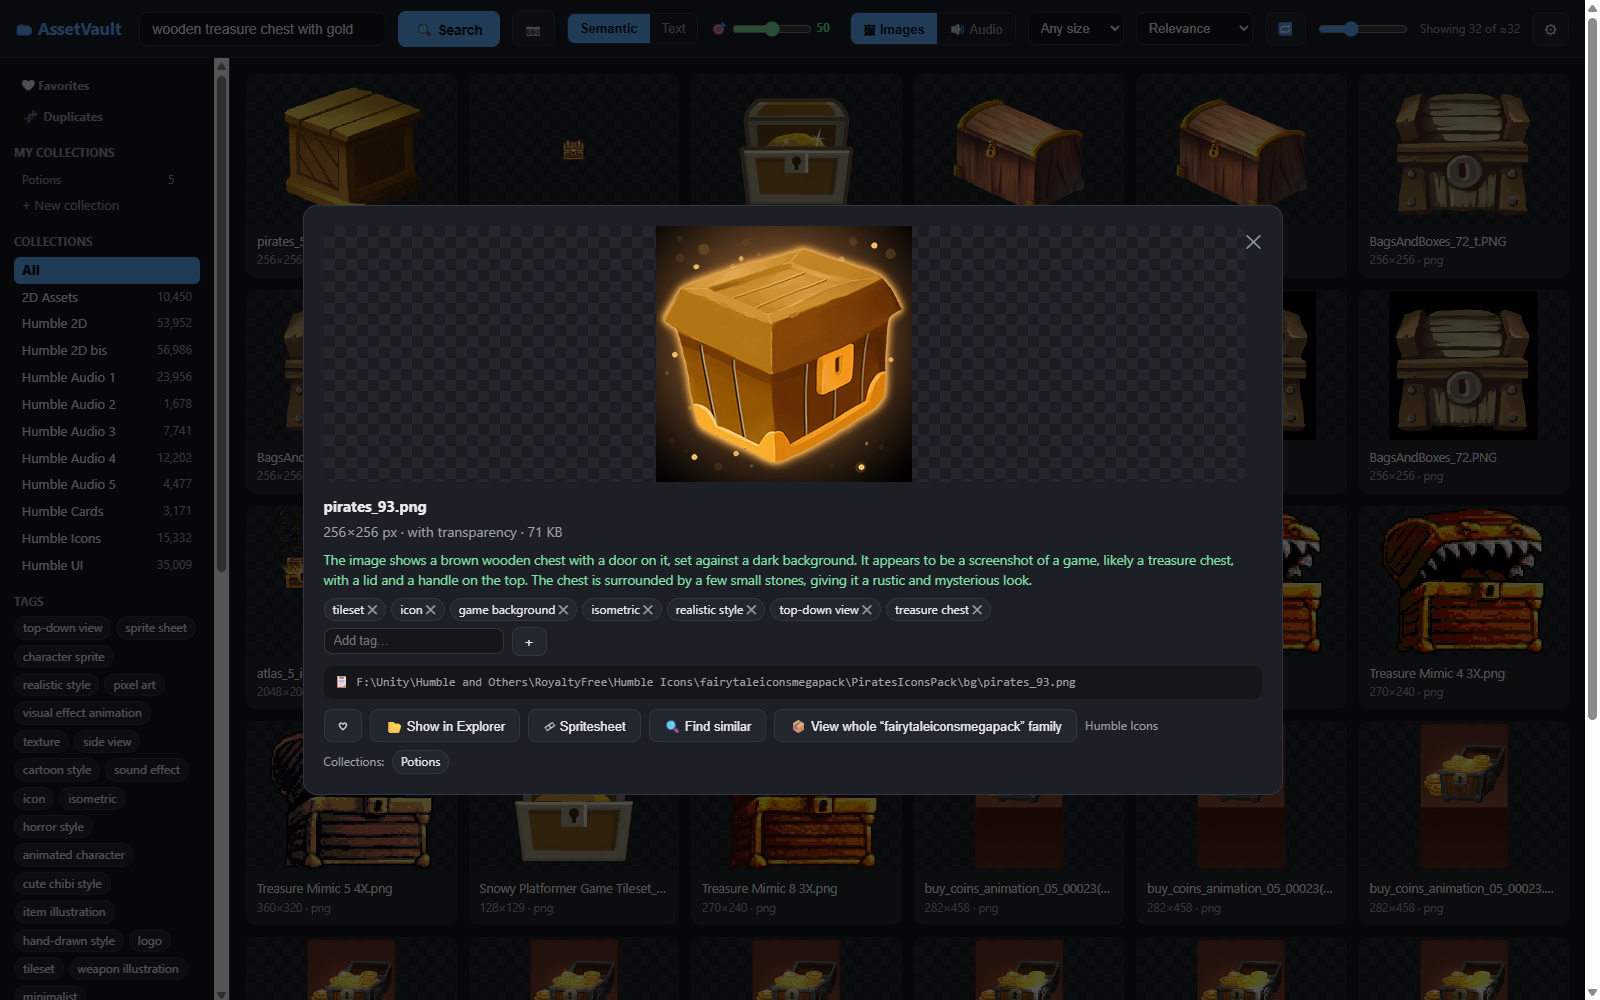
From top to bottom:
- Large preview. The checkerboard pattern behind it indicates transparency.
- Technical facts: dimensions and file size for images; duration, sample rate and channels for audio; whether it has transparency.
- AI description — the sentence the model wrote when it looked at the image.
- Tags — editable (see section 15); click one to filter, ✕ to remove, or add your own.
- The path bar — click it to copy the full file path to your clipboard.
- Action buttons:
- ♡ Favorite — add or remove from favorites.
- 📂 Show in Explorer — open the containing folder with the file selected, ready to drag into your project.
- 🎞 Spritesheet — open the animation viewer (next section; images only).
- 🔍 Find similar — start a by-example search from this exact asset, finding its visual or sonic look-alikes across the whole library.
- 📦 View whole "…" family — jump to the asset's source pack (section 16).
- Collections row — the collection chips for adding/removing this asset.
Press Esc or click outside the panel to close it.
19. Spritesheet viewer 🎞
Game sprites often come as spritesheets: many animation frames packed into one image. A grid of thumbnails can't tell you whether an animation actually looks right — so AssetVault can play it for you. In the detail view of any image, click 🎞 Spritesheet:
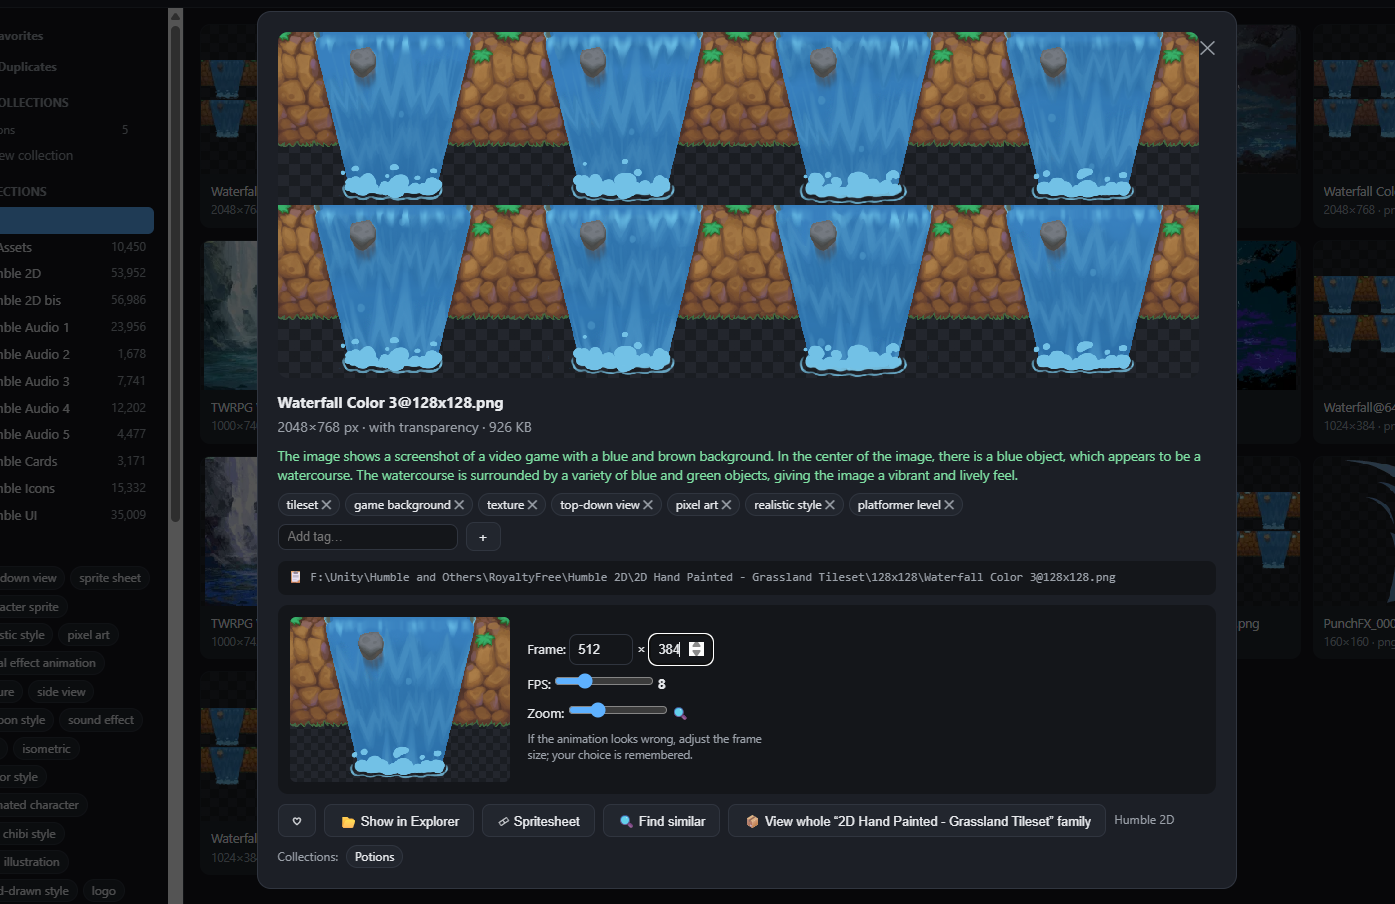
The panel shows the sheet at the top and a live animated preview at the bottom left, cycling through the frames. The catch with spritesheets is that nothing in the file reliably says how big each frame is — so AssetVault guesses, using several clues in order: a size written in the file name, rows of evenly-spaced transparent gaps, strips of square frames, and common tile sizes. It gets it right most of the time.
When it doesn't, you fix it in seconds — and the waterfall above is a perfect
example of why. Its name is @128x128, but that's the tileset's tile size,
not the animation's frame size: each full waterfall frame is actually
512 × 384. One glance at the preview tells you if the framing is off, and the
controls let you correct it:
- Frame — type the correct frame width × height (here, 512 × 384 to get one whole waterfall per frame). The preview updates instantly, and your correction is saved for that asset — next time you open it, it just works.
- FPS — playback speed, to check the animation at its intended rhythm.
- Zoom — enlarge the preview (great for tiny pixel-art frames); the setting is remembered.
20. Audio tools
Auditioning sound is where AssetVault saves the most clicks. A few things make it fast:
- One-click play. Click any audio card's waveform to play it; click again to stop. A thin line runs along the bottom of the card to show progress. No external player, no opening files — just click down the grid as fast as you can listen.
-
Loop mode 🔁. The loop button in the header (next to the sort dropdown) makes playback repeat. This is essential for judging music loops and ambiences: you can only tell if a loop is seamless by hearing it wrap around several times.
-
Format variants. When the same sound exists as
.wav,.oggand.mp3, it appears as a single card with awav+oggbadge. Open it and you'll find a chip for each format — click one to play, copy or reveal that specific file. You get the convenience of one entry with the choice of all formats.
21. Grid zoom and keyboard shortcuts
Two conveniences for working quickly through big result sets.
Thumbnail size. The slider at the far right of the header resizes the grid thumbnails — drag it up to inspect artwork detail, down to see more assets at once. Here it's turned up to examine a set of fantasy swords, and the currently keyboard-selected card is outlined in green:
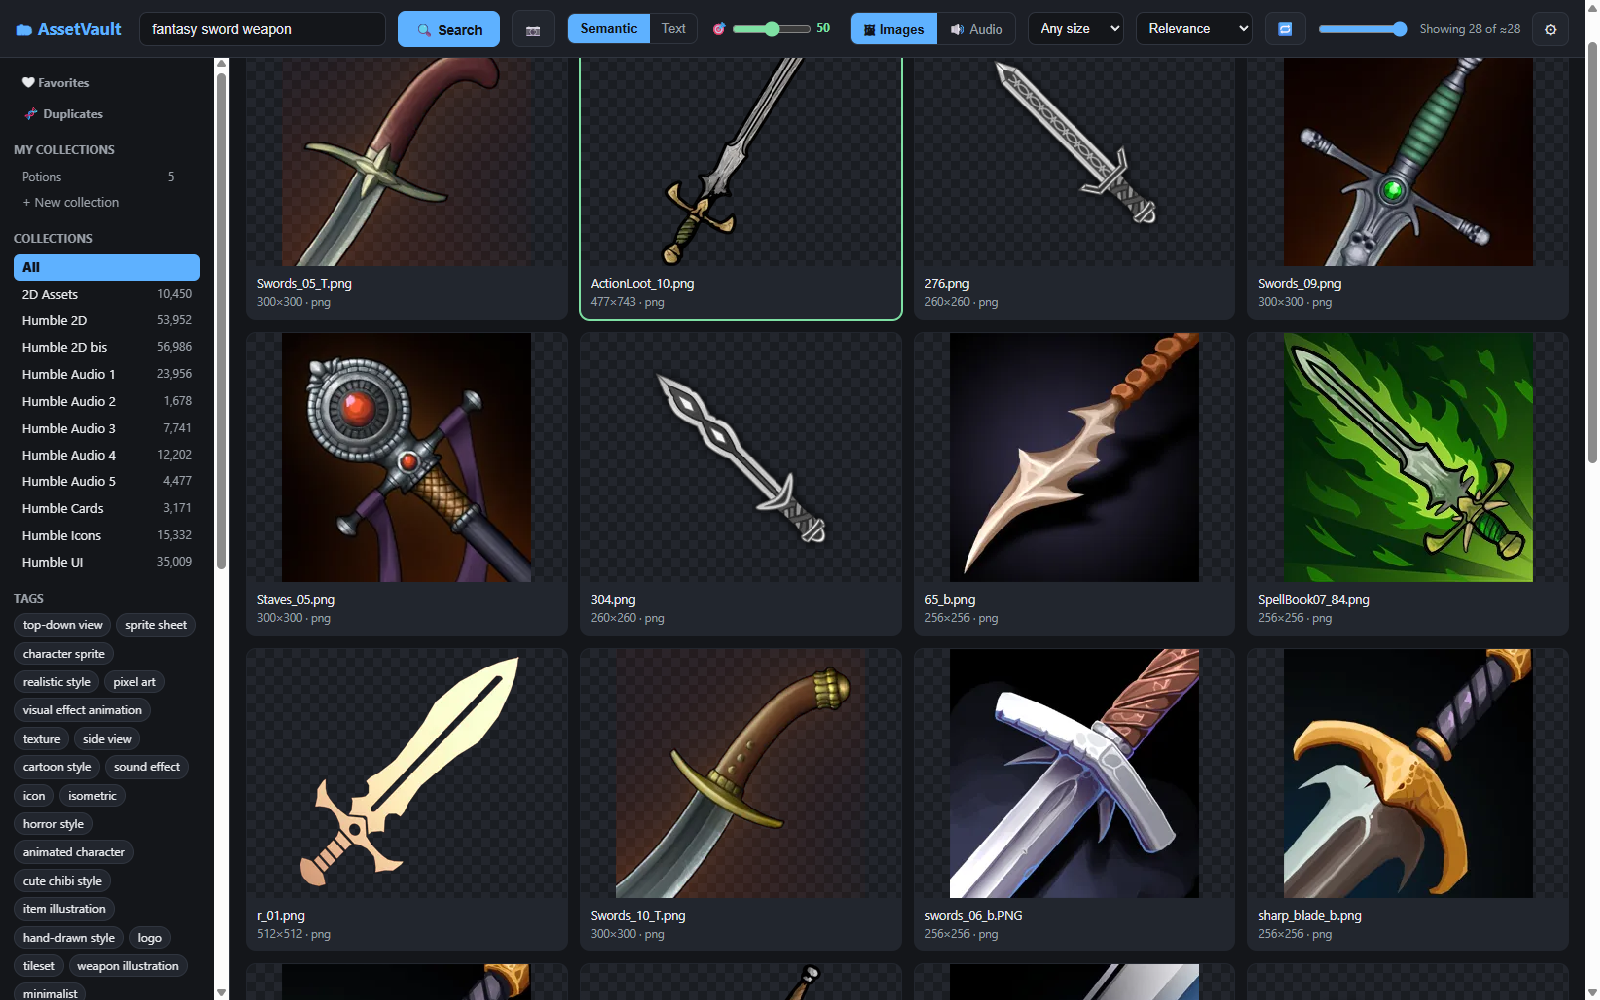
Your chosen thumbnail size is remembered between sessions.
Keyboard navigation. Once you've run a search, you can fly through the results without the mouse:
| Key | Action |
|---|---|
| Arrow keys | Move the selection around the grid |
| Enter | Open the selected asset's detail view |
| Space | Play the selected audio (or open an image) |
| Esc | Close the detail view / spritesheet |
Part 5 — Administration ⚙
Everything behind the ⚙ gear button: the folders that make up your library, the AI models that power it, the interface language, and the tray icon that keeps it all running.
22. Indexed folders
The top of the Administration panel lists every folder AssetVault is indexing, each with its current asset count:
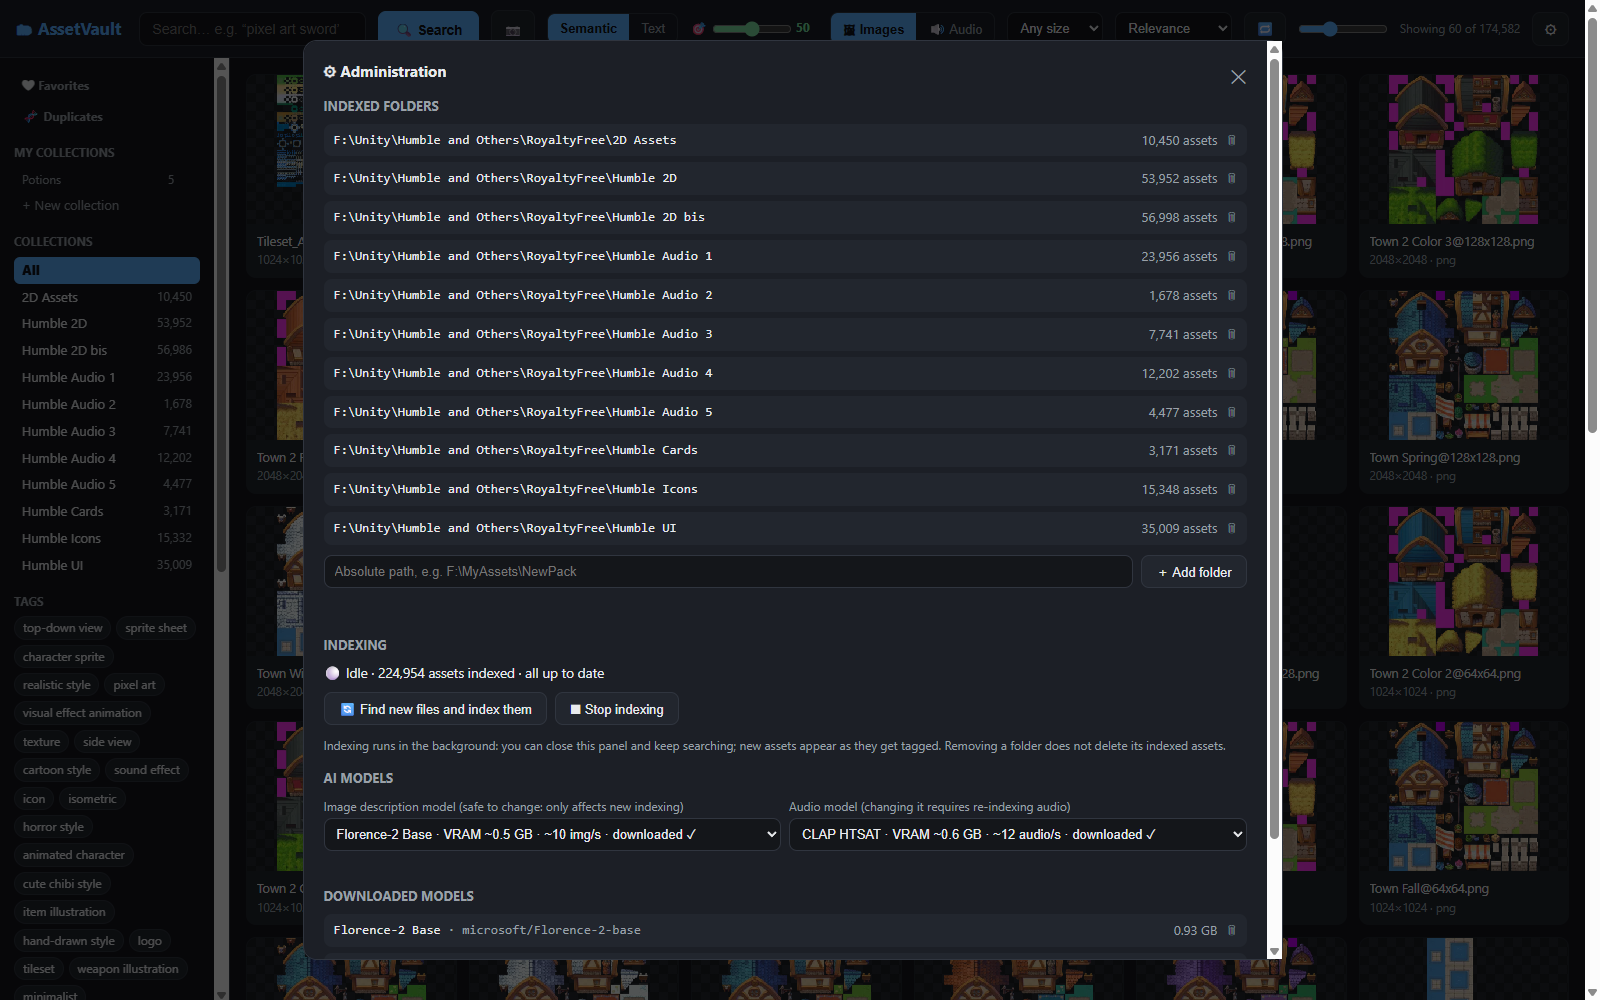
- Add a folder: type or paste an absolute path into the box and click + Add folder. Point it at the top of a collection; everything inside is found recursively. Add as many as you like, on any drive.
- Remove a folder (🗑): stops indexing it going forward. Already-indexed assets stay in your library and remain searchable — removing a folder never deletes anything.
- The indexing status line shows "Idle · 224,954 assets indexed · all up to date" when there's nothing to do, or live progress while it works.
- 🔄 Find new files and index them is the button you'll use whenever you add a new pack. Indexing is incremental: it processes only files it hasn't seen before, so keeping your library current takes minutes, not hours. ⏹ Stop indexing pauses the run; your progress is kept and you can resume any time.
Your typical workflow after buying a new bundle: unzip it into one of your asset folders → open ⚙ → Find new files and index them → keep working while it processes in the background.
23. Choosing AI models
AssetVault uses three AI models: one for image search (fixed), one for writing image descriptions and tags, and one for audio. The two that affect quality are selectable, so you can trade speed for quality to suit your hardware:
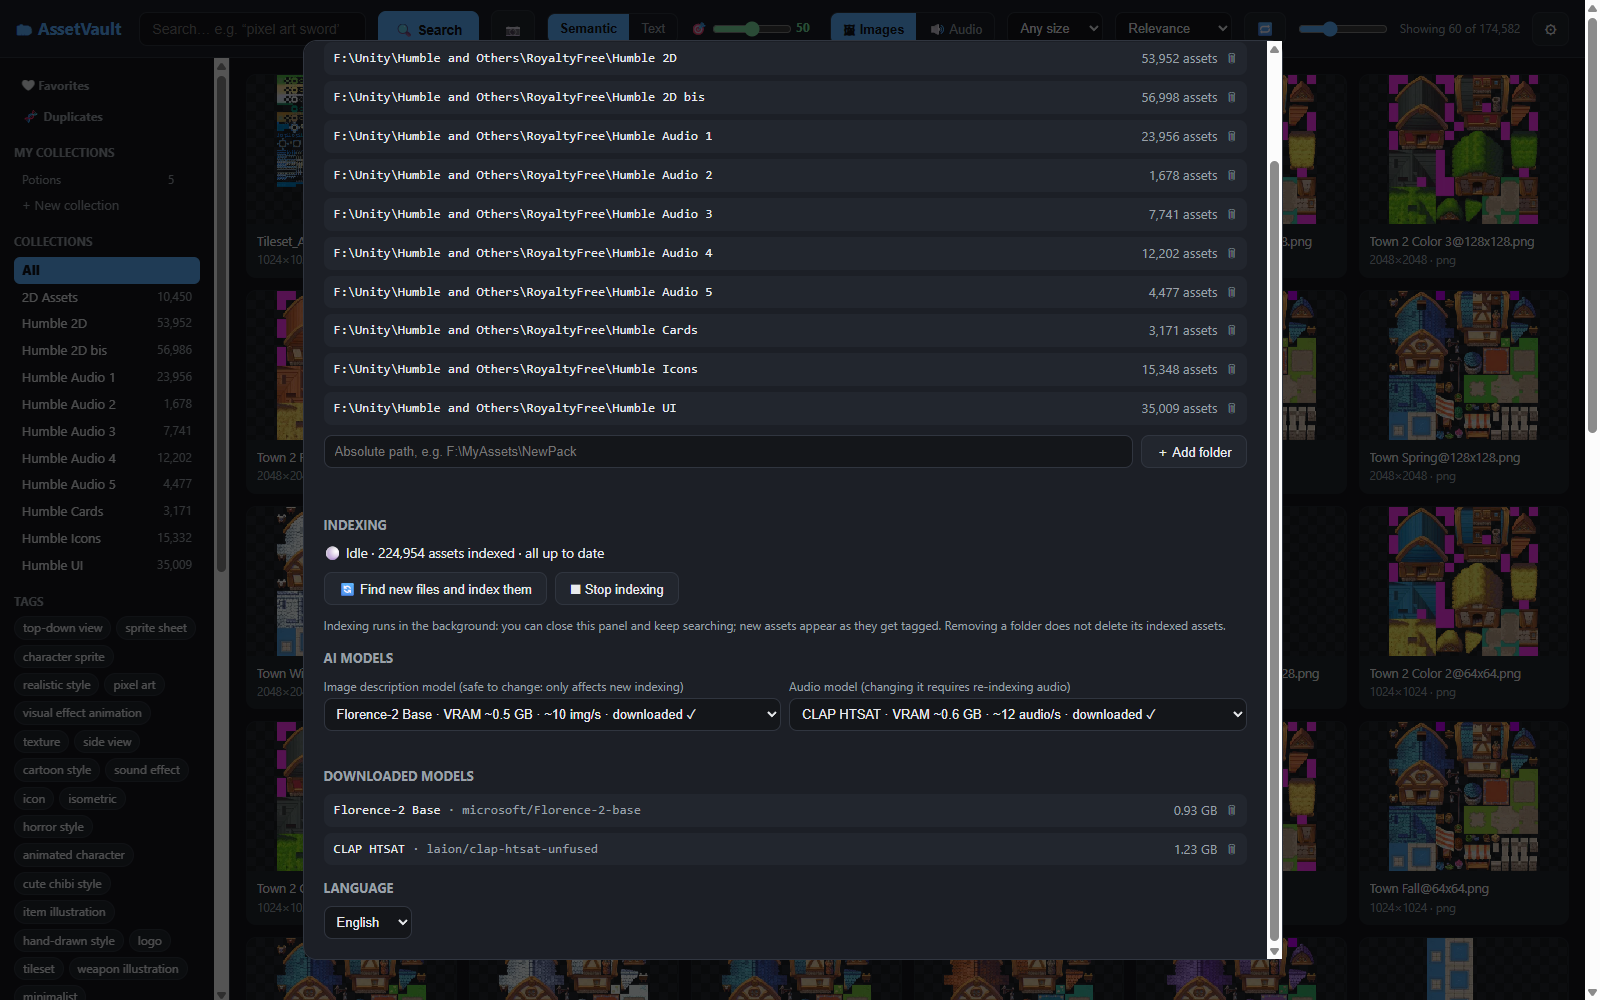
- Image description model — from lightweight (SmolVLM) through the default (Florence-2 Base, ~0.5 GB VRAM, fast) to the highest quality (Florence-2 Large, more VRAM, slower but richer descriptions). Each option shows its VRAM use and speed. Changing it is completely safe — it only affects assets indexed from then on; your existing descriptions are untouched.
- Audio model — CLAP variants of increasing quality. Changing the audio model is different: the two models produce incompatible data, so switching means all your audio must be re-indexed on the next run. AssetVault warns you before doing this — say yes only if you're prepared for the re-index.
Downloaded models. Below the selectors, every model currently on disk is listed with its size and a 🗑 to delete it — handy for reclaiming a couple of gigabytes from a model you tried but don't use. The image-search model is never listed (it's always required). Deleting a model you do use is harmless: it simply re-downloads automatically the next time indexing needs it. Downloading a model, as always, is free — no account, no cost.
24. Indexing and the GPU
Indexing is the one demanding job in AssetVault, and it runs entirely on your graphics card. A few practical points:
- Speed: on a typical NVIDIA GPU, expect roughly 7–10 assets per second — so a 100,000-asset library is an afternoon's unattended work. Without a dedicated GPU it falls back to the CPU and is much slower, but still works.
- You can search while it indexes. Indexing runs in the background; assets become searchable seconds after they're processed. Close the panel and keep working — the library just fills in around you.
- Don't index while gaming or doing other heavy GPU work. If another program (a game, a 3D editor, video rendering) is using the graphics card at the same time, they compete for GPU memory and indexing can slow to a crawl or stall. Index when the GPU is otherwise free — overnight is ideal for a big first run. Searching, by contrast, is light and unaffected.
25. Language
AssetVault's interface is available in six languages: English (default), Español, Français, Deutsch, 中文 (Simplified Chinese) and 日本語 (Japanese). Change it with the Language dropdown at the bottom of the Administration panel (visible in the screenshot in section 23). The interface reloads instantly in your chosen language, and the setting is saved — the tray icon's menu follows it too.
One thing stays in English regardless: the AI-generated tags and descriptions. Those are data produced by the models (trained in English) and are shared across all interface languages — which is also why image search happily accepts queries in any of the six languages while the labels stay consistent.
26. The tray icon
AssetVault has no traditional window — it lives in the system tray, next to the Windows clock, as a small magnifying-glass icon. That icon is the whole application: it runs the local engine in the background and manages it for you.
|
|
|---|---|
| Idle | Indexing (green) |
Right-click it for the menu:
- Open AssetVault — opens the interface in your browser (or just double-click the icon).
- Start with Windows — toggle whether AssetVault launches automatically when you log in. No admin rights needed; change it whenever you like.
- Quit — shuts AssetVault down completely, engine included. (While it's quit, the web interface won't open — relaunch it from the Start Menu.)
The icon also handles the engine's lifecycle for you: it starts the local server when you launch it, keeps it running, and restarts it if it ever stops. You never have to manage a server or a console — the icon is all there is.
Part 6 — 3D Models 🧊
AssetVault doesn't stop at images and sound: it searches your 3D models
too. Point it at a folder of .fbx, .obj or .gltf files and they join the
library alongside everything else — searchable by meaning, previewable, and
rotatable right in the app. It's the same workflow you already know, extended
to a third kind of asset.
27. Indexing 3D models
You do nothing special. Add a folder that contains 3D models the same way you'd add any folder (⚙ → add folder → Find new files and index them), and AssetVault handles the rest automatically. Behind the scenes, for every model it:
- renders six views from around the model, with its textures and neutral lighting;
- counts its triangles and vertices;
- builds a lightweight version for the in-app 3D viewer;
- and feeds the renders through the same AI as your images, so the model gets a description and tags and becomes searchable by meaning.
This is heavier than indexing an image (a few seconds per model), but it's just as hands-off — start it and walk away. Models that can't be read, or whose textures a pack didn't bundle correctly, are simply skipped or rendered untextured; everything else just works.
Note: 3D indexing needs Blender installed (free). The installer detects it; if it's missing, that's the one extra piece you'd add for 3D support.
28. Browsing and filtering by polygons
Switch the type selector to 🧊 3D and search exactly as you do for images — by meaning. "medieval building house" brings back the right models from every pack you own, each card showing its triangle count:
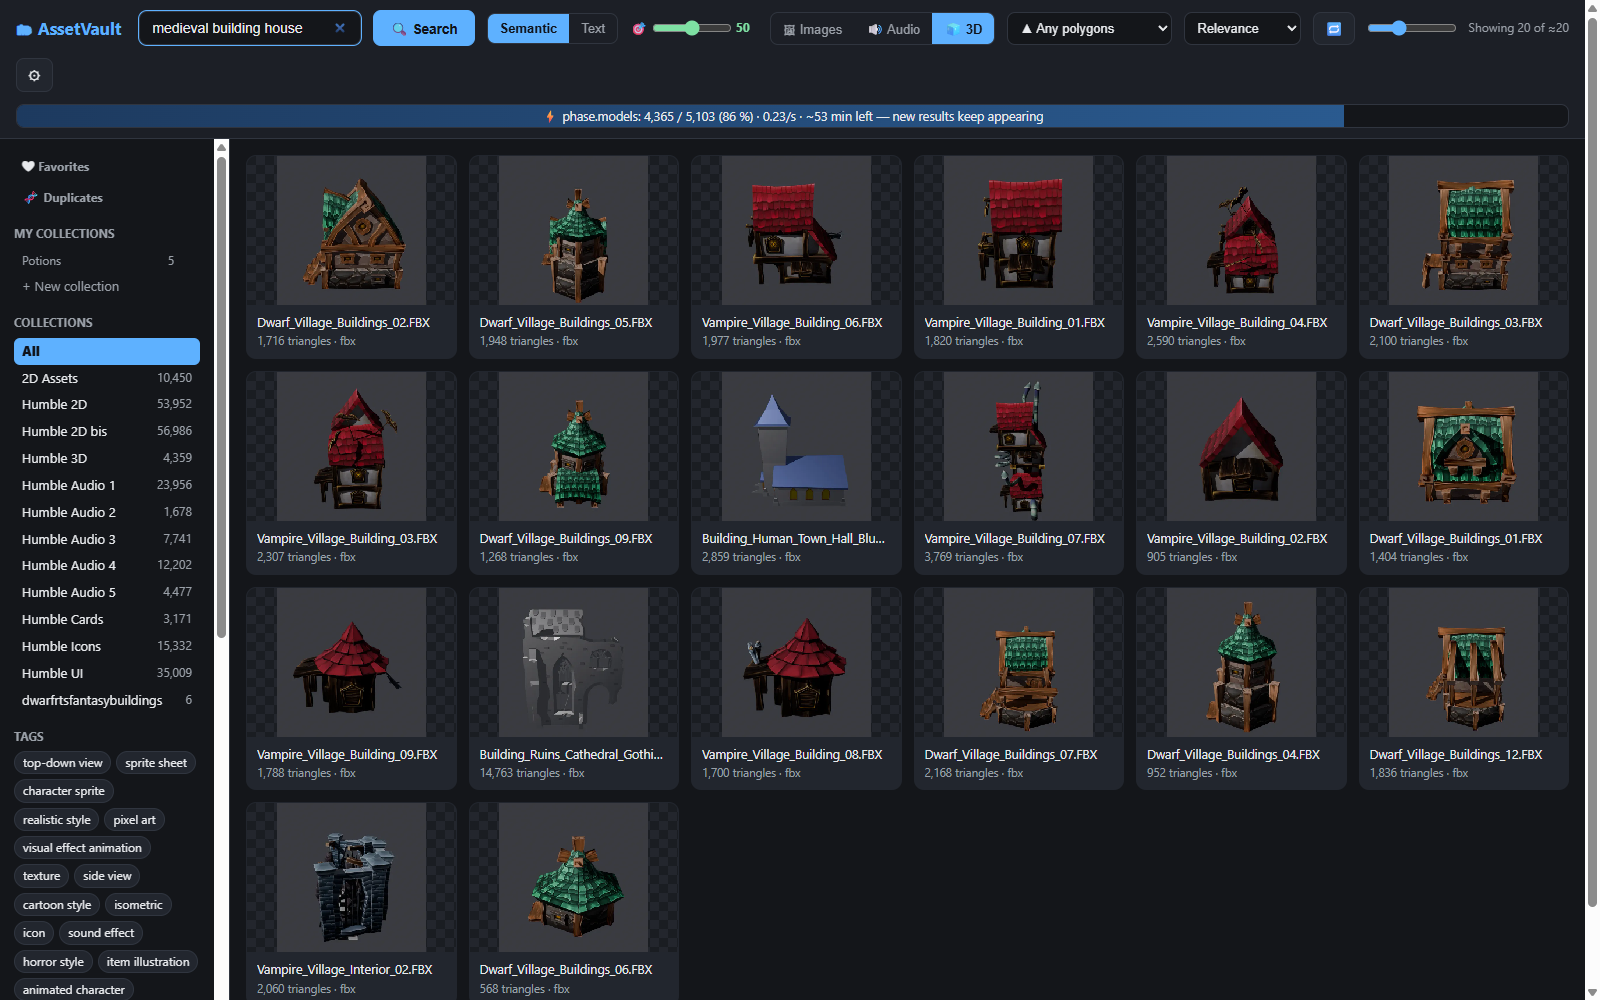
The one filter unique to 3D is the polygon budget — the dropdown that replaces the image-size filter when you're in 3D. It's how a game artist actually chooses a model: not by a raw number, but by where it fits. Pick a preset and only the models in that range remain:
- Low-poly (< 1k) — mobile, background props, huge counts on screen.
- Game-ready (1k–10k) — the everyday workhorse range.
- High-poly (10k–50k) — hero assets, close-ups.
- Cinematic (> 50k) — pre-rendered or high-end.
- Any polygons — no filter.
Here's the same search narrowed to Low-poly, leaving only models under a thousand triangles:
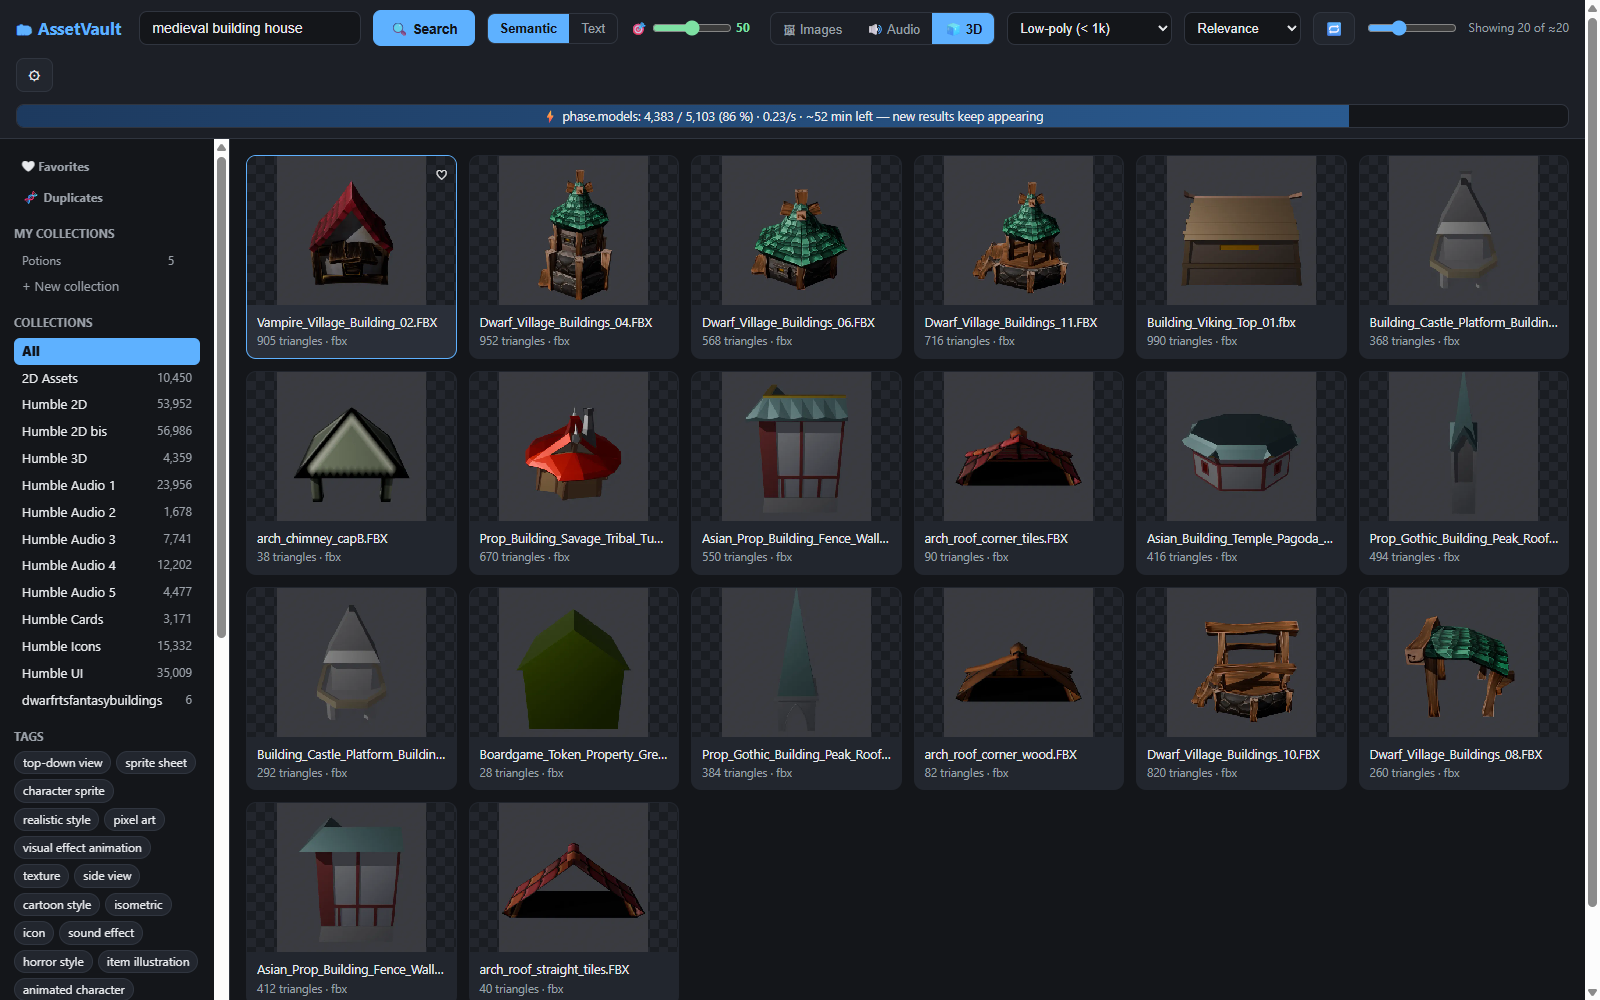
You can also sort by polygon count (ascending or descending) from the sort dropdown — handy for finding the leanest or heaviest model in a set.
29. The 3D viewer
Click any model to open it. Instead of a flat image, you get a real 3D viewer you can rotate and zoom with the mouse:
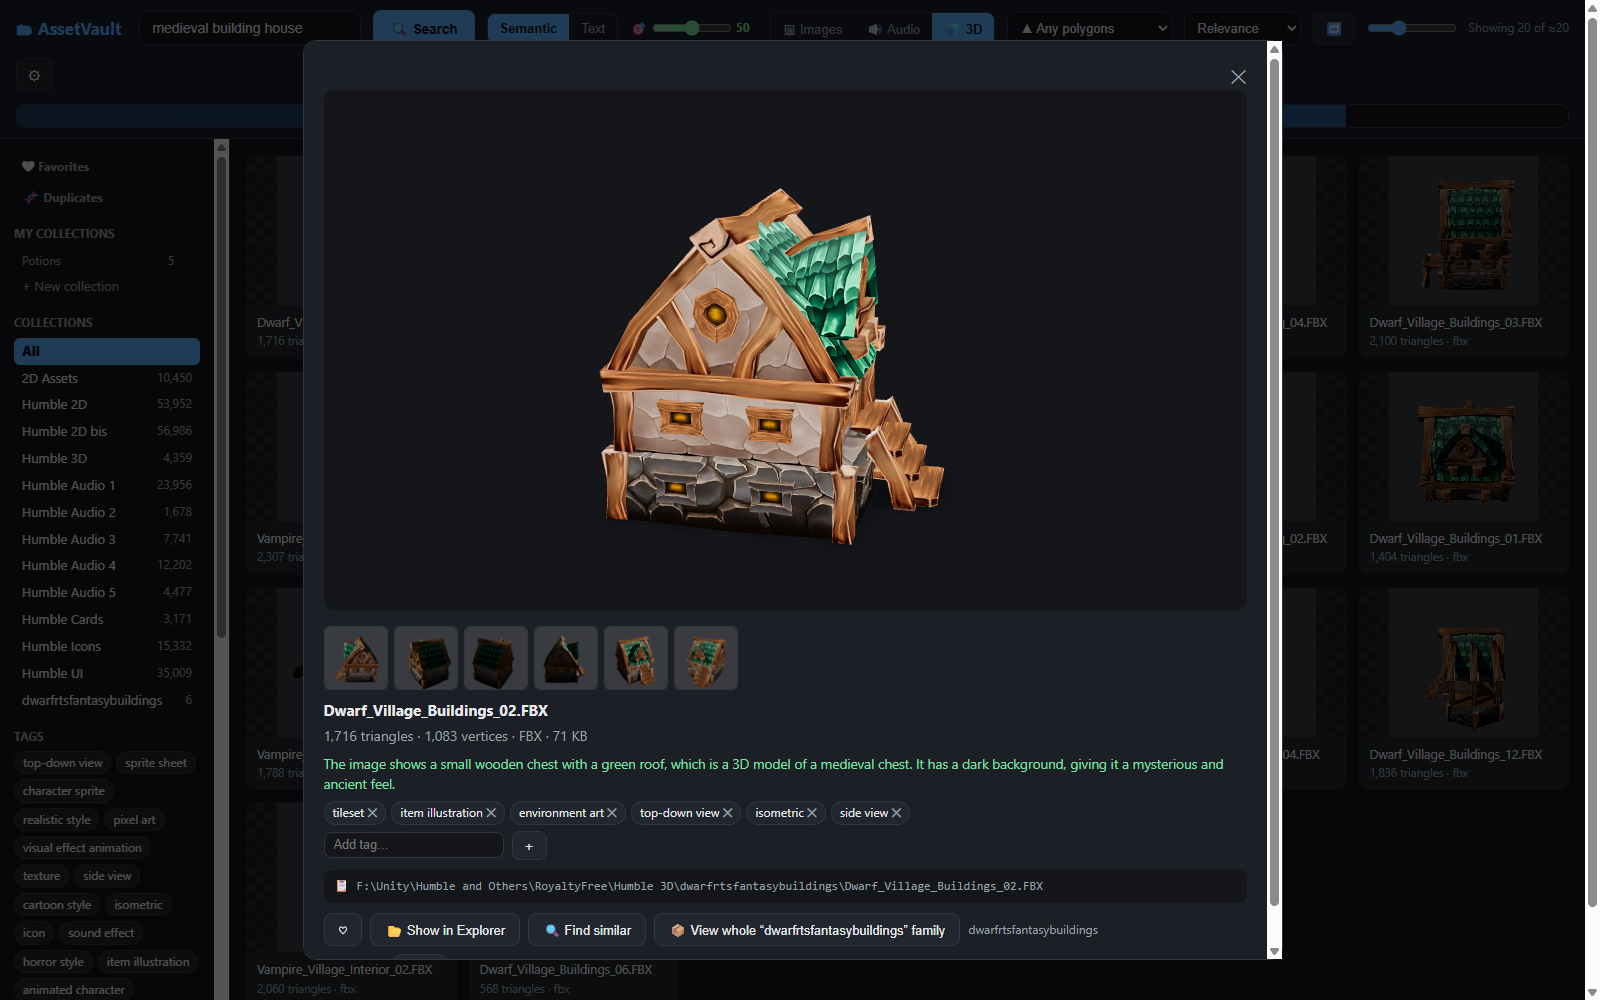
- Drag to orbit the model, scroll to zoom — the model turns on its own too.
- Below the viewer, the six captured renders act as a gallery: click any one to open it large in the same space, with arrows (or the keyboard) to flip through them and a ✕ to return to the 3D view.
- The info line shows triangles, vertices, format and file size — the poly count front and center, because that's what you need to decide if a model fits your budget.
- The usual actions apply: favorite it, Show in Explorer to drag the FBX into your engine, Find similar, or View whole family to see the rest of its pack (staying in 3D).
Part 7 — FAQ & Troubleshooting 🩹
30. FAQ
Is AssetVault really free to use? Are there any ongoing costs? No costs, ever. Once you own AssetVault, using it is completely free — forever. There are no AI usage fees, no tokens or credits consumed, no API subscriptions, no per-search charges, and no account of any kind. This is the heart of how AssetVault is built: every AI model runs locally, on your own computer, using your own graphics card. Nothing is sent to a cloud service to be processed. Index a million assets and search ten thousand times a day — the running cost is, and always will be, zero.
Does anything leave my PC? Is my library private? No, and yes. AssetVault works entirely offline after installation. Your files, your searches, and everything the AI generates stay on your machine. There's no telemetry, no upload, no account. The only time it needs the internet is during installation, to download the software dependencies and the AI models.
Does AssetVault modify, move or rename my asset files? Never. AssetVault only ever reads your folders. It builds its own separate index (a database and thumbnails) next to the app, and your original files are left exactly where and how they are. If you uninstall AssetVault, your asset library is completely untouched.
Can I move my asset library to another drive later? Yes, but tell AssetVault about it: after moving the files, open ⚙, remove the old folder path and add the new one, then run indexing. Because the assets are technically new locations, they'll be re-indexed. (Moving the AssetVault app folder itself is fine too — it keeps its index with it.)
What happens if I delete an AI model to save space? Nothing bad. If you later do something that needs it (indexing, or switching back to it), AssetVault simply re-downloads it automatically. You can't delete the image-search model, and you can't delete a model that's currently selected — those are protected.
Why is the first search after starting AssetVault slower? The first semantic search of a session loads the search model into memory, which takes a few seconds. Every search after that is fast. Text search, browsing and filters are always instant.
Do I need an NVIDIA graphics card? It's strongly recommended, but only for indexing — the one-time AI pass over your library. With a good GPU indexing takes hours; without one it falls back to the CPU and takes much longer. Searching and everything else works the same on any machine, because the heavy lifting happens only once, at indexing time.
Can I add my own tags and correct the AI's? Yes — open any asset and edit its tags freely (see section 15). Your custom tags are searchable exactly like the AI ones.
31. Troubleshooting
The web interface won't open. Make sure the tray icon (the magnifying glass by the clock) is present — if not, launch AssetVault from the Start Menu. Then double-click it, or right-click → Open AssetVault. If a browser tab opens but shows an error, give the engine a few seconds to start and refresh. If you had chosen Quit from the tray menu, the engine is stopped; just relaunch from the Start Menu.
Indexing seems stuck / very slow. Almost always this means the GPU is busy with something else. Close any game, 3D editor or video software using the graphics card and indexing will speed back up. Indexing that appears frozen with the GPU at 100% is the classic sign of GPU-memory contention — free the card and it resumes. (You can also press Stop indexing and run it later when the GPU is free.)
A folder shows "⚠ unavailable" in the Administration panel. The folder's drive isn't currently connected — common with assets on an external or network drive. Reconnect the drive and it'll be readable again. Its already-indexed assets remain searchable in the meantime; only re-indexing and opening the original files require the drive.
A model is downloading again when I didn't expect it. You (or a model change) removed it earlier, and an operation now needs it. This is normal and harmless — let it finish once and it won't download again.
A spritesheet animation looks wrong in the viewer. The automatic frame-size detection guessed incorrectly. Just type the correct frame width × height in the viewer (section 19); your correction is saved for that asset.
Search results include things that don't match well. Raise the 🎯 precision slider (section 8) to tighten a semantic search, or add more descriptive words to your query. For audio, remember it responds best to English descriptions.
Screenshots in this manual are captured from a real library of ~225,000 assets. AssetVault runs entirely on your own machine — no cloud, no accounts, no running costs.